Developer Guide
- Introduction
- Setting up
- Design
- Todo List
- Implementation
- Module list management features
- Module zoom link management feature
-
Contact list management feature
- Contact list features
- Details of implementation
- TodoList feature
- Event list management feature
- Add Event Feature
- Delete Event Feature
- Edit Event Feature
- Find Event Feature
- Calendar GUI Feature
- Undo/redo feature
- Cons: We must ensure that the implementation of each individual command is correct.
- Documentation, logging, testing, configuration, dev-ops
- Appendix: Requirements
- Module list use cases
- Contact list use cases
- Todo List Use Cases
- General feature use cases
- Appendix: Instructions for manual testing
Introduction
CAP5Buddy helps NUS SoC students to keep track of their module details efficiently. It helps them centralize key module details and follows their study progress through a Command Line Interface (CLI) that allows efficient management of module details. CAP5Buddy also functions as a scheduling system, todo list and contact list.
Setting up
Refer to the guide Setting up and getting started.
Design
Architecture
How the architecture components interact with each other
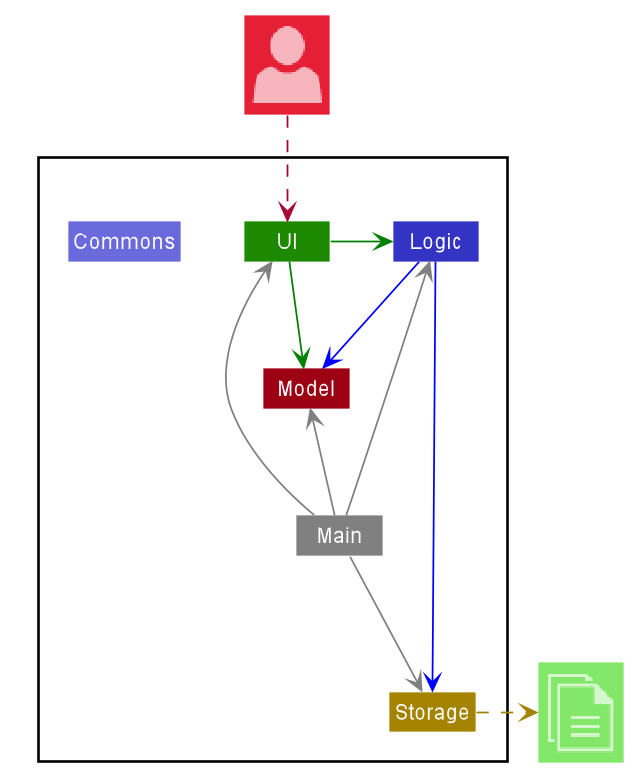
This is the overall design of our product. As we are using GUI to help to display the information and mainly focuses on using CLI to take in the required commands, thus the product consists of 6 main major components. The product starts from the Launcher classes, that initiates based on our pre-set settings and then activates the MainApp class the will run the GUI with these settings. MainApp will also start the brain and muscles of the program, which are the Logic, Storage, Model and Ui components.
Overall components
Main has two classes called Main and MainApp. It is responsible for,
- At app launch: Initializes the components in the correct sequence, and connects them up with each other.
- At shut down: Shuts down the components and invokes cleanup methods where necessary.
Commons represents a collection of classes used by multiple other components.
The rest of the App consists of four components.
-
UI: The role of the Ui component is to handle all the User interface related instructions, which includes the loading of GUI components, the updating of these components and displaying the changes. -
Logic: The role of the Logic component is to act as the brain of the program, where all the parsing of information will be done, and the execution of the commands will be carried out. -
Model: The role of the Model component is to represent all the items and their behaviours. Contains all the item classes and their support classes. -
Storage: The role of the Storage component is to represent the memory of the program, where the storing and tracking of the different items happens. These items are saving locally in a json file, which can be imported and exported easily.
Each of the four components,
- defines its API in an
interfacewith the same name as the Component. - exposes its functionality using a concrete
{Component Name}Managerclass (which implements the corresponding APIinterfacementioned in the previous point.
For example, the Logic component defines its API in the Logic.java interface and exposes its functionality using the LogicManager.java class which implements the Logic interface.
How the architecture components interact with each other
The Sequence Diagram below shows how the components interact with each other for the scenario where the user issues the command delete 1.
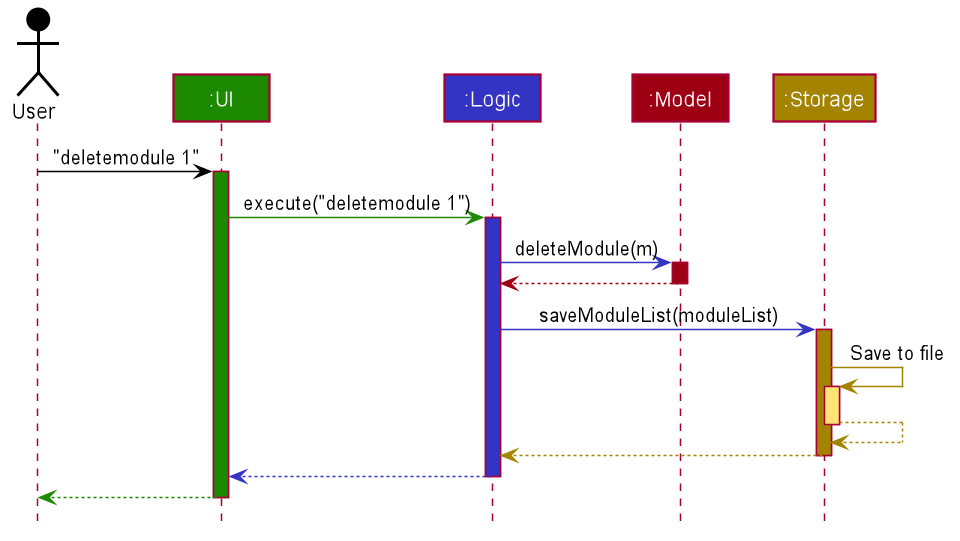
The sections below give more details of each component.
UI component
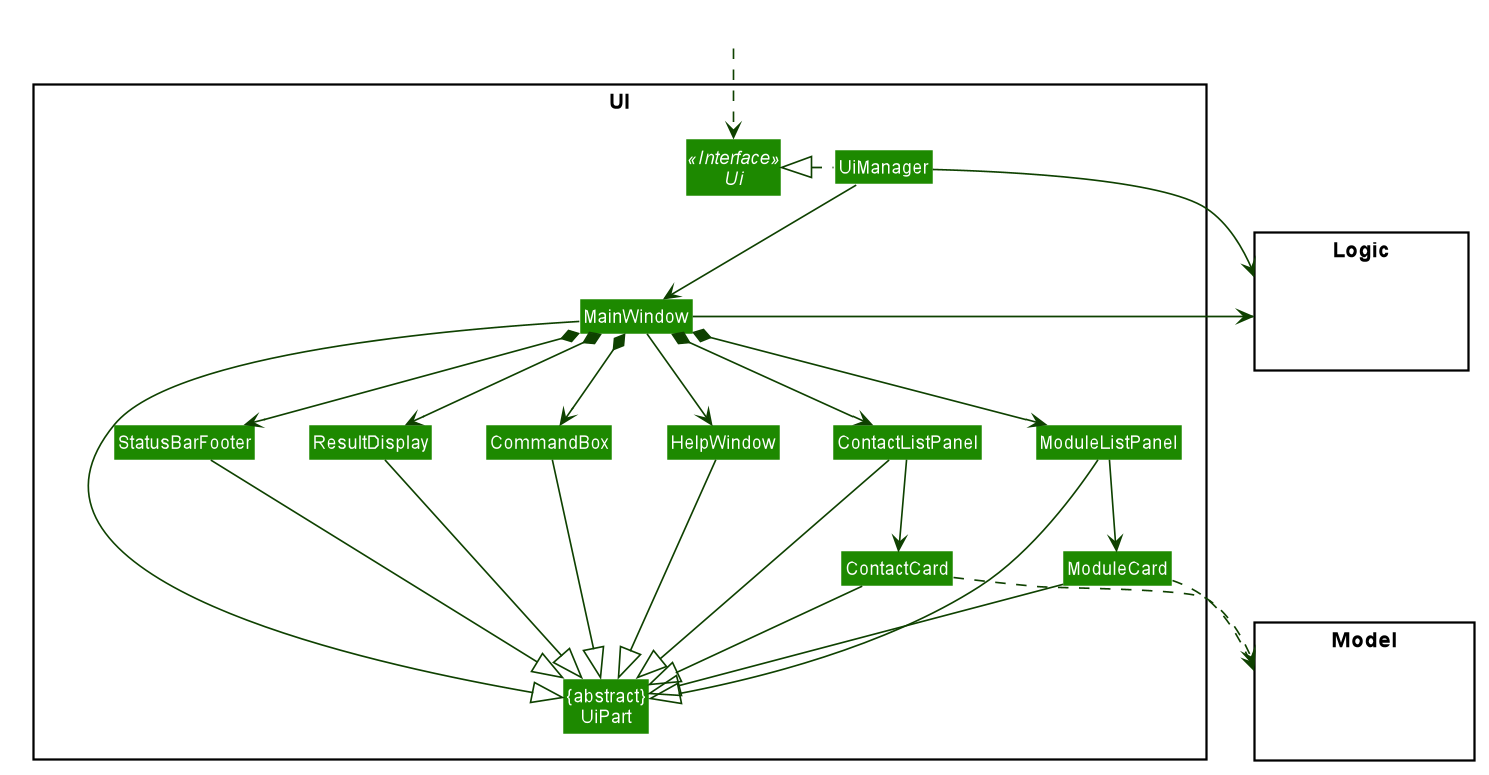
The job of the UI component is to be the face of the product, which the user directly interacts with. It is in charge of containing the logic that breaks down and executes the user input, and displaying the GUI of the product.
It composes of a few main classes, that serves as the focal point of this component. Such classes are UiPart, MainWindow, UiManager and the respective panel displays, (XYZListPanel). The rest of the classes are supporting classes to help make the GUI.
The MainWindow is what the user actually sees, which has a CommandBox, XYZListPanel, ResultDisplay and StatusBar. These components are stacking on top of one another using stackPane to ensure a smooth looking GUI. The order of the components are as follows, CommandBox, ResultDisplay, XYZListPanel and StatusBar.
The CommandBox is just a textField component where the user can enter the commands. Upon pressing Enter, extracting of the text occurs and is sent to the logic to be parsed and executed.
Next, after the executing is completed, a CommandResult object returns and is then passed to the ResultDisplay for the relevant information to be shown in this component. This is being displayed in a TextArea component.
Lastly, the XYZListPanel is in charge of displaying all the modules, contacts, etc that is the product is tracking. Each of these items are being displayed in a cell under their respective XYZCard, which will be displayed in the ListCell of the XYZListPanel.
API :
Logic component
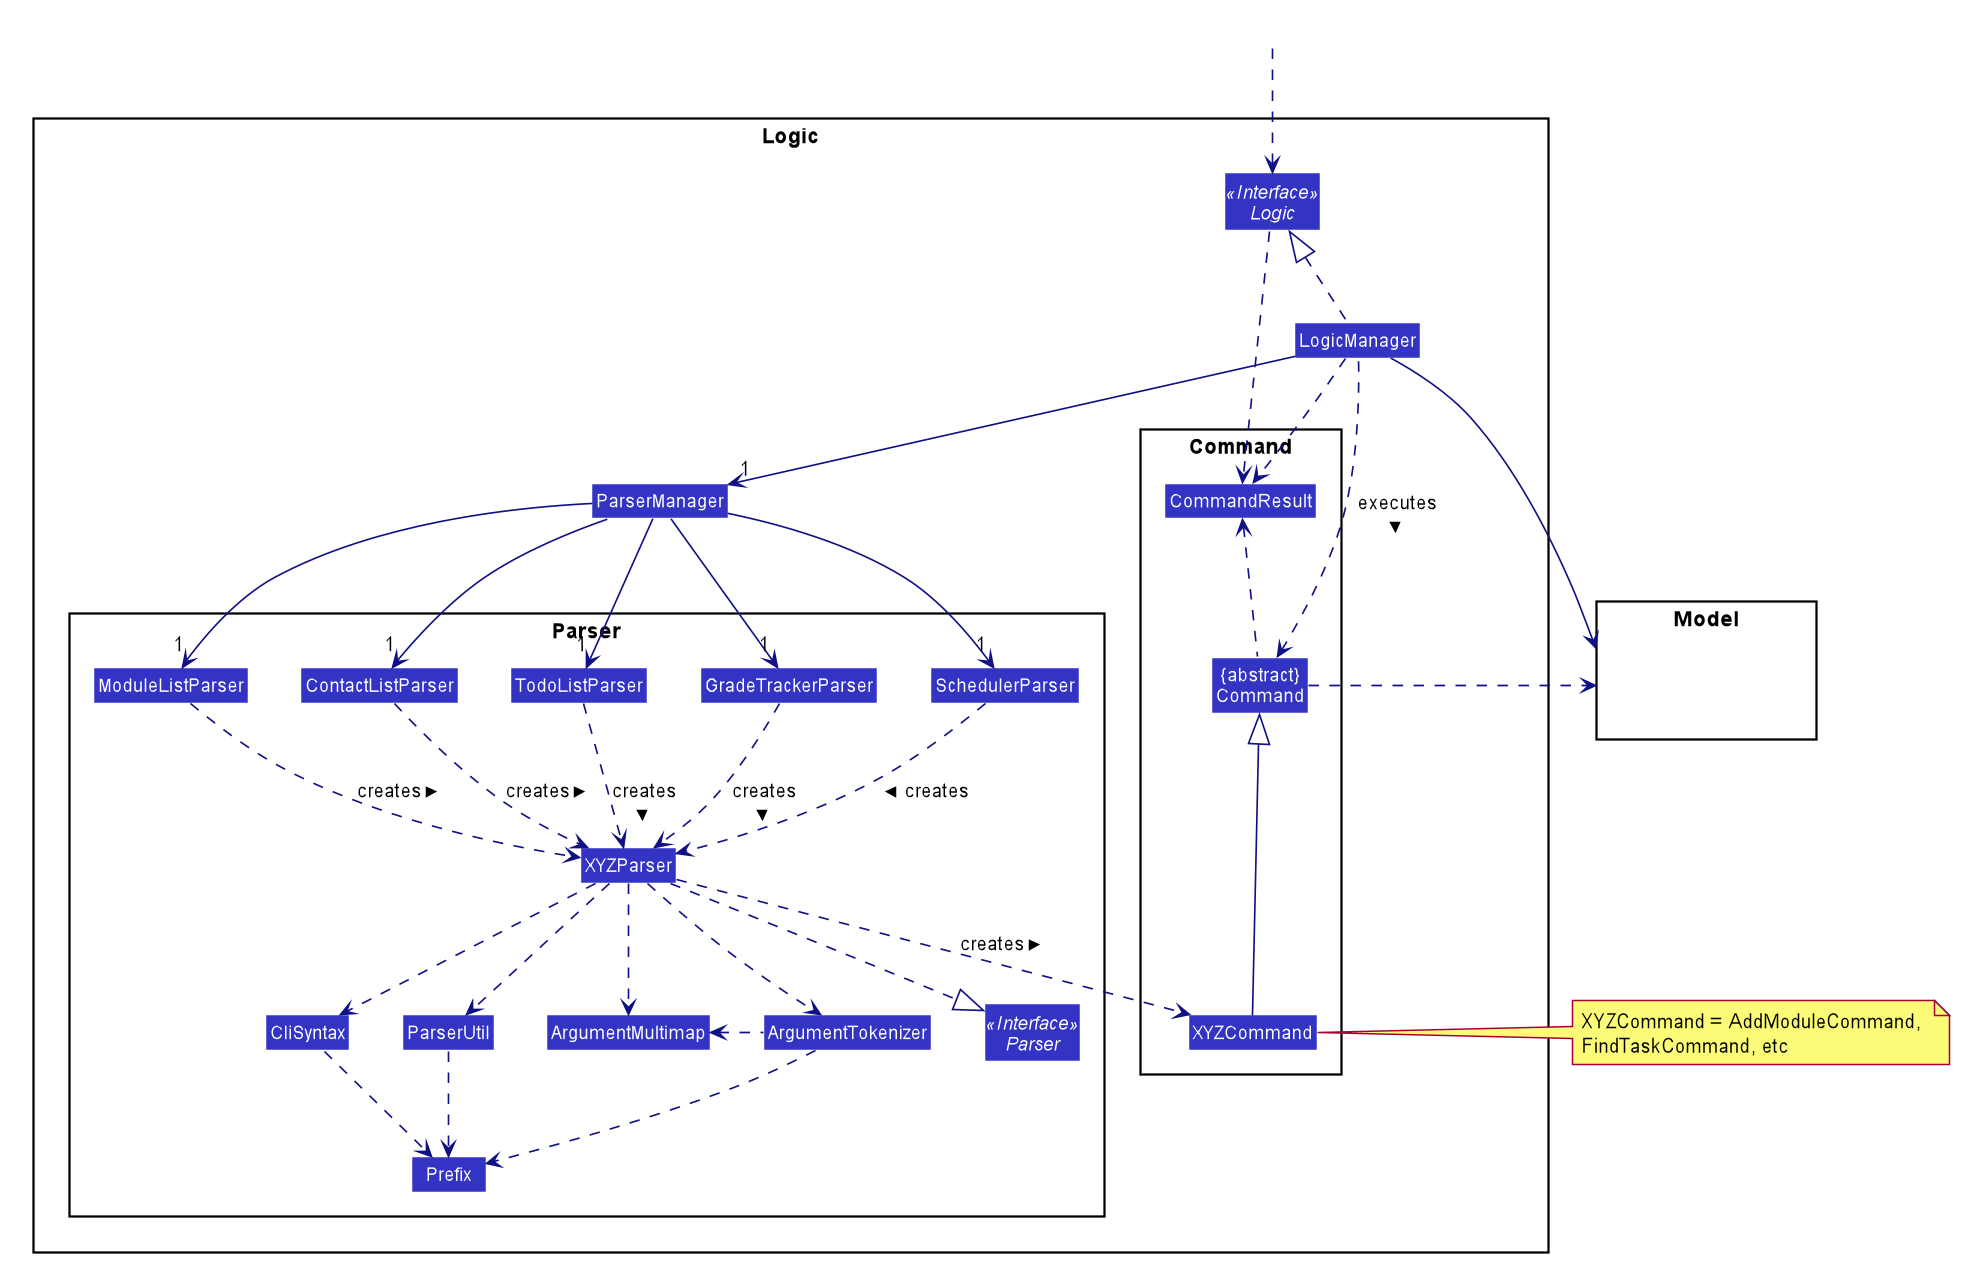
API : Logic.java
-
Logicuses theParserManagerclass to create the respective classes:ModuleListParser,ContactListParser,TodoListParser,GradeTrackerParserandSchedulerParserwhich will parse the user command.
- This results in a
Commandobject which is executed byLogicManager.
- The command execution can affect the
Model(e.g. adding a module).
- The result of the command execution is encapsulated as a
CommandResultobject which is passed back to theUi.
- In addition, the
CommandResultobject can also instruct theUito perform certain actions, such as displaying help to the user.
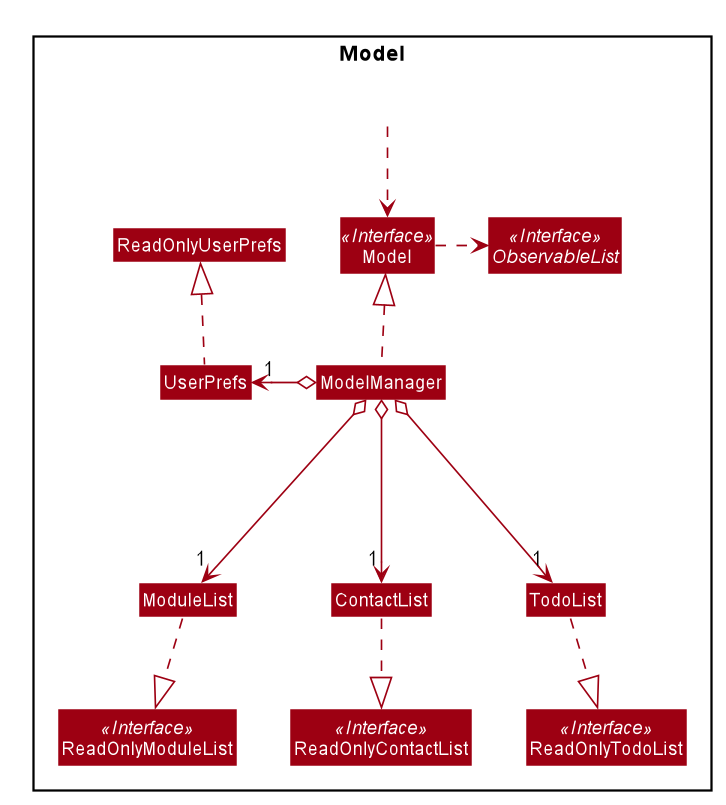
Model component
API : Model.java
The Model,
- stores a
UserPrefobject that represents the user’s preferences. - stores the data for these 3 types of list:
- module tracker
- contact list
- todo list
- exposes an unmodifiable
ObservableList<T>for all types of list as mentioned above which can be ‘observed’ e.g. the UI can be bound to this list so that the UI automatically updates when the data in the list change. - does not depend on any of the other three components
Module Tracker
Module List
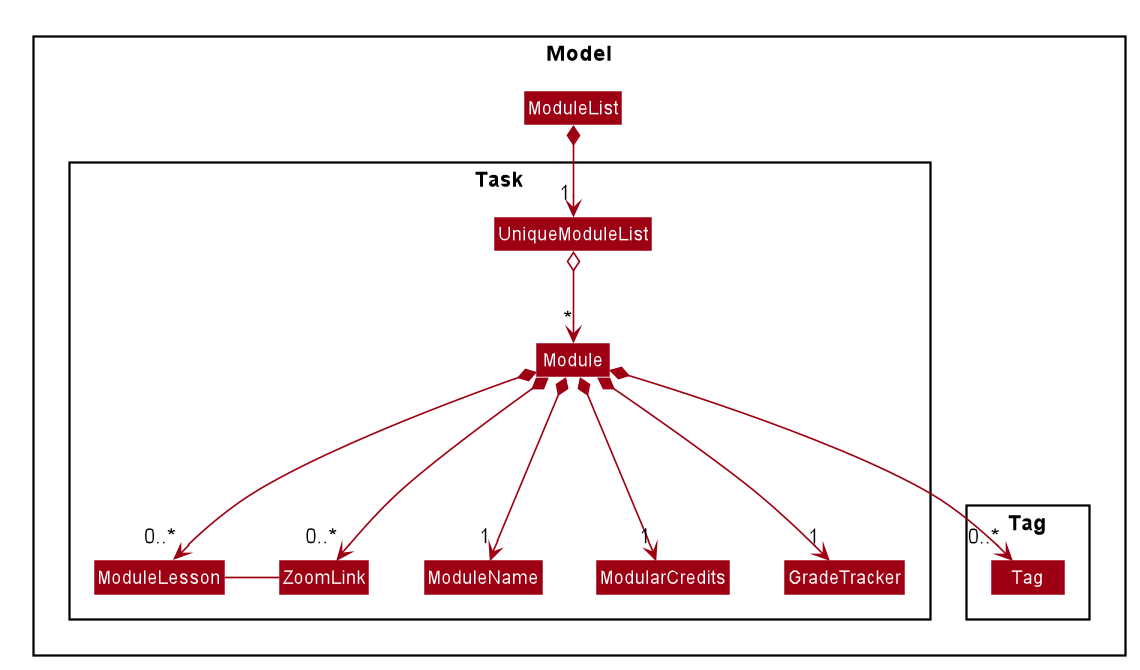
ModuleList class
ModuleList class : ModuleList.java
- Wraps all data i.e. Modules at the module list level
- Stores Modules in memory
- Stores a UniqueModuleList
- Duplicate Modules are not allowed
Module class
Module package : seedu.address.model.module
- Module is a container class that stores :
- Name of a module
- HashMap of ModuleLesson and ZoomLink key value pairs
- GradeTracker of a module
- ModularCredits of a module
- Tag(s) of a module
- GradeTracker is a container class that stores:
- Grade for a module
- Assignments for a module
Contact List
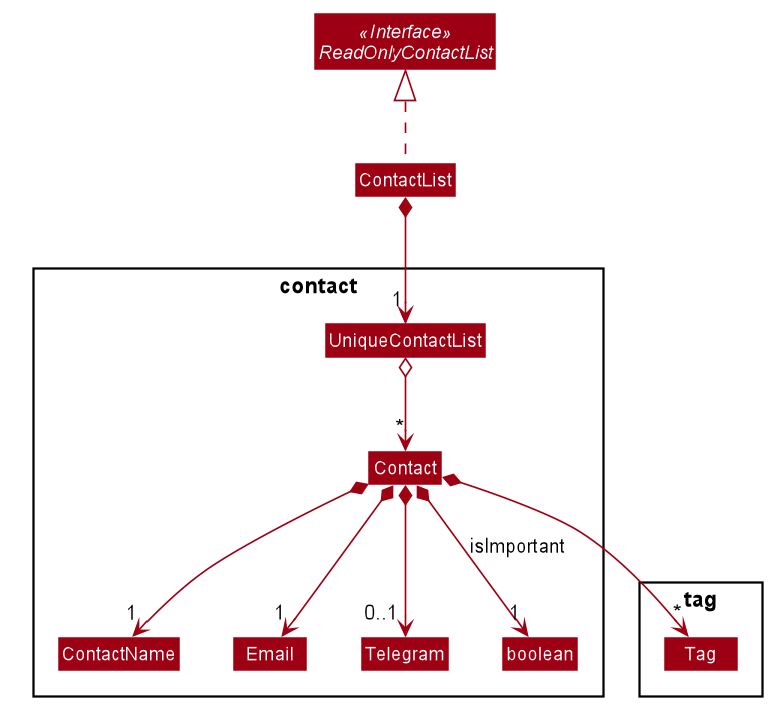
Contact package : seedu.address.model.contact
Contact class: Contact.java
It encapsulates the following classes:
ContactNameEmailTelegramSet<Tag>- boolean
isImportant
ContactList class : ContactList.java
- Wraps all data i.e.
Contactat the contact list level - Stores all the
Contactin memory - Stores a
UniqueContactList - Duplicate
Contactare not allowed inUniqueContactList
Todo List
Scheduler
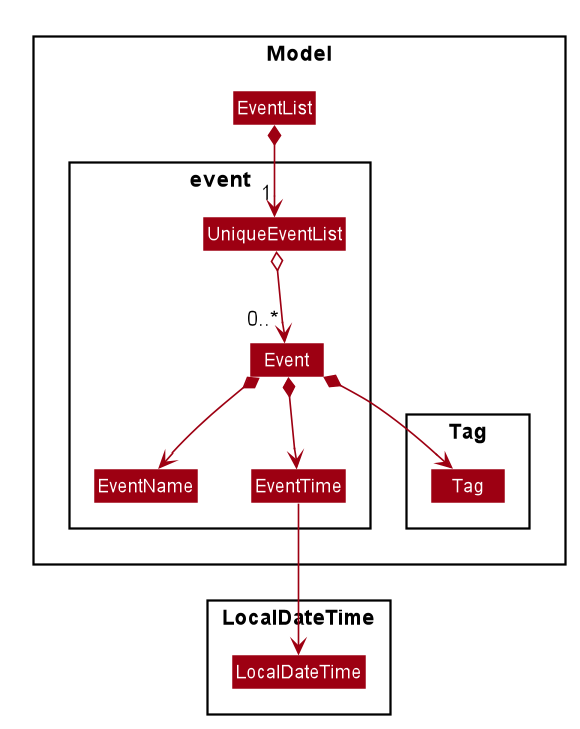
EventList class
EventList class : EventList.java
- Holds and stores all the events.
- Saves to
Storageafter each execution of a command. - Stores a
UniqueEventListthat ensures no duplicates of events. - Duplicate events are not allowed.
Event class
Event class :
Event.java - Holds the
EventNameandEventTimeof the created Event. - EventName and EventTime cannot be null.
- Events are considered to be the same if the EventName is equal.
-
Tagsare optional for each event.
EventName class
EventName class : EventName.java
- Holds the date for the name of the String.
- Acts like a logic container for the name of the event.
EventTime class
EventTime class : EventTime.java
- Holds the date and time of the event.
- Stores the date and time as a LocalDateTime object.
- Follows a strict input format of : day-month-year 24h time, e.g.
5-12-2020 1200 - Throws an error if the wrong format or invalid date is enterred.
Storage component
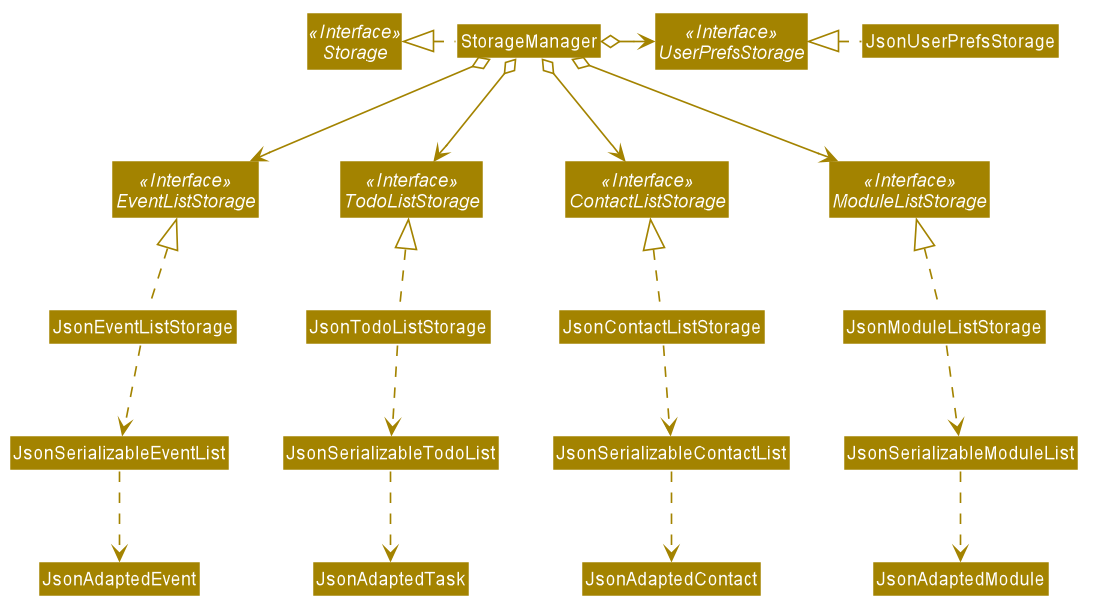
API : Storage.java
The Storage component facilitates the storage of CAP5BUDDY data in the hard drive. When the program attempts to save
data, the Storage component converts java data objects such as ModuleList and ContactList into a json format to store
at a specified file location. When the program is started, it will attempt to read existing user data and the Storage
component will be converting data in json format into java objects.
- can save
UserPrefobjects in json format and read it back. - can save the
ModuleListdata in json format and read it back. - can save the
ContactListdata in json format and read it back. - can save the
TodoListdata in json format and read it back. - can save the
EventListdata in json format and read it back.
Json Adapted Objects
Each of the higher level Json Adapted objects shown in the storage diagram above is dependent on other lower level Json Adapted objects related to their feature type.
-
JsonAdaptedModuleis dependent onJsonAdaptedTag,JsonAdaptedGradeTrackerandJsonAdaptedZoomLink. -
JsonAdaptedGradeTrackeris dependent onJsonAdaptedAssignment -
JsonAdaptedContactis dependent onJsonAdaptedTag,JsonAdaptedGradeTrackerandJsonAdaptedZoomLink. -
JsonAdaptedTaskis dependent onJsonAdaptedTag. -
JsonAdaptedEventis dependent onJsonAdaptedTag.Common classes
Classes used by multiple components are in the seedu.addressbook.commons package.
Todo List
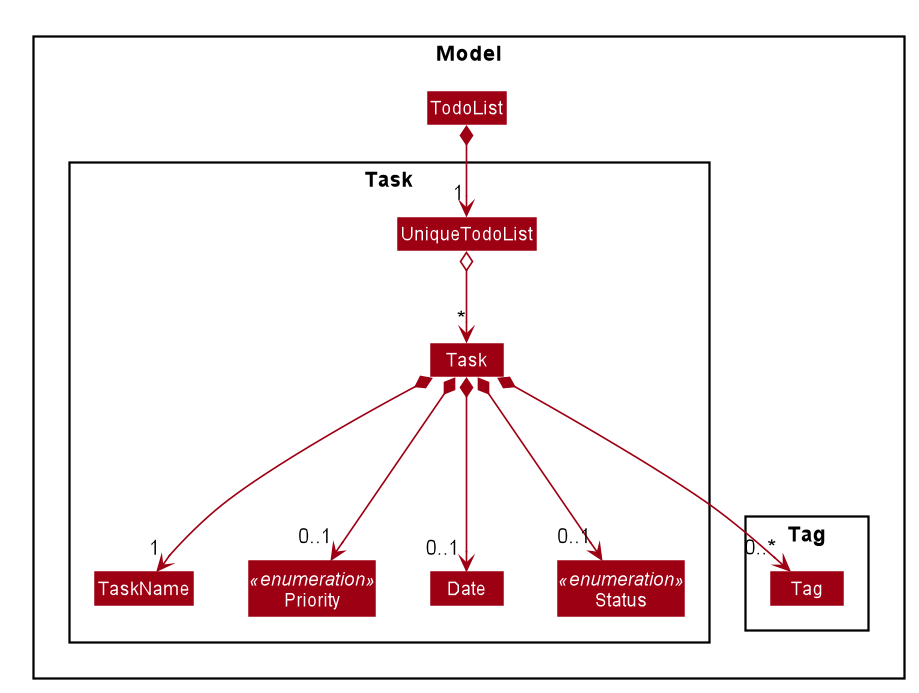
Task class
Task package : seedu.address.model.task
- Task is a container class that stores :
- Name of a task
- Tags of a task
- Priority of a task
- Date or deadline of a task
- Status of a task
Only name is compulsory when creating a new Task.
TodoList class
TodoList class : TodoList.java
- Wraps all data i.e. Tasks at the Todo List level
- Stores Tasks in memory
- Stores a UniqueTodoList
- Duplicate Task objects are now allowed
TodoList will be explained more comprehensively in the TodoList feature Section
Implementation
This section describes some noteworthy details on how certain features are implemented.
Logic
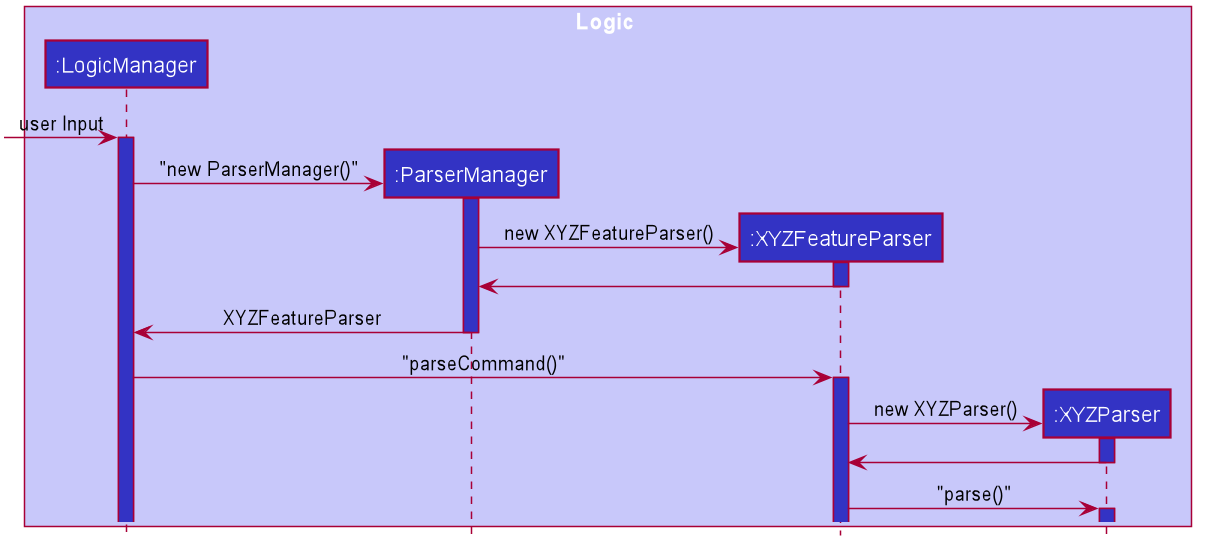
Implementation
The idea of this implementation is to abstract the overall process into a more OOP focused design, where each class only handles the functions
that is relevant to its responsibility. As we have many features that each have their own commands, we decided to
create a new Facade class ParserManager to handle which Feature parser to call. Feature parser are those in charge of
handling all commands related to that feature. For instance, ModuleListParser will be selected by the ParserManager when
a module related command is called.
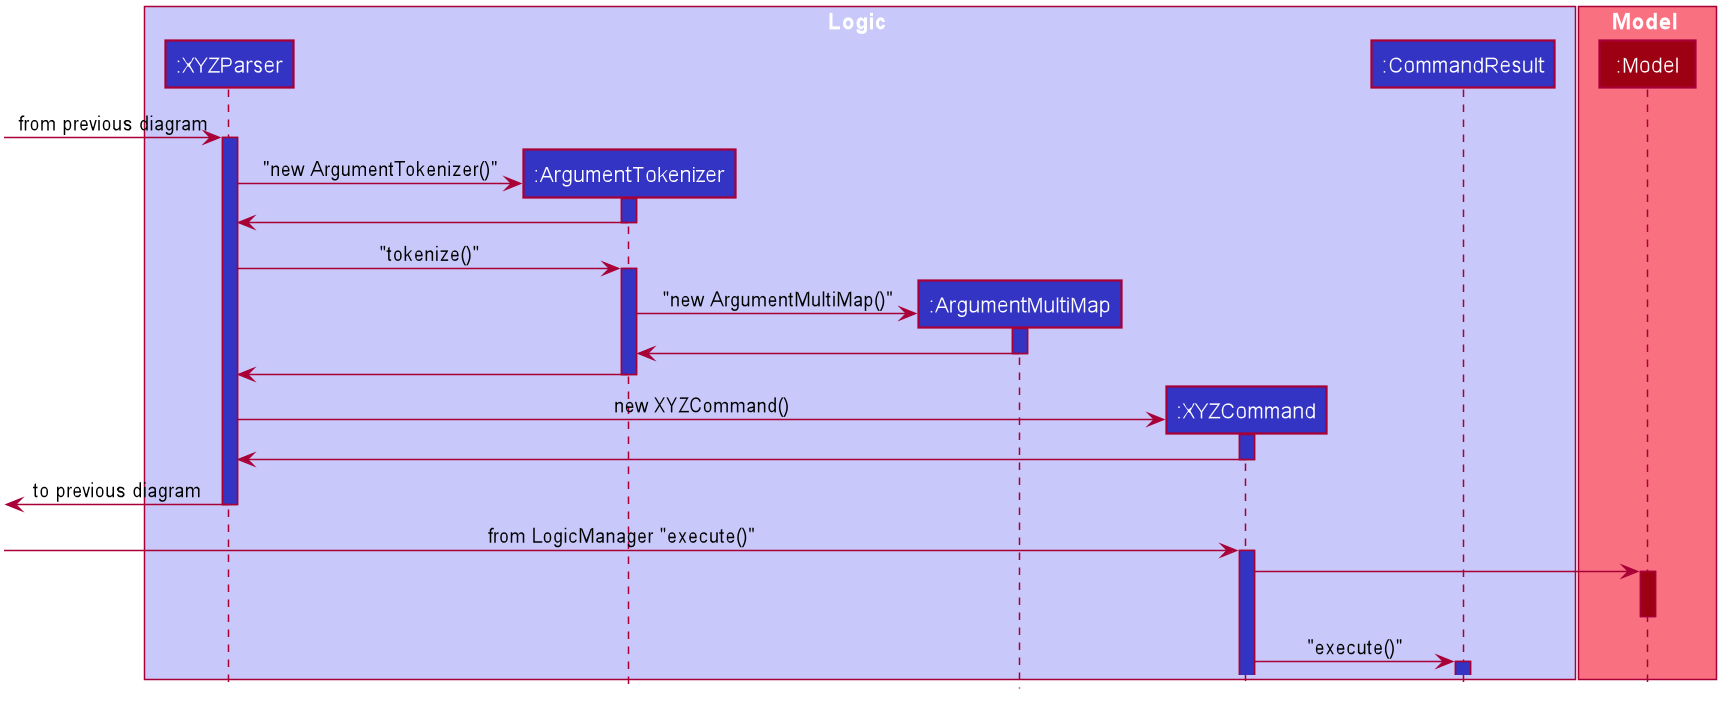
After the appropriate feature parser is selected, the user input is passed into it to be broken down. It splits the user input into
command word and arguments, where the command word is checked and the respective sub-parser is called. For instance, if the
command word is addmodule, then the sub-parser that will be called is AddModuleParser. The argument is then passed into the
sub-parser and tokenized by ArgumentTokenizer and a ArgumentMultiMap is returned, which is a HashMap of the strings for each
prefix enterred. The relevant supporting classes are then created based on the strings under each prefix, and the appropriate
command is created.
The returned command is then executed by the LogicManager, which will execute the function of the command. The respecitve changes are
changed in the model provided in the command. At the end, a CommandResult is returned where the results are stored in.
Design consideration:
Aspect: Whether to create a Facade class ParserManager to handle all the individual parsers.
Aspect: Whether to create a custom parser for each of the feature to handle their respective commands.
Option 1 (Current implementation): A custom Parser in charge of all Scheduler related commands only. Pros:
- More OOP orientated.
- More defensive programming. Cons:
- More Parsers to handle by the ParserManager
Option 2: Place the Scheduler related parser together with the rest of the other parsers for other features, like module list, etc. Pros:
- Faster to implement.
- Less effort needed, simply add on to the existing Parser. Cons:
- Mess and less readable, hard to distinguish between different commands.
- Higher chance of errors, as we are mixing all the different parsers for every feature into a single Parser.
- LONG methods.
Module list management features
Basic Module Tracker features
Add Module feature
This feature creates and adds a new Module into the ModuleList if the Module does not already exist.
This feature is facilitated by the following classes:
-
AddModuleParser:- It implements
AddModuleParser#parse()to parse and validate the user arguments to create a newModule.
- It implements
-
AddModuleCommand:- It implements
AddModuleCommand#execute()which executes the addition of the newModuleintoModel.
- It implements
Given below is an example usage scenario and how the mechanism for adding module behaves at each step:
Step 1. LogicManager receives the user input addmodule n/CS2100 mc/4.0 t/Coremodule from Ui
Step 2. LogicManager calls ModuleListParser#parseCommand() to create an AddModuleParser
Step 3. Additionally, ModuleListParser will call the AddModuleParser#parse() method to parse the command arguments
Step 4. This creates an AddModuleCommand and AddModuleCommand#execute() will be invoked by LogicManager to execute the command to add the Module
Step 5. The Model#addModule() operation exposed in the Model interface is invoked to add the new Module
Step 6. A CommandResult from the command execution is returned to LogicManager
Given below is the sequence diagram of how the operation to add a Module works:
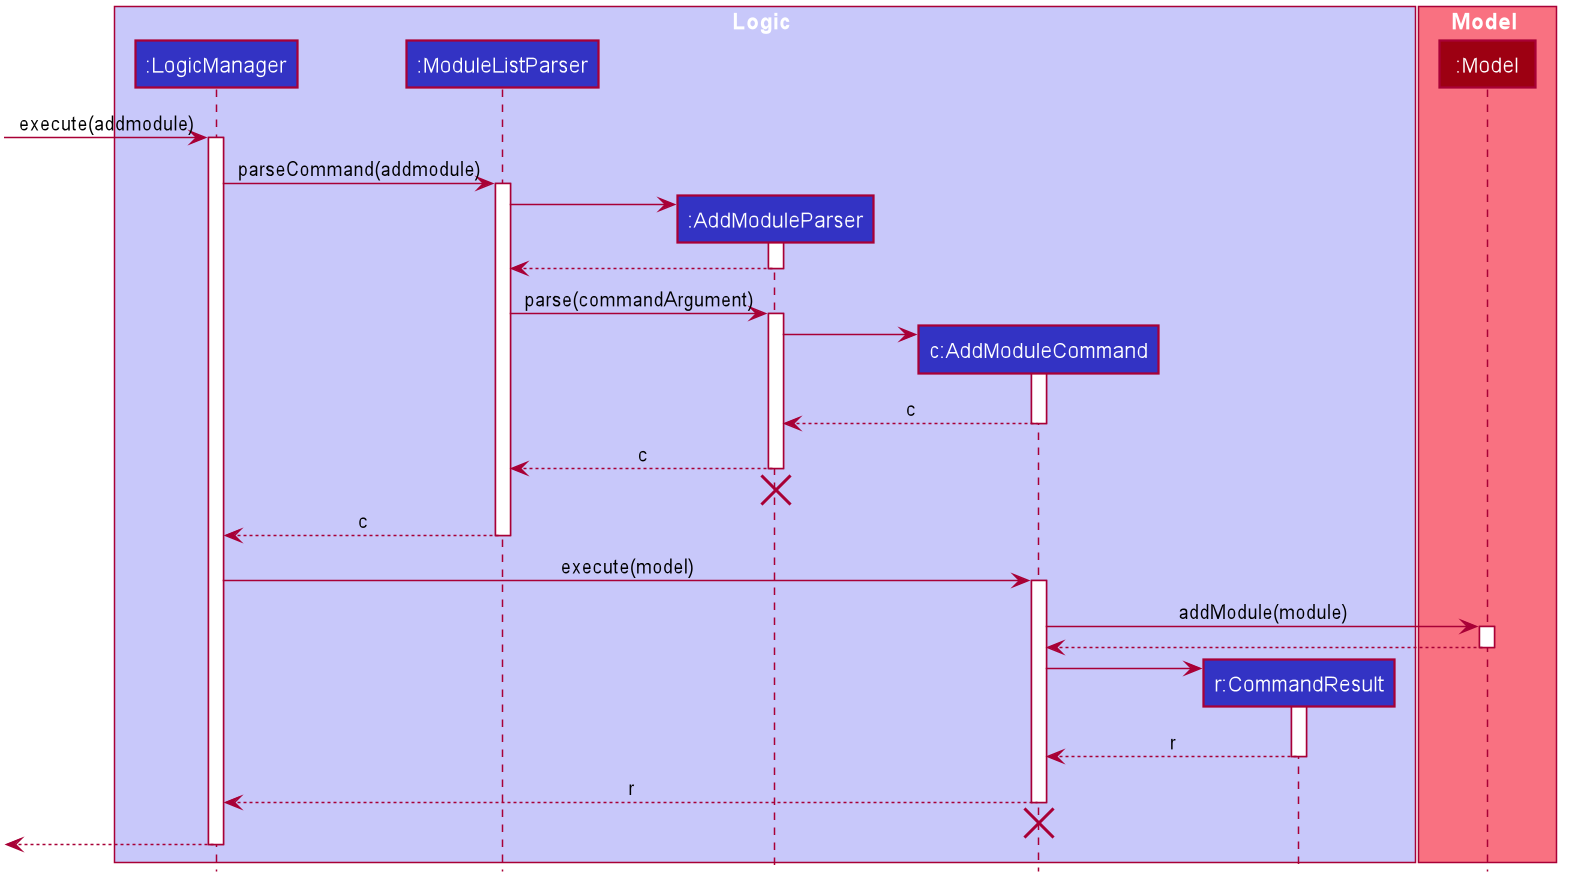
Figure 3.1.1.1 Sequence diagram for the execution of AddModuleCommand
AddModuleCommand and AddModuleParser should end
at the destroy marker (X) but due to a limitation of PlantUML, the lifeline reaches the end of diagram.
The add completed module feature serves a very similar function — it calls Model#addModule() also but creates a Module that contains the “completed” tag by default instead.
Delete Module Feature
The delete module feature deletes a pre-existing module using the index of the Module on the displayed ModuleList.
This feature is facilitated by the following classes:
-
DeleteModuleParser:- It implements
DeleteModuleParser#parse()to parse and validate theModuleID
- It implements
-
DeleteModuleCommand:- It implements
DeleteModuleCommand#execute()to delete theModulefromModel
- It implements
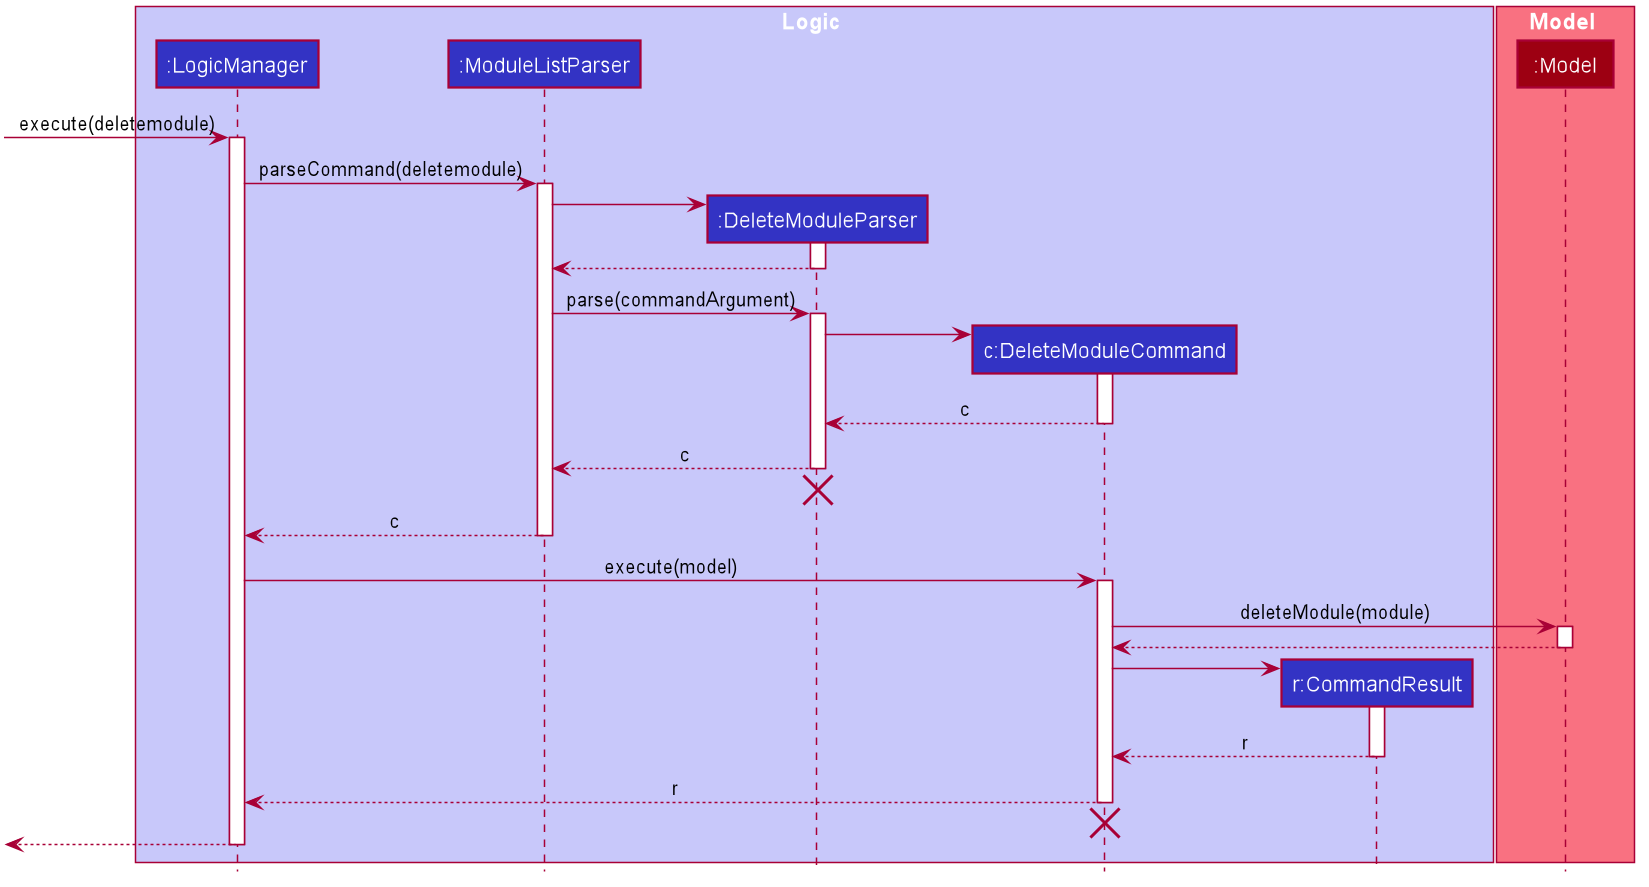
After the user input has been parsed by DeleteModuleParser, LogicManager will execute the delete operation by invoking
DeleteModuleCommand#execute(). This deletes the target Module by invoking the Model#deleteModule() method exposed in the Model interface.
Given below is the sequence diagram of how the operation to delete a Module works:
Design consideration:
Aspect: Method to delete module
-
Alternative 1 (current choice): Delete a
Modulebased on its index in the displayedModuleList- Pros: Using the
Moduleindex allows us to uniquely identify the targetModuleto delete, reducing the room for possible error - Cons: The target
Moduleto be deleted might not be displayed on theModuleListand hence theModuleindex might not be readily available. This can inconvenience users who have to search for theModuleto retrieve theModuleindex
- Pros: Using the
-
Alternative 2: Delete a
Modulebased on theModulename- Pros: It can make the deletion process simpler for users who can provide the name of the
Modulewithout having to execute more commands - Cons: This is more difficult to implement
- Pros: It can make the deletion process simpler for users who can provide the name of the
Alternative 1 was chosen since it is easier to implement and it makes the command simpler for users to input.
Edit Module Feature
The edit module feature edits a pre-existing Module in the ModuleList using Module details provided by the user.
This feature is facilitated by the following classes:
-
EditModuleParser:- It implements
EditModuleParser#parse()to parse and validate the providedModuledetails andModuleindex
- It implements
-
EditModuleDescriptor:- It stores the
Moduledetails which will be used to edit the targetModule
- It stores the
-
EditModuleCommand:- It implements
EditModuleCommand#execute()to edit theModuleinModel
- It implements
Given below is an example usage scenario and how the mechanism for editing a Module behaves at each step:
Step 1. LogicManager receives the user input editmodule 1 n/CS2100 mc/4.0 gp/5.0 t/Coremodule from Ui
Step 2. LogicManager calls ModuleListParser#parseCommand() to create an EditModuleParser
Step 3. Additionally, ModuleListParser will call the EditModuleParser#parse() method to parse the command arguments
Step 4. This creates an EditModuleCommand and EditModuleCommand#execute() will be invoked by LogicManager to edit the target Module
Step 5. The Model#setModule() operation exposed in the Model interface is invoked to replace the target Module with the edited Module
Step 6. A CommandResult from the command execution is returned to LogicManager
Given below is the sequence diagram of how the operation to edit a Module works:

Design consideration:
Aspect: Implementation of EditModuleCommand
-
Alternative 1 (current choice):
- Pros: Reduces coupling between the command classes and
EditModuleCommandcan be implemented without restrictions, or a need to consider how it might affect the other command classes - Cons: Additional methods have to be implemented to replace the target module with the edited module
- Pros: Reduces coupling between the command classes and
-
Alternative 2: Reuse
DeleteModuleCommandto delete the targetModuleandAddModuleCommandto add the editedModule- Pros: Reusing other commands would make the implementation of
EditModuleCommandsimpler and easier - Cons: It increases coupling between the 3 commands and this can cause issues in
EditModuleCommandif eitherDeleteModuleCommandorAddModuleCommanddeveloped bugs or errors. Also, it might affect performance since executingEditModuleCommandwill execute 2 other commands
- Pros: Reusing other commands would make the implementation of
Alternative 1 was chosen since it gave more freedom with regard to the implementation of EditModuleCommand since
we were not restricted to reusing other commands. Less coupling between the classes meant that changes in one class would
less likely require changes to other classes.
Find Module Feature
The find Module feature is important since sieving through all modules to search for a specific Module can be
tedious and not user-friendly.
The find Module feature searches for modules using the Module name.
For each search parameter, modules have to match at least one keyword to fulfil the search criteria.
This feature is facilitated by the following classes:
-
FindModuleParser:- It implements
FindModuleParser#parse()to parse and validate the user input - It creates
NameContainsKeywordsPredicateobjects using the command arguments
- It implements
-
FindModuleCommand:- It implements
FindModuleCommand#execute()to find all matching modules by updating the filtered displayed module list inModelusing theNameContainsKeywordsPredicatefromFindModuleParser
- It implements
Given below is an example usage scenario and how the mechanism for finding Module behaves at each step:
Step 1. LogicManager receives the user input findmodule CS2100 from Ui
Step 2. LogicManager calls ModuleListParser#parseCommand() to create a FindModuleParser
Step 3. Additionally, ModuleListParser will call the FindModuleParser#parse() method to parse the command arguments
Step 4. This creates a NameContainsKeywordsPredicate that will be used to obtain the filtered displayed ModuleList
Step 5. Additionally, a FindModuleCommand is created and FindModuleCommand#execute() will be invoked by LogicManager to find matching modules
Step 6. The Model#updateFilteredModuleList() operation exposed in the Model interface is invoked to update the displayed ModuleList
using NameContainsKeywordsPredicate
Step 7. A CommandResult from the command execution is returned to LogicManager
Given below is the sequence diagram of how the operation to find modules works:
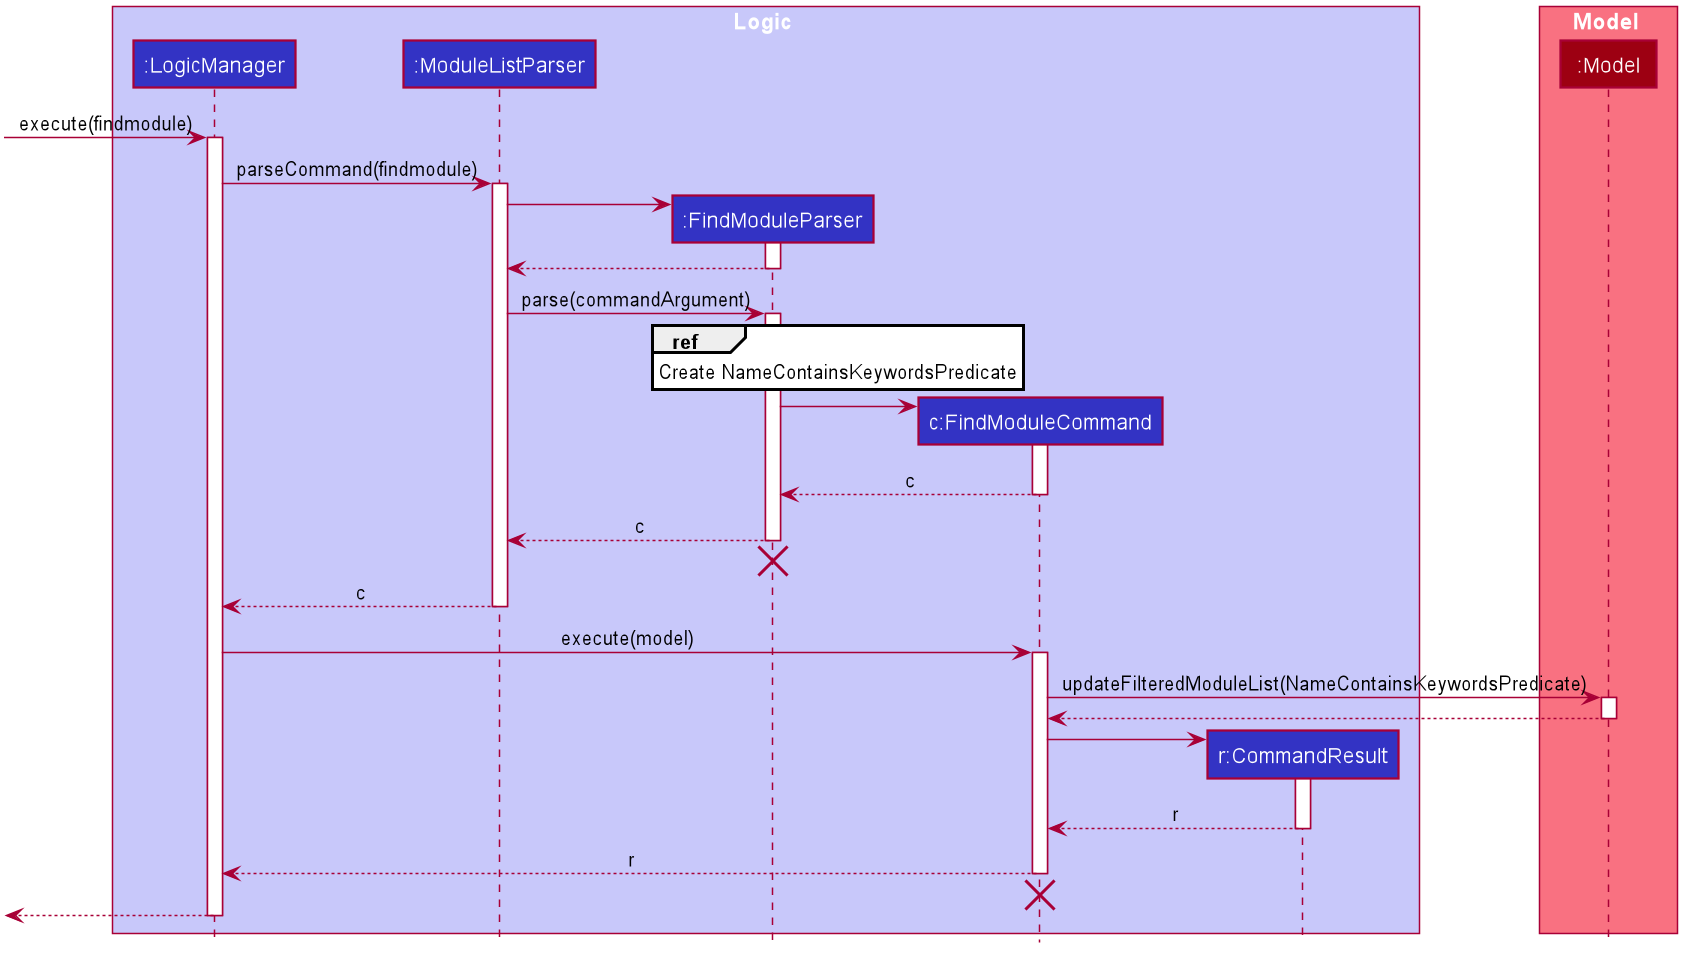
Fig ??
Module list data archiving
Implementation
The module list data archiving function is facilitated by ModelManager. It keeps track of a additional ModuleList which stores archived modules as
compared the the current ModuleList that stores currently relevant modules. Additionally, it implements the following operations:
-
ModelManager#archiveModule()- Archives a module by removing it from the currentModuleListand placing it in the archivedModuleList. -
ModelManager#unarchiveModule()- Un-archives a module by removing it from the archivedModuleListand placing it in the currentModuleList.
The following sequence diagram shows how the archive module operation works:
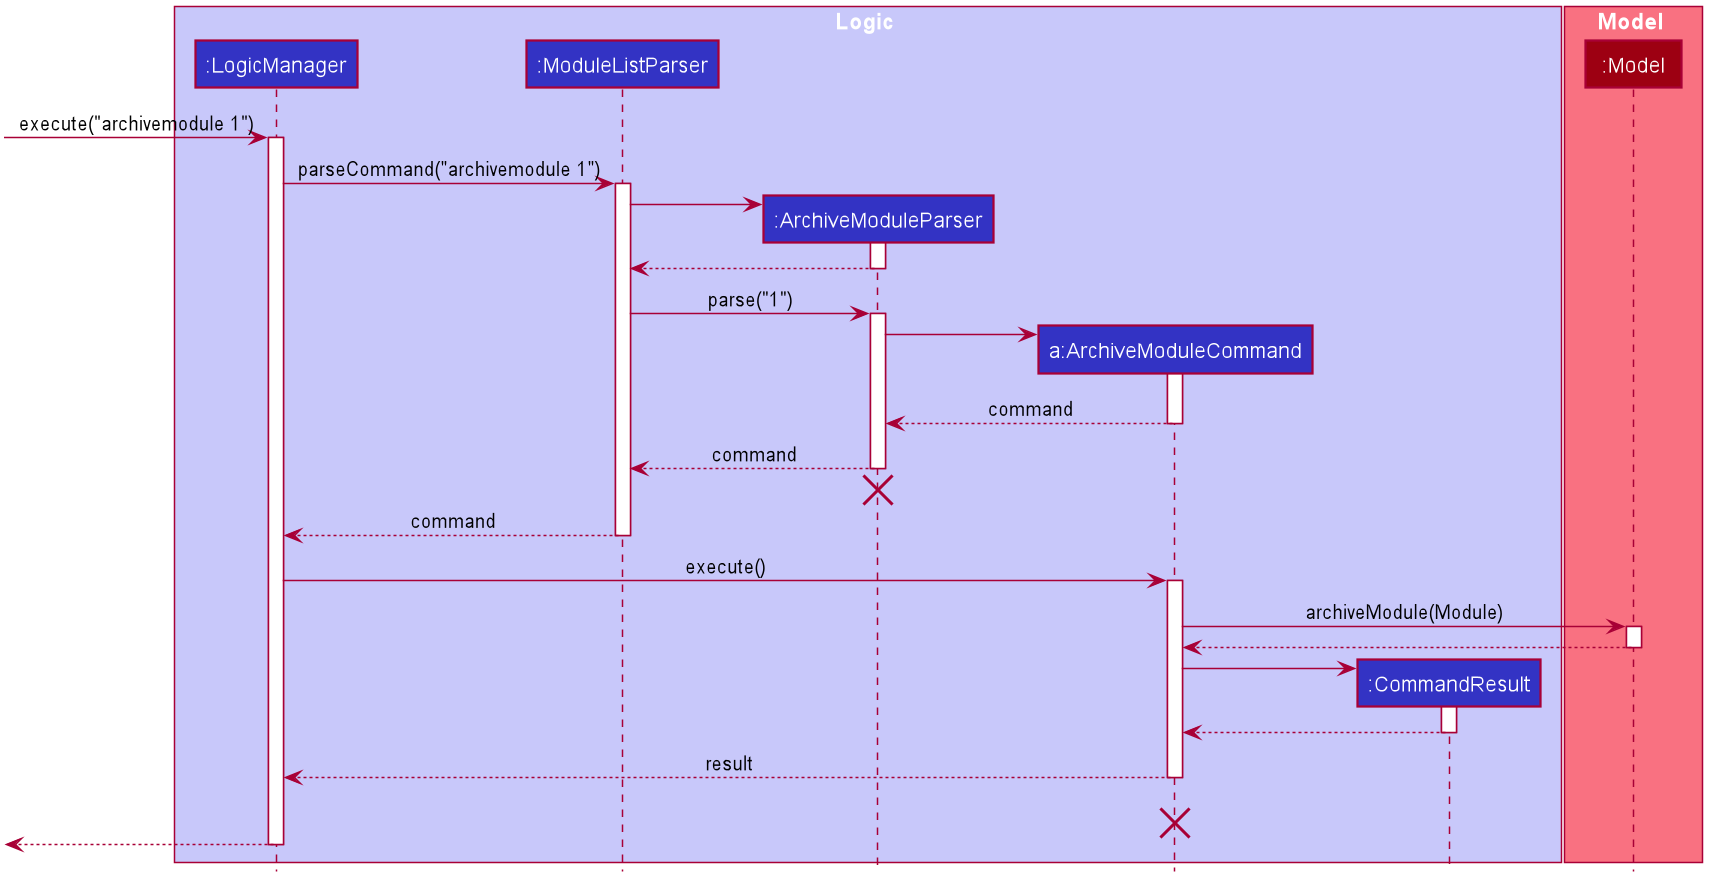
ArchiveModuleCommand
should end at the destroy marker (X) but due to a limitation of PlantUML, the lifeline reaches the end of diagram.
The unarchivemodule command does the opposite — it calls Model#unarchiveModule(), which removes the specified module from the archived ModuleList and placing it in the current ModuleList.
Module Assignment
In order for CAP 5 Buddy to properly support the students study, information of the students grades assignments and results should be kept. This would allow the student to adequately assess the current grades that he or she currently has. With knowledge of the grades already achieved for the module CAP 5 Buddy can calculate the current percentage and results for the student so that the student can understand how close he or she is to their next grade.
The section below provides details on the implementation of each assignment related function and design considerations of these features.
Details of implementation
The model below shows the implementation of the GradeTracker that is stored under the Module class.
Each Module can only have one GradeTracker which manages the assignments under that module.
The GradeTracker stores a UniqueAssignmentList that ensures assignments within the list are not duplicates of each other.
Each Assignment contains the following three fields: an AssignmentName, AssignmentPercentage and AssignmentResult.
![]()
The list of all GradeTracker related features are:
- Add an Assignment: Adds a new assignment to the
GradeTracker. - Edit an Assignment: Edits a pre-existing assignment in the
GradeTracker. - Delete an Assignment: Deletes a pre-existing assignment in the
GradeTracker. - Add a Grade: Adds a grade for the overall module.
Add Assignment Feature
This feature creates and adds a new Assignment to the GradeTracker of a Module. This action
is only allowed if the Assignment does not already exist in the GradeTracker.
This feature is facilitated by the following classes:
-
AddAssignmentParser:- It implements
AddAssignmentParser#parse()to validate and parse the module name and assignment details.
- It implements
-
AddAssignmentCommand:- It implements
AddAssignmentCommand#execute()which executes the creation of theAssignmentand adds the assignment to the module identified by theModuleNamethat was parsed.
- It implements
Given below is an example usage scenario and how the mechanism for adding an Assignment behaves at each step:
Step 1. LogicManager receives the user input addassignment n/CS2100 a/Quiz 1 %/20 r/85 from Ui
Step 2. LogicManager calls ParserManager, which calls GradeTrackerParser#parseCommand() to create a AddAssignmentParser
Step 3. Additionally, AddAssignmentParser will call the AddAssignmentParser#parse() method to parse the command arguments
Step 4. An AddAssignmentCommand is created and the command arguments are passed to it.
Step 5. AddAssignmentCommand#execute() will be evoked by LogicManager to creates an Assignment using the parsed inputs, Quiz 1 for AssignmentName, 20 for AssignmentPercentage
and 85 for AssignmentResult. A ModuleName is also created using the input CS2100.
Step 6. The Module is searched for through the Model#getFilteredModuleList() and when it is found, the
Module#addAssignment() is executed with the Assignment, adding the assignment to the module’s GradeTracker.
Step 7. The Model#setModule() operation exposed in the Model interface is invoked to replace the original module
with the updated module containing the assignment.
Step 8. A CommandResult from the command execution is returned to LogicManager
The sequence diagram for Add Assignment Command functions similarly to the sequence diagram for Delete Assignment. You can view the sequence diagram for Delete Assignment here for reference.
Design consideration:
Aspect: Whether to directly store the assignments under module
- Alternative 1 : Module stores assignments directly without any association class.
- Pros : Less work to be done.
- Cons : Less OOP.
- Alternative 2 (current choice): Module stores a separate class that then stores the assignments
- Pros : More OOP and the assignments are less coupled to the Module.
- Cons : Takes more effort and complexity to recreate the unique object list within another layer(
Module).
We implemented the second option despite its difficulty and complexity, taking more time to carry out as we felt that this feature was major enough to warrant the time and depth to implement.
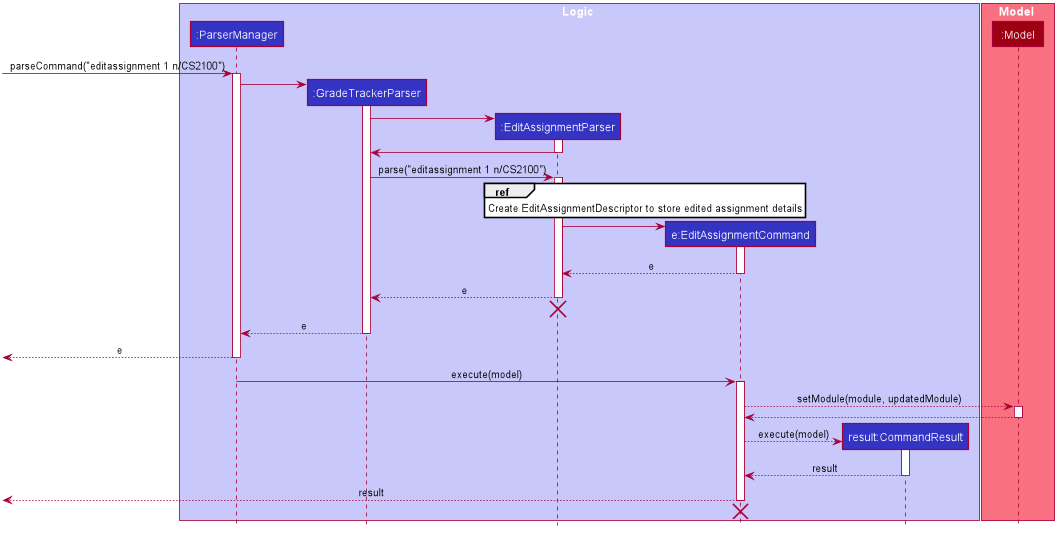
####Edit Assignment Feature
This feature allows assignments within a GradeTracker to be edited. The fields that can be edited are the
AssignmentName, AssignmentPercentage and its AssignmentResult. The grade tracker of the module to act on must
currently have a valid assignment to target.
This feature requires the following classes:
-
EditAssignmentDescriptor:- It represents and encapsulates the edited assignment and stores the fields to replace the current ones.
-
EditAssignmentParser:- It implements
EditAssignmentParser#parse()to validate and parse the assignmentIndex, module name and assignment edited details, creating anEditAssignmentDescriptorobject with the edited details.
- It implements
-
EditAssignmentCommand:- It implements
EditAssignmentCommand#execute()which will execute the editing of the assignment at the corresponding assignmentIndexin the correspondingModuleidentified by the parsed module name.
- It implements
Given below is an example usage scenario and how the mechanism for editing an Assignment behaves at each step:
Step 1. LogicManager receives the user input editassignment 1 n/CS2100 a/Quiz 1 from Ui
Step 2. LogicManager calls ParserManager, which then calls GradeTrackerParser#parseCommand() to create an EditAssignmentParser
Step 3. Additionally, EditAssignmentParser will call the EditAssignmentParser#parse() method to parse the command arguments
Step 4. An EditAssignmentCommand is created and the command arguments are passed to it.
Step 5. EditAssignmentCommand#execute() will be evoked by LogicManager to creates an EditAssignmentDescriptor
using the parsed inputs, Quiz 1 for AssignmentName. A ModuleName is also created using the input CS2100.
Step 6. The Module is searched for through the Model#getFilteredModuleList() and when it is found, the
GradeTracker replaces the Assignment with a new one created using the EditAssignmentDescriptor.
Step 7. A CommandResult from the command execution is returned to LogicManager
Design consideration:
Aspect: Whether to receive the user inputs as an index or as the assignment name
- Alternative 1 : Receive user input of assignment to edit as an assignment name.
- Pros : The user is less prone to typing in the wrong commands and selecting the wrong assignment to edit.
- Cons : Tougher to implement as need to identify not just which module in the module list is the one being targeted, but now also which assignment in the grade tracker of that module is being targeted.
- Alternative 2 (current choice): Receive user input of assignment to edit as an index.
- Pros : Easier to implement and shorter commands needed to type out for the user.
- Cons : The user will need to observe the GUI more carefully in order to not make mistakes.
We implemented the second option as we believe that with a clean enough GUI, the user will not be as likely to make mistakes in selecting the right assignment to edit.
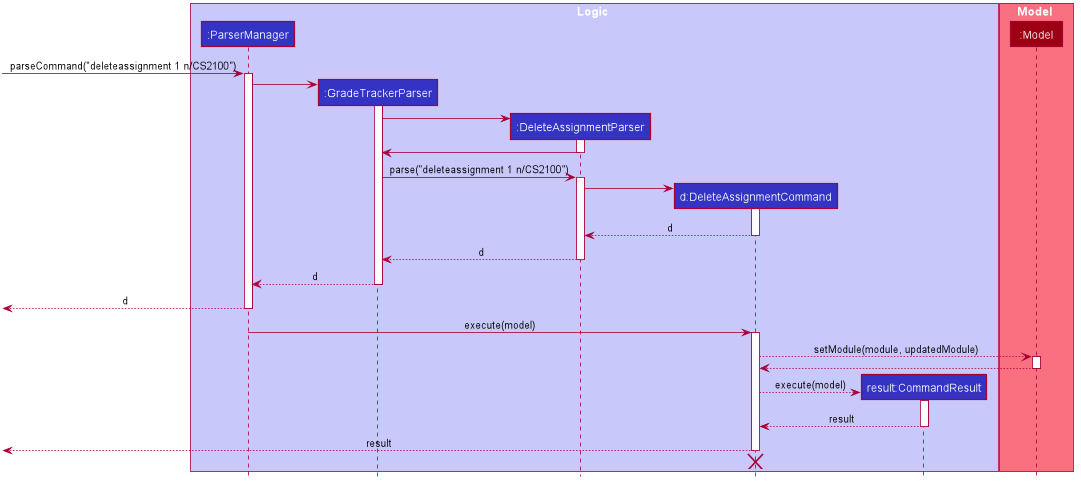
####Delete Assignment Feature
This feature allows assignments within a GradeTracker to be deleted. The assignment to be deleted is identified
by the module name that stores the grade tracker it is under and the index of the assignment. The grade tracker of the module to act on must
currently have a valid assignment to target.
This feature requires the following classes:
-
DeleteAssignmentParser:- It implements
DeleteAssignmentParser#parse()to validate and parse the assignmentIndexand module name.
- It implements
-
DeleteAssignmentCommand:- It implements
DeleteAssignmentCommand#execute()which will execute the deleting of the assignment at the corresponding assignmentIndexin the correspondingModuleidentified by the parsed module name.
- It implements
Given below is an example usage scenario and how the mechanism for deleting an Assignment behaves at each step:
Step 1. LogicManager receives the user input deleteassignment 1 n/CS2100 from Ui
Step 2. LogicManager calls ParserManager, which then calls GradeTrackerParser#parseCommand() to create a DeleteAssignmentParser
Step 3. Additionally, DeleteAssignmentParser will call the DeleteAssignmentParser#parse() method to parse the command arguments
Step 4. An DeleteAssignmentCommand is created and the command arguments are passed to it.
Step 5. DeleteAssignmentCommand#execute() will be evoked by LogicManager . A ModuleName is also created using the input CS2100.
Step 6. The Module is searched for through the Model#getFilteredModuleList() and when it is found, the
GradeTracker deletes the Assignment at the Index.
Step 7. The Model#setModule() operation is run to update the model with the newly updated module.
Step 7. A CommandResult from the command execution is returned to LogicManager
Below is the sequence diagram for the DeleteAssignmentCommand:
Design consideration:
Aspect: Format to accept the user input
- Alternative 1 : Receive user input of as two indexes to simplify the command.
- Pros : The command becomes very short for the user to write. The implementation can also become very simple.
- Cons : There might be confusion for the user to realise which index corresponds to the module and which index corresponds to the assignment.
- Alternative 2 (current choice): Receive only the assignment to delete as an index and the name of the module as its module name.
- Pros : Better for clarity for the user to input exactly what they are asking to delete.
- Cons : The user will have to fully type out the name of the module to delete the assignment from.
We implemented the second option as we believe that with oversimplifying the command could lead to it being extremely unintuitive. With this implementation, it will be as similar as possible to the other delete commands with only one extra input.
####Add Grade Feature
This feature allows a Grade to be stored in a GradeTracker. The Grade is the aggregated score from the assignments
in the grade tracker of that module. The Grade can also be set to override the current assignment aggregated Grade.
This feature requires the following classes:
-
AddGradeParser:- It implements
AddGradeParser#parse()to validate and parse the module name and grade.
- It implements
-
AddGradeCommand:- It implements
AddGradeCommand#execute()which will execute the overriding to the current grade for the module with the module name.
- It implements
Given below is an example usage scenario and how the mechanism for adding a grade behaves at each step:
Step 1. LogicManager receives the user input addgrade n/CS2100 g/80 from Ui
Step 2. LogicManager calls ParserManager, which then calls GradeTrackerParser#parseCommand() to create an AddGradeParser
Step 3. Additionally, AddGradeParser will call the AddGradeParser#parse() method to parse the command arguments
Step 4. An AddGradeCommand is created and the command arguments are passed to it.
Step 5. AddGradeCommand#execute() will be evoked by LogicManager . A ModuleName is also created using the input CS2100
and a Grade is created with the input 80.
Step 6. The Module is searched for through the Model#getFilteredModuleList() and when it is found, the
GradeTracker for that module replaces the Grade currently stored with the new Grade.
Step 7. The Model#setModule() operation is run to update the model with the newly updated module.
Step 7. A CommandResult from the command execution is returned to LogicManager
The sequence diagram for Add Grade Command functions similarly to the sequence diagram for Delete Assignment. You can view the sequence diagram for Delete Assignment here for reference.
Design consideration:
Aspect: Whether to implement the ability for the assignments being added to update the grade
- Alternative 1 : Grade is only updated with
AddGradeCommand.- Pros : The implementation becomes simpler and less coupling between assignment and grades.
- Cons : The grade feature might not be as useful for the user.
- Alternative 2 (current choice):
AddAssignmentCommandandEditAssignmentCommandwill update grade with the changes to the assignments.- Pros : More relevant to the user and would be more helpful.
- Cons : The implementation will be significantly harder and increased coupling between assignments and grades.
We implemented the second option as the usefulness of the Grade feature increases significantly and the overall usefulness of
GradeTracker would also increase as well.
Cap Calculator
Calculate CAP Feature
The calculate CAP function is facilitated by CalculateCapCommand. It extends Command with a counter for total
grade points and modular credits, both stored internally gradePoints and modularCredits respectively. Additionally, it implements the following operations:
-
CalculateCapCommand#calculateCap()- Calculates CAP using data from modules tagged as completed in currentModuleListand archivedModuleList.
The following sequence diagram shows how the calculate cap operation works:
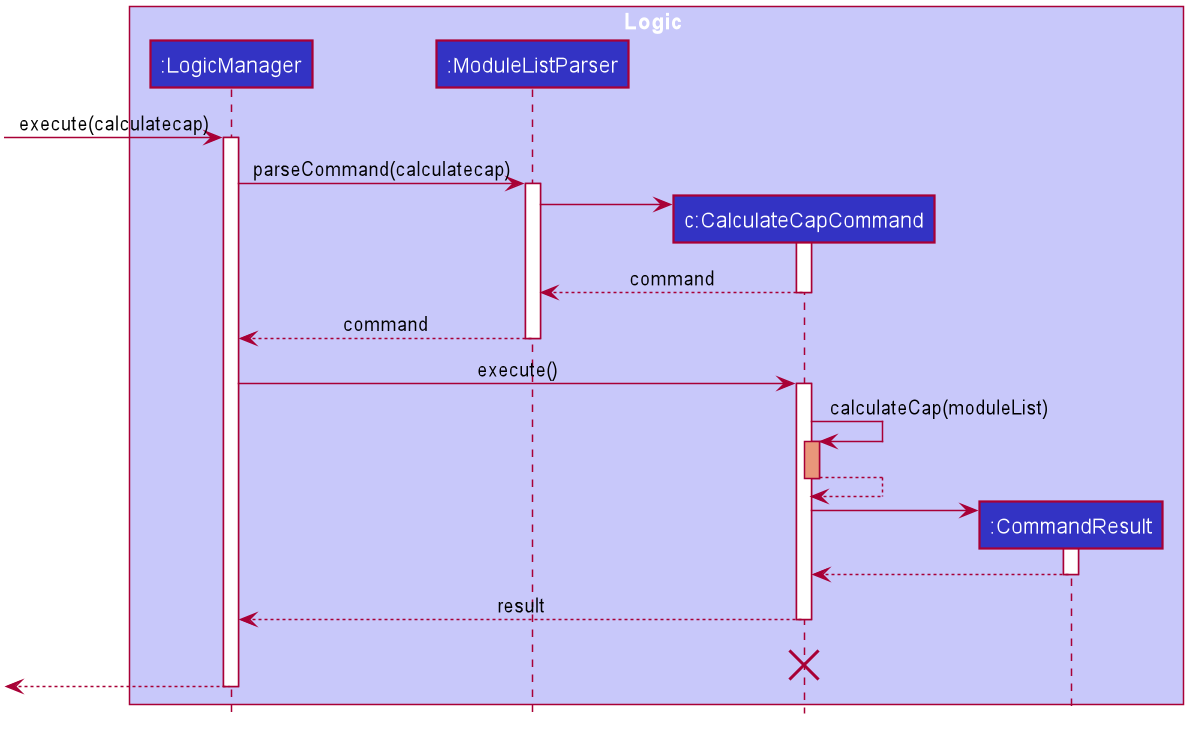
CalculateCapCommand
should end at the destroy marker (X) but due to a limitation of PlantUML, the lifeline reaches the end of diagram.
Design consideration:
Aspect: Information used to calculate cap
- Alternative 1 (current choice): Calculates based on academic information on mods tagged as completed.
- Pros : Easy to implement.
- Cons : User has to manually input every module to be used as data for calculation.
- Alternative 2 : Prompts user for academic information used for last calculated cap and stores it.
- Pros :
- User does not need to input unnecessary modules.
- Will use less memory.(e.g Modules that the user is not currently taking does not need to be added by user).
- Cons : Will require additional storage.
Calculate target CAP details Feature
The calculate CAP function is facilitated by TargetCapCalculatorCommand. It extends Command. Additionally, it implements the following operations:
-
TargetCapCalculatorCommand#calculateCapNeeded()- Calculates CAP needed for planned modules for user to achieve input target CAP using data from modules in currentModuleListand archivedModuleList.
The following sequence diagram shows how the target cap operation works:
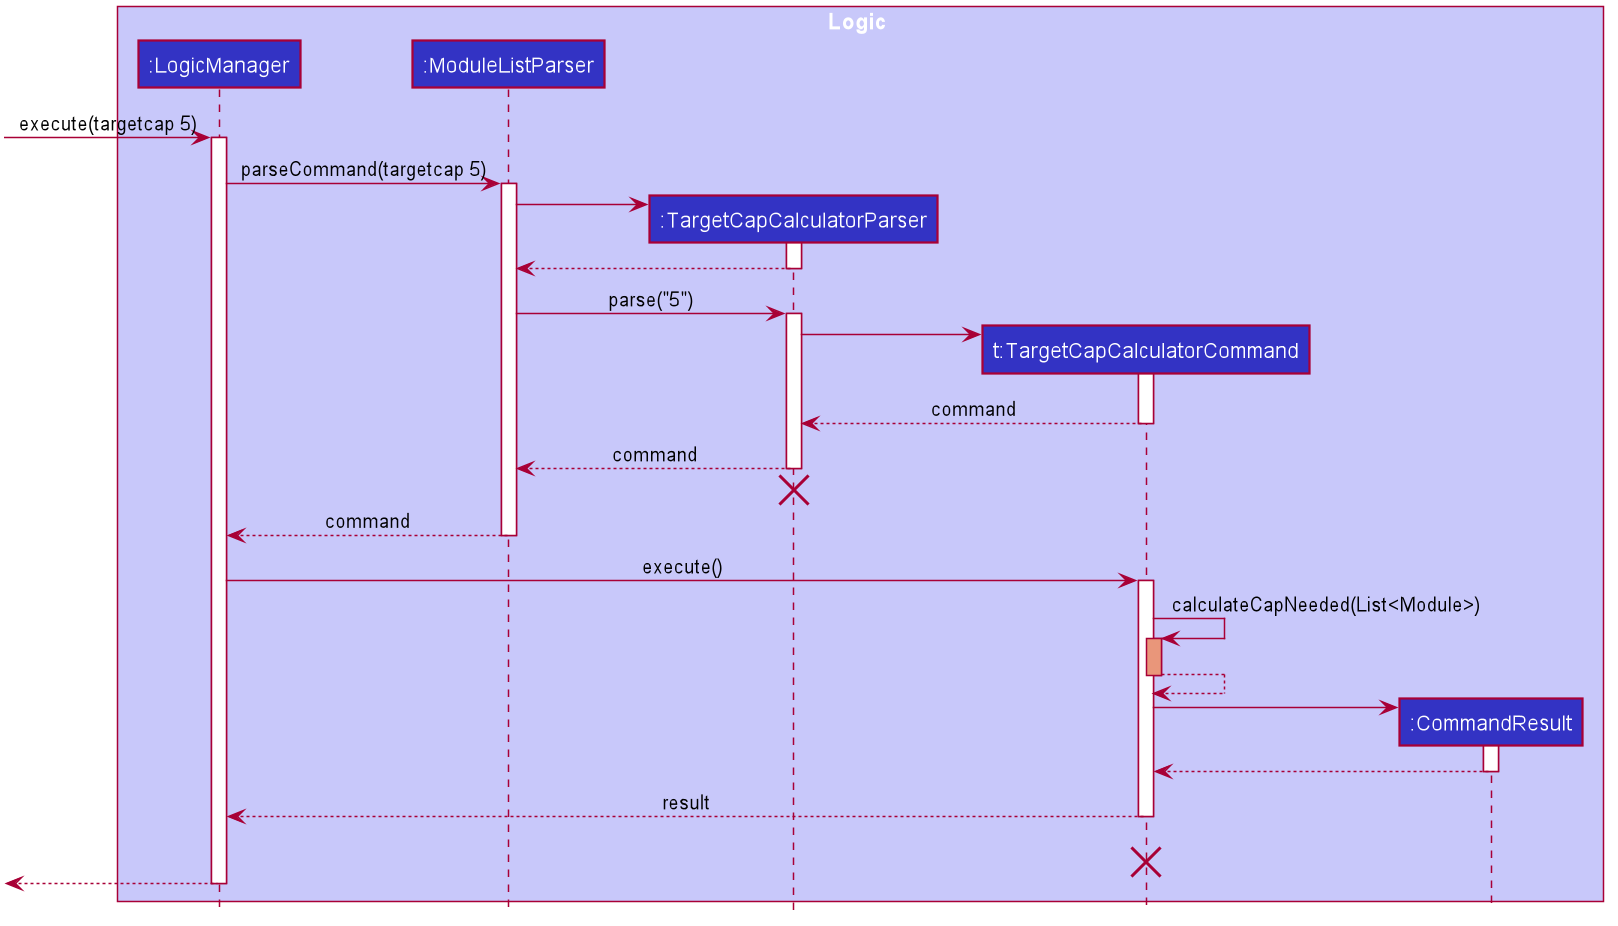
CalculateCapCommand
should end at the destroy marker (X) but due to a limitation of PlantUML, the lifeline reaches the end of diagram.
Module zoom link management feature
As Cap 5 Buddy is designed to be a module tracking application for SoC students, it is crucial to design features which allows efficient management of zoom links which are widely used by modules during online learning. However, it is worth noting that these features can be easily modified to manage any website links, showcasing the usefulness of these features for tracking module related details beyond online learning.
The section below provides details of the implementation of each zoom link related function and design considerations of these features.
Details of implementation
Add zoom link feature
This feature creates and adds a new ZoomLink for a ModuleLesson into a specific Module, if the
ZoomLink does not already exist in the module. Each ModuleLesson in a Module is only allowed to have one ZoomLink.
This feature is facilitated by the following classes:
-
AddZoomLinkParser:- It implements
AddZoomLinkParser#parse()to validate and the parse the module index and zoom link details, and creates aZoomDescriptorobject.
- It implements
-
ZoomDescriptor:- It stores and encapsulates the
ZoomLinkandModuleLessonobjects which will be added to the specifiedModule
- It stores and encapsulates the
-
AddZoomLinkCommand:- It implements
AddZoomLinkCommand#execute()which executes the addition of theZoomLinkand its correspondingModuleLessoninto theModuleencapsulated inModel
- It implements
Given below is an example usage scenario and how the mechanism for adding zoom links behaves at each step:
Step 1. LogicManager receives the user input addzoom 1 n/Lecture z/https://nus-sg.zoom.us/link from Ui
Step 2. LogicManager calls ModuleListParser#parseCommand() to create an AddZoomLinkParser
Step 3. Additionally, ModuleListParser will call the AddZoomLinkParser#parse() method to parse the command arguments
Step 4. This creates an AddZoomLinkCommand using a ZoomDescriptor object that encapsulates the ZoomLink and ModuleLesson to be added
Step 5. AddZoomLinkCommand#execute() will be invoked by LogicManager to create
the updated Module with the added ZoomLink and ModuleLesson by calling the Module#addZoomLink() method
Step 5. The Model#setModule() operation exposed in the Model interface is invoked to replace the target module with the updated module containing the newly added zoom link
Step 6. A CommandResult from the command execution is returned to LogicManager
Given below is the sequence diagram of how the operation to add a zoom link works:
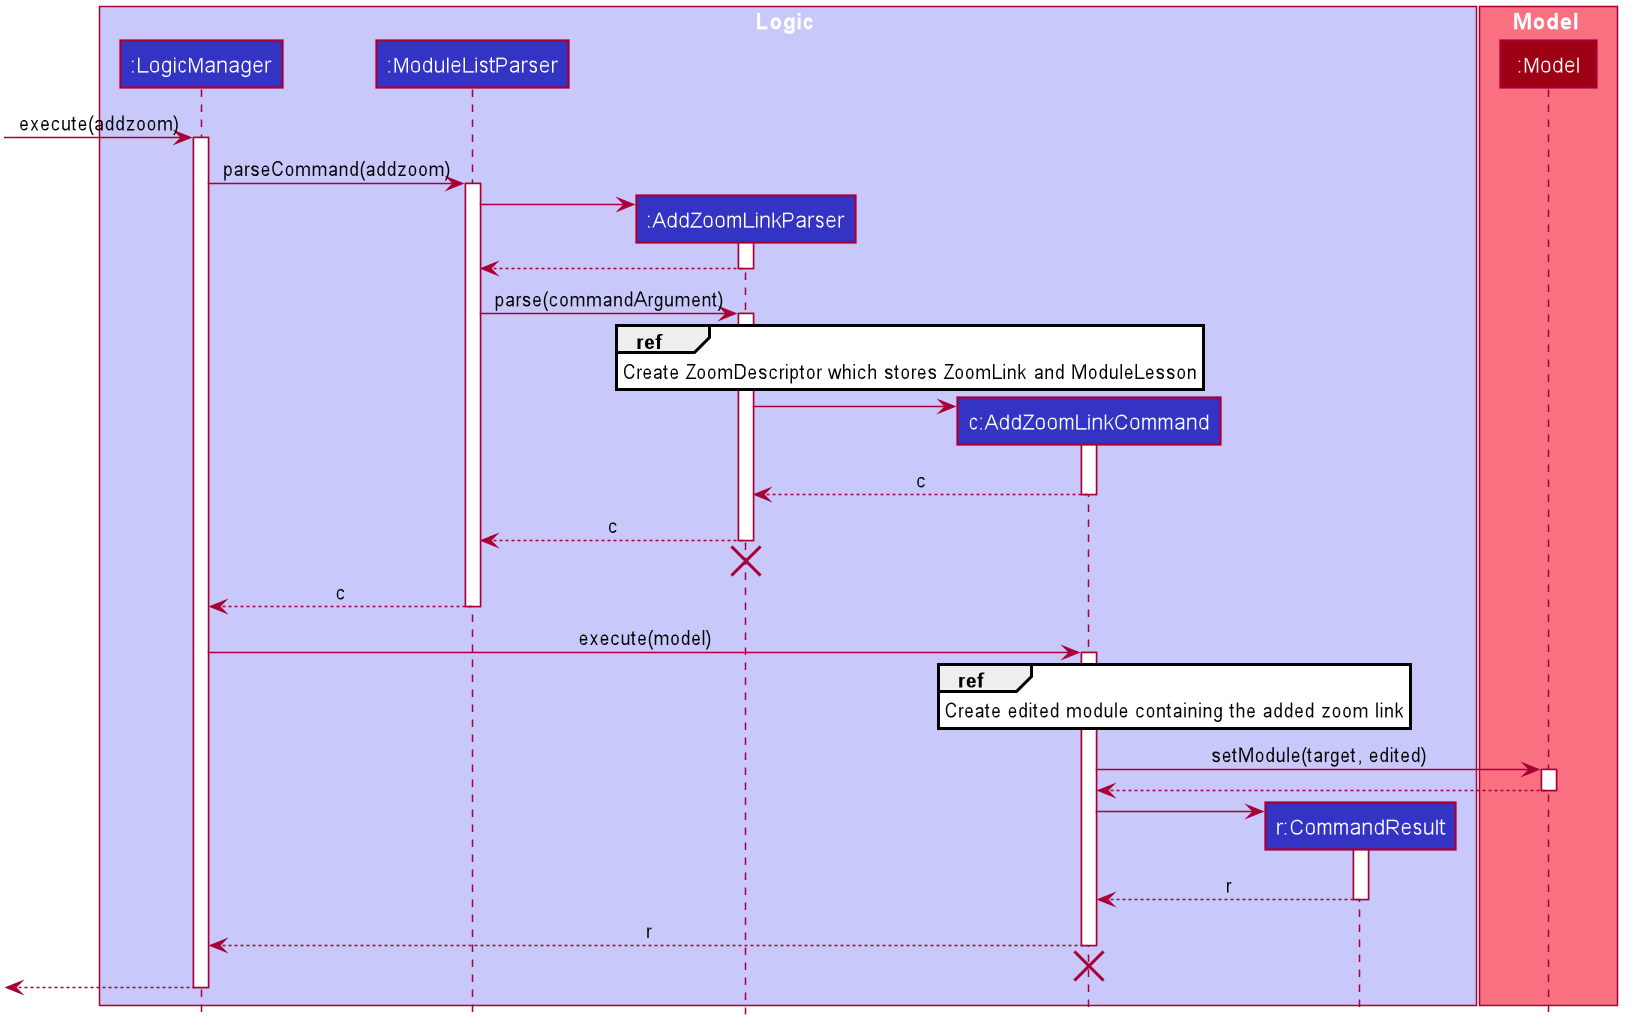 Fig 3.1.4 Sequence diagram for the execution of
 AddZoomLinkCommand
AddZoomLinkCommand and AddZoomLinkParser should end
at the destroy marker (X) but due to a limitation of PlantUML, the lifeline reaches the end of diagram.
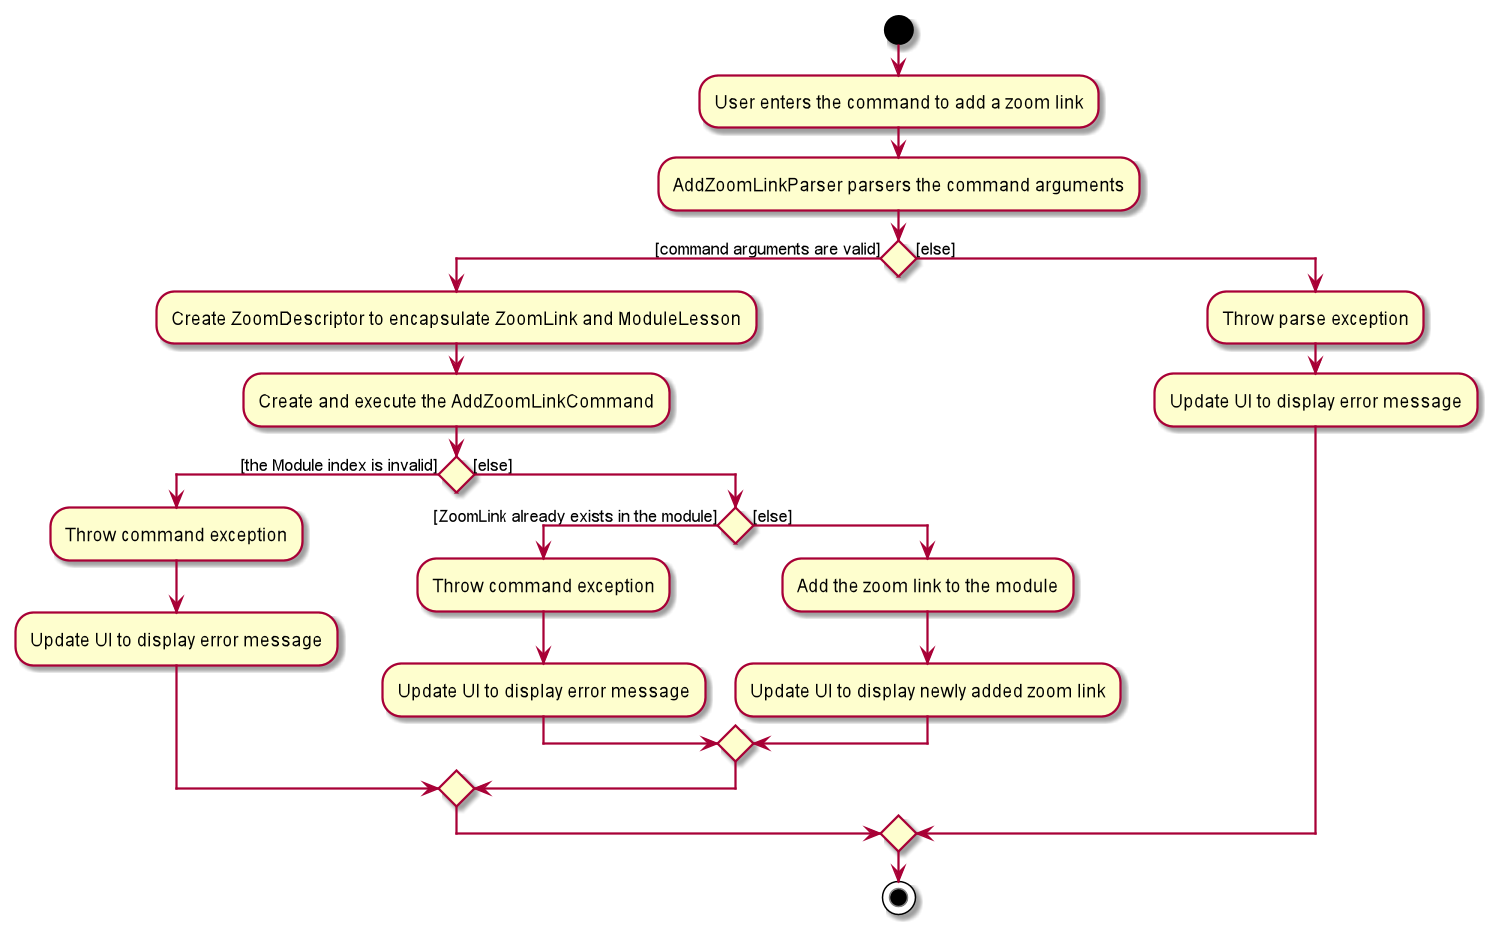
The following activity diagram summarizes what happens when a user executes the AddZoomLinkCommand:
Design consideration:
Aspect: How to encapsulate zoom links and module lesson fields
-
Alternative 1: Store zoom link and module lesson as strings
- Pros: Easier to implement as we do not need to create extra classes to encapsulate these objects.
- Cons: Does not adhere to OOP principles as higher level classes such as
Parserneed to be aware of lower level details, such as the regular expression of a zoom link.
-
Alternative 2 (current choice): Create classes to represent
ZoomLinkandModuleLessonobjects- Pros: Adheres strongly to OOP principles as we are able to abstract out the lower level details of
ZoomLinkandModuleLessoninto their respective classes. We will be able to better demonstrate the behaviour of the respectiveZoomLinkandModuleLessonobjects. It facilitates future development of the project if zoom link or module lesson were to have certain states or behaviour that have to be implemented. - Cons: Additional classes have to be implemented to encapsulate zoom link and module lesson. These classes may appear to be unnecessary since zoom link and module lesson do not currently have significant states or behaviour.
- Pros: Adheres strongly to OOP principles as we are able to abstract out the lower level details of
Alternative 1 was chosen since it followed OOP principles which is a good practice in a SE project. Also, it provides greater flexibility for expansion of the project.
Delete zoom link feature
This feature deletes an existing ZoomLink from a Module using the ModuleLesson that is mapped to the
target ZoomLink.
This feature is facilitated by the following classes:
-
DeleteZoomLinkParser:- It implements
DeleteZoomLinkParser#parse()to validate and parse the module index and module lesson provided by the user.
- It implements
-
DeleteZoomLinkCommand:- It implements
DeleteZoomLinkCommand#execute()to delete theZoomLinkfrom theModuleusing the uniqueModuleLessonthat is mapped to the target zoom link.
- It implements
Given below is an example usage scenario and how the mechanism for deleting zoom links behaves at each step:
Step 1. LogicManager receives the user input deletezoom 1 n/Lecture from Ui
Step 2. LogicManager calls ModuleListParser#parseCommand() to create a DeleteZoomLinkParser
Step 3. Additionally, ModuleListParser will call the DeleteZoomLinkParser#parse() method to parse the command arguments
Step 4. This creates a DeleteZoomLinkCommand and DeleteZoomLinkCommand#execute() will be invoked by LogicManager
Step 5. This deletes the target zoom link identified by its unique module lesson using the Module#deleteZoomLink() method
Step 6. The Model#setModule() operation exposed in the Model interface is invoked to replace the target module with the updated module
Step 7. A CommandResult from the command execution is returned to LogicManager
Design consideration:
Aspect: Limit on the number of zoom links that can be mapped to each module lesson
-
Alternative 1 (current choice): Each
ModuleLessoncan only be mapped to a singleZoomLink- Pros: The execution of a zoom link command is less complicated as each zoom link is uniquely identified by its module lesson. The implementation of the command is easier as we only need to identify the correct module lesson and remove the key value pair from the hashmap.
- Cons: Creates a restriction for users as they are only allowed to add one zoom link for each module lesson.
-
Alternative 2: Each
ModuleLessoncan be mapped to multipleZoomLinks- Pros: This creates more freedom and flexibility for users to add multiple zoom links for the same lesson.
- Cons: Locating the specific zoom link to remove is tedious as we have to iterate through the list of zoom links that are mapped to the module lesson. Additionally, we need to implement a mechanism to allow users to specify the exact zoom link to be deleted since using the module lesson is not sufficient.
Alternative 1 was chosen as it was significantly simpler to implement and did not violate any key design principles. We also took into consideration the fact that it is unlikely for a single lesson to have multiple zoom links.
Edit zoom link feature
This feature edits an existing zoom link in a module using the module lesson that is mapped to the target zoom link.
This feature is facilitated by the following classes:
-
EditZoomLinkParser:- It implements
EditZoomLinkParser#parse()to validate and parse the module index, module lesson and edited zoom link provided by the user. This creates aZoomDescriptorobject that encapsulates the zoom link details needed for the edit zoom link command.
- It implements
-
ZoomDescriptor- It stores and encapsulates the
ZoomLinkandModuleLessonobjects which will be used to execute the command to edit the zoom link
- It stores and encapsulates the
-
EditZoomLinkCommand:- It implements
EditZoomLinkCommand#execute()which edits the target zoom link in the specified module encapsulated inModel
- It implements
Given below is an example usage scenario and how the mechanism for editing zoom links behaves at each step:
Step 1. LogicManager receives the user input editzoom 1 n/Lecture z/https://nus-sg.zoom.us/newLink from Ui
Step 2. LogicManager calls ModuleListParser#parseCommand() to create an EditZoomLinkParser
Step 3. Additionally, ModuleListParser will call the EditZoomLinkParser#parse() method to parse the command arguments
Step 4. This creates an EditZoomLinkCommand using a ZoomDescriptor object that encapsulates the edited zoom link
Step 5. EditZoomLinkCommand#execute() will be invoked by LogicManager to create
the updated Module with the edited ZoomLink by calling the Module#editZoomLink() method
Step 5. The Model#setModule() operation exposed in the Model interface is invoked to replace the target module with the updated module containing the edited zoom link
Step 6. A CommandResult from the command execution is returned to LogicManager
The sequence diagram of how the operation to edit a zoom link works is similar to the one in figure 3.3,
except that the respective parser and command classes are EditZoomLinkParser and EditZoomLinkCommand
Design consideration:
Aspect: How to implement the command to edit zoom link
-
Alternative 1: Reuse the same
ParserandCommandclasses used by theAddZoomLinkcommand to implement theEditZoomLinkcommand at the same time since the two commands have very similar implementations.- Pros: Reduces the amount of code that has to be written, as well as the number of classes that have to be implemented.
- Cons: Violates the Single Responsibility Principle since the same parser and command class have 2 separate responsibilities and have to perform 2 different operations.
-
Alternative 2 (current choice): Implement the
EditZoomLinkcommand separately.- Pros: Adheres to the Single Responsibility Principle and it is easier to implement the function since we do not need to handle 2 separate commands in the same parser and command classes.
- Cons: Repetition of code may occur.
Alternative 2 was chosen since it was a good practice to follow key designing principles. Using alternative 1 would complicate the implementation of the command since we had to handle 2 different commands within the same class and this can increase the difficulty of testing and debugging.
Aspect: Data structure to support zoom link commands
-
Alternative 1 (current choice): Use a
HashMapto store module lesson and zoom links in a module. Each module lesson will be used as a key which is mapped to a zoom link.- Pros: Checking for duplicate zoom links will be simpler.
- Cons: Zoom links can only be uniquely identified by their module lesson. Any operation involving zoom link objects would require the module lesson that the zoom link is mapped to.
-
Alternative 2: Encapsulate a zoom link object as a field of module lesson and use a
HashSetto store module lesson objects.- Pros: It is easy to check for duplicate module lessons.
- Cons: It is tedious to check for duplicate zoom links as we have to access the zoom link field of each module lesson in the hashset.
-
Alternative 3: Encapsulate a zoom link object as a field of module lesson and use an
ArrayListto store module lesson objects.- Pros: It is easy to identify module lessons by index. Users can provide the index of the module lesson for zoom link commands, which is simpler compared to providing the module lesson name.
- Cons: The process of checking for duplicate module lessons and zoom links in the module is more tedious.
Alternative 1 was chosen since checking for duplicate zoom links occurs frequently during the execution of zoom link related commands.
Contact list management feature
As a module tracking system, Cap 5 Buddy allows users to manage a list of module-related contacts with ease. This is especially important since being enrolled in numerous modules can result in the need to keep track of numerous contacts, each with different contact details.
The section below provides details of the implementation of each Contact List function and design considerations of these features.
Contact list features
Below is a list of all Contact related features:
- Add a contact: Adds a new contact into the contact list
- Delete a contact: Deletes a pre-existing contact from the contact list
- Edit a contact: Edits a pre-existing contact in the contact list
- Find a contact: Search for contacts using different search parameters
- Mark a contact as important:
- Sort the contact list:
- List out all contacts in the contact list
- Clear the contact list
Given below is the class diagram of the Contact class:
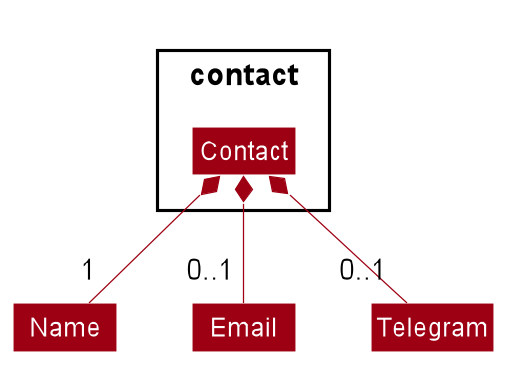
Figure ?.? Class Diagram for Contact class
Details of implementation
Add contact feature
This feature creates and adds a new Contact into the contact list if the contact does not already exist.
This feature is facilitated by the following classes:
-
AddContactParser:- It implements
AddContactParser#parse()to parse and validate the user arguments to create a newContact.
- It implements
-
AddContactCommand:- It implements
AddContactCommand#execute()which executes the addition of the new contact intoModel.
- It implements
Given below is an example usage scenario and how the mechanism for adding contact behaves at each step:
Step 1. LogicManager receives the user input addcontact n/John e/john@gmail.com te/@johndoe from Ui
Step 2. LogicManager calls ContactListParser#parseCommand() to create an AddContactParser
Step 3. Additionally, ContactListParser will call the AddContactParser#parse() method to parse the command arguments
Step 4. This creates an AddContactCommand and AddContactCommand#execute() will be invoked by LogicManager to excecute the command to add the contact
Step 5. The Model#addContact() operation exposed in the Model interface is invoked to add the new contact
Step 6. A CommandResult from the command execution is returned to LogicManager
Given below is the sequence diagram of how the operation to add a contact works:
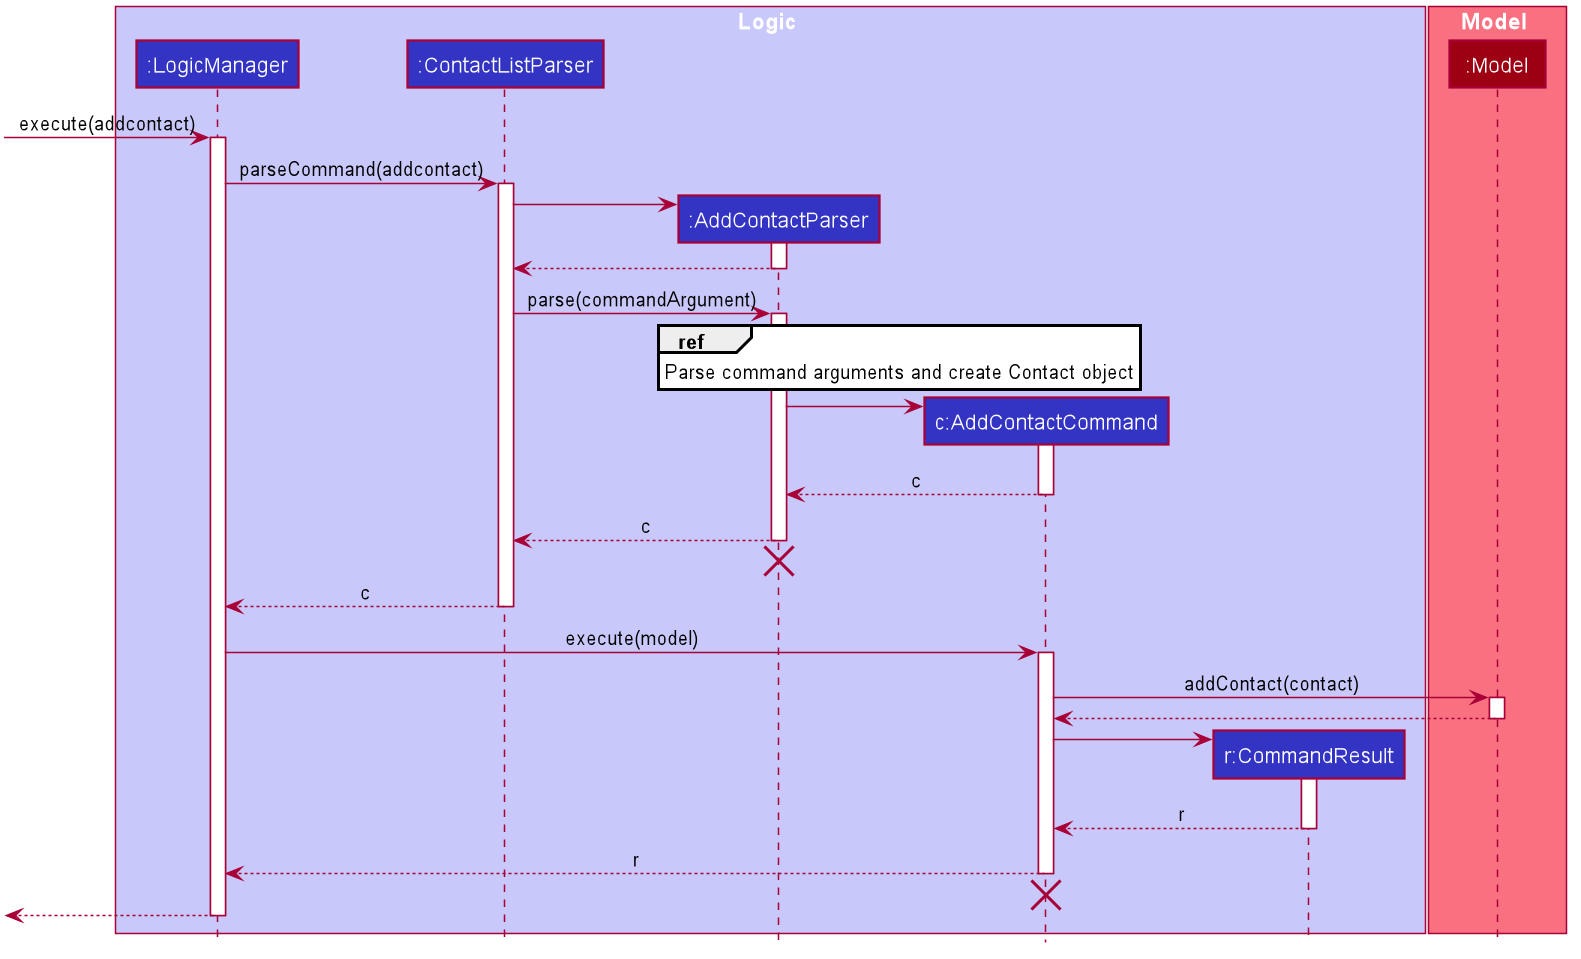 Figure ?.? Sequence diagram for the execution of
 AddContactCommand
AddContactCommand and AddContactParser should end
at the destroy marker (X) but due to a limitation of PlantUML, the lifeline reaches the end of diagram.
The following activity diagram summarizes what happens when a user executes AddContactCommand:
 Figure ?.? Activity diagram representing the execution of
 AddContactCommand
Design consideration:
Aspect: Require users to provide all contact fields when adding a new contact
-
Alternative 1 (current choice): Require
ContactNameandEmailto be mandatory fields that must be provided, while leavingTelegramas an optional field- Pros: This caters to certain contacts who do not have a
Telegramfield, providing more flexibility for users when creating contacts. - Cons: This implementation of contact related methods can become complicated since we need to consider if the
Telegramfield of a contact is present before any operation is performed.
- Pros: This caters to certain contacts who do not have a
-
Alternative 2: Require
ContactName,EmailandTelegramto be mandatory fields- Pros: The process of checking if 2 contacts are the same by comparing all 3 contact fields will be simpler.
- Cons: This can create problems for users who want to add a contact that does not have a suitable
Telegramfield
Alternative 1 was chosen since it provides users with greater freedom when creating contacts. Enforcing all contact fields to be mandatory can restrict users when adding contacts, hindering user experience.
Delete Contact Feature
The delete contact feature deletes a pre-existing Contact using the index of the contact on the displayed contact list.
This feature is facilitated by the following classes:
-
DeleteContactParser:- It implements
DeleteContactParser#parse()to parse and validate the contact index
- It implements
-
DeleteContactCommand:- It implements
DeleteContactCommand#execute()to delete theContactfromModel
- It implements
Given below is an example usage scenario and how the mechanism for deleting contact behaves at each step:
Step 1. LogicManager receives the user input deletecontact 1 from Ui
Step 2. LogicManager calls ContactListParser#parseCommand() to create a DeleteContactParser
Step 3. Additionally, ContactListParser will call the DeleteContactParser#parse() method to parse the command arguments
Step 4. This creates a DeleteContactCommand and DeleteContactCommand#execute() will be invoked by LogicManager to delete the target contact
Step 5. The Model#deleteContact() operation exposed in the Model interface is invoked to delete the target contact from Model
Step 6. A CommandResult from the command execution is returned to LogicManager
Given below is the sequence diagram of how the operation to delete a contact works:

Design consideration:
Aspect: Mechanism to delete contacts
-
Alternative 1 (current choice): Delete a contact based on its index in the displayed contact list
- Pros: Using the contact index allows us to uniquely identify the target contact to delete, reducing the room for possible error
- Cons: The target contact which the user wants to delete might not be displayed on the contact list and hence the contact index might not be readily available. This can inconvenience users who have to search for the contact to retrieve the contact index.
-
Alternative 2: Delete a contact using the contact name
- Pros: It can make the deletion process simpler for users who can provide the name of the contact without having to execute more commands.
- Cons: This can complicate the deletion process since contacts with the same name is a possibility. If there are multiple contacts with the same provided name, more information of the target contact has to be provided by the user, creating more inconvenience for the user as well.
Alternative 1 was chosen since it guarantees a unique contact would be provided in every case. This ensures that the target contact can be accurately identified and deleted, minimising the room for potential errors or bugs.
Edit Contact Feature
The edit contact feature edits a pre-existing contact in the contact list using contact details provided by the users. This feature is facilitated by the following classes:
-
EditContactParser:- It implements
EditContactParser#parse()to parse and validate the provided contact details and contact index
- It implements
-
EditContactDescriptor:- It encapsulates the contact details which will be used to edit the target contact
-
EditContactCommand:- It implements
EditContactCommand#execute()to edit the contact inModel
- It implements
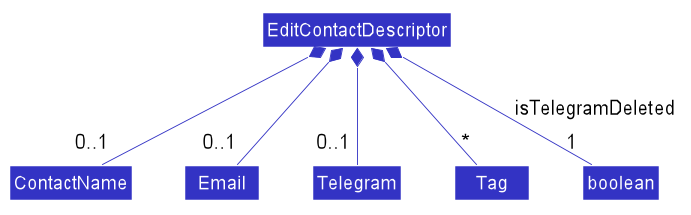 Fig ?.? Class diagram describing the
 EditContactDescriptor class
Given below is an example usage scenario and how the mechanism for editing contact behaves at each step:
Step 1. LogicManager receives the user input editcontact 1 n/John te/@johndoe from Ui
Step 2. LogicManager calls ContactListParser#parseCommand() to create an EditContactParser
Step 3. Additionally, ContactListParser will call the EditContactParser#parse() method to parse the command arguments
Step 4. This creates an EditContactCommand and EditContactCommand#execute() will be invoked by LogicManager to edit the target contact
Step 5. The Model#setContact() operation exposed in the Model interface is invoked to replace the target contact with the edited contact
Step 6. A CommandResult from the command execution is returned to LogicManager
Given below is the sequence diagram of how the operation to edit a contact works:
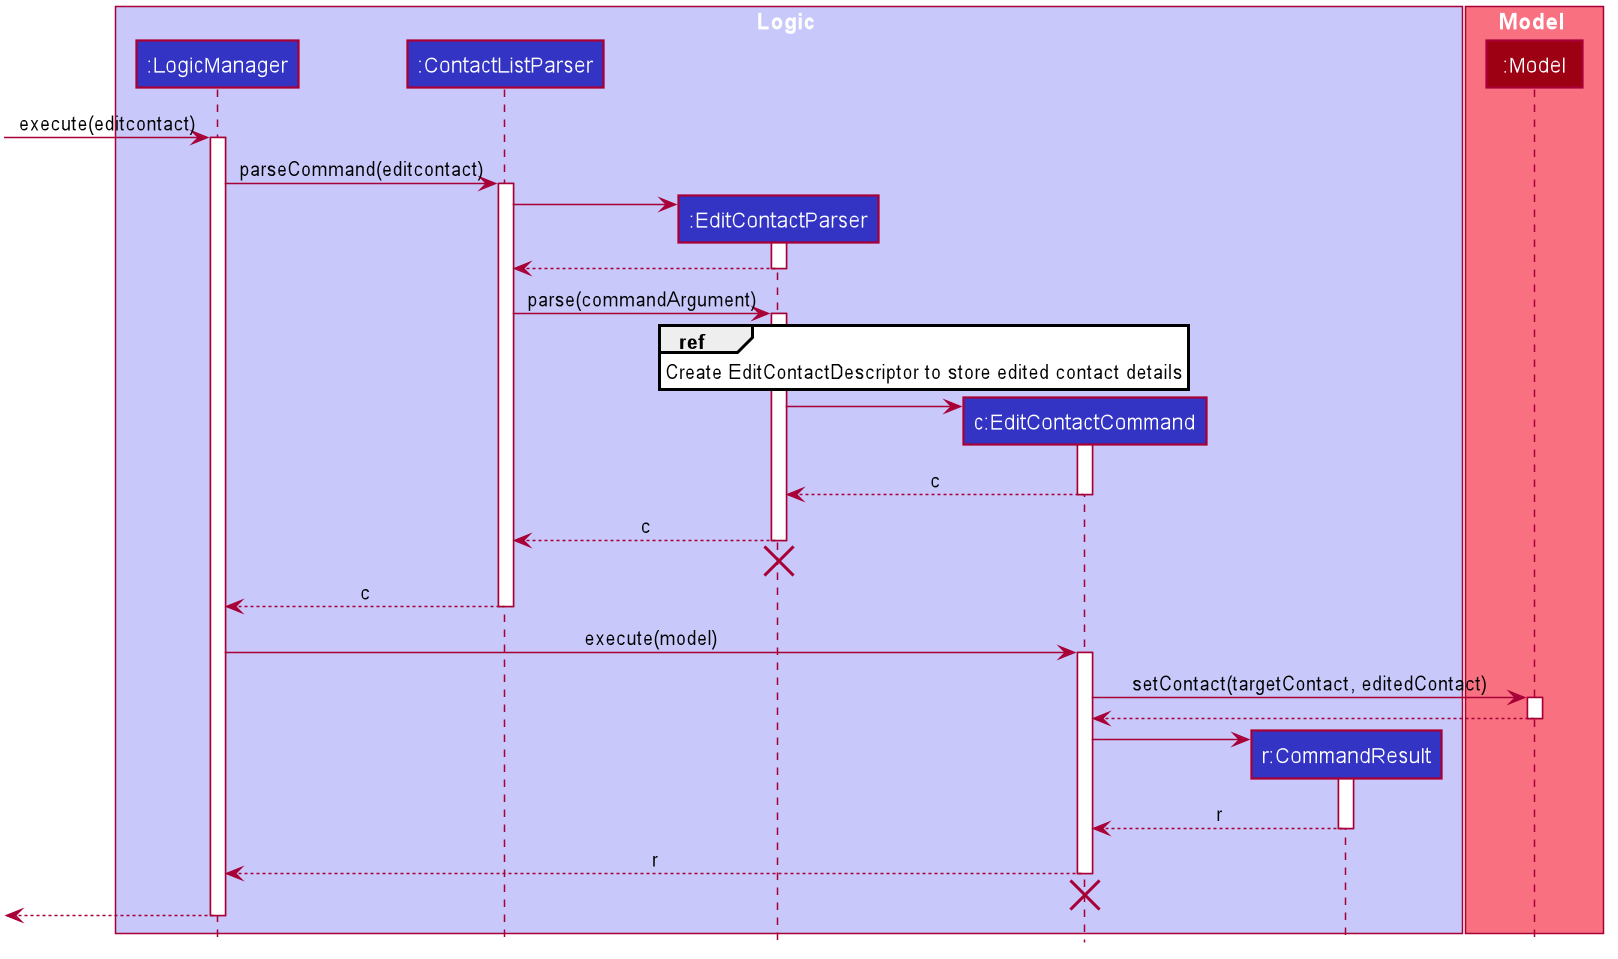
AddContactCommand and AddContactParser should end
at the destroy marker (X) but due to a limitation of PlantUML, the lifeline reaches the end of diagram.
The following activity diagram summarizes what happens when a user executes EditContactCommand:
 Fig ?.? Activity diagram for the execution of
 EditContactCommand
Design consideration:
Aspect: How to encapsulate the edited contact details and relay this information to EditContactCommand
-
Alternative 1 (current choice): Encapsulate all edited contact details in a class
EditContactDescriptor- Pros: Reduces the complexity of the
EditContactCommandclass constructor as the number of parameters for the constructor is constant. It also reduces the level of coupling betweenEditContactCommandandEditContactParser - Cons: Additional method calls are require to store the edited contact details in
EditContactDescriptorclass.
- Pros: Reduces the complexity of the
-
Alternative 2: Provide the edited contact details as arguments for the
EditContactCommandconstructor- Pros: Fewer method calls are required since
EditContactParsercan directly pass the edited contact arguments to theEditContactCommandconstructor - Cons: This can increase data coupling between
EditContactParserandEditContactCommandwhich can cause unnecessary changes in either class if the other class were to change.
- Pros: Fewer method calls are required since
Alternative 1 was chosen as it would make future changes to any class easier and less error-prone, hence increasing the ease of maintenance, since there was less coupling between the 2 classes.
Aspect: How to implement EditContactCommand
-
Alternative 1 (current choice): Implement a separate
EditContactCommandwithout reusing other command classes- Pros: Reduces coupling between the command classes and
EditContactCommandcan be implemented without restrictions, or a need to consider how it might affect the other command classes - Cons: Additional methods have to be implemented to replace the target contact with the edited contact
- Pros: Reduces coupling between the command classes and
-
Alternative 2: Reuse
DeleteContactCommandto delete the target contact andAddContactCommandto add the edited contact- Pros: Reusing other commands would make the implementation of
EditContactCommandsimpler and more straightforward - Cons: It increases coupling between the 3 commands and this can cause issues to
EditContactCommandif eitherDeleteContactCommandorAddContactCommanddeveloped bugs or errors. Also, it might affect performance since executingEditContactCommandwill execute 2 other commands.
- Pros: Reusing other commands would make the implementation of
Alternative 1 was chosen since it gave more freedom in regard to the implementation of EditContactCommand since
we were not restricted to reusing other commands. Less coupling between the classes meant that changes in one class would
less likely require changes to other classes.
Find Contact Feature
The find contact feature is important since sieving through all contacts to search for a specific contact can be tedious and not user-friendly. Finding contacts using one search parameter is not meaningful as the search results might not be refined and accurate.
The find contact feature searches for contacts using 2 parameters: contact name and/or tag. For each search parameter, contacts have to match at least one keyword to fulfil that search criteria. If multiple parameters are provided, e.g both name and tag keywords, only contacts that fulfil both the name and tag criteria are returned.
This feature is facilitated by the following classes:
-
FindContactParser:- It implements
FindContactParser#parse()to parse and validate the user input - It creates predicate objects using the command arguments and adds them to the list of predicates in
FindContactCriteria - It implements
FindContactParser#isAtLeastOnePrefixPresent()to validate that at least one search parameter was provided by the user
- It implements
-
FindContactCriteria:- It encapsulates all the predicates which will be used to test for matching contacts
- It implements the following operations:
-
FindContactCriteria#addPredicate()to add a new predicate into the list of predicates to test for matching contacts -
FindContactCriteria#getFindContactPredicate()to compose all the predicates into a single predicate
-
- Predicate objects that can be stored in
FindContactCriteria:-
ContactNameContainsKeywordsPredicate:- Tests if the name of a given contact matches at least one of the name keywords provided (case-insensitive)
-
ContactContainsTagsPredicate:- Tests if a given contact contains at least one of the search tags provided (case-insensitive)
-
-
FindContactCommand:- It implements
FindContactCommand#execute()to find all matching contacts by updating the filtered contact list inModelusing the predicate fromFindContactCriteria
- It implements
Given below is an example usage scenario and how the mechanism for finding contact behaves at each step:
Step 1. LogicManager receives the user input findcontact n/John t/friend from Ui
Step 2. LogicManager calls ContactListParser#parseCommand() to create a FindContactParser
Step 3. Additionally, ContactListParser will call the FindContactParser#parse() method to parse the command arguments
Step 4. This creates a FindContactCriteria that encapsulates the created Predicate objects to test for matching contacts
Step 4. Additionally, a FindContactCommand is created and FindContactCommand#execute() will be invoked by LogicManager to find matching contacts
Step 5. The Model#updateFilteredContactList() operation exposed in the Model interface is invoked to update the displayed contact list
using the predicate from FindContactCriteria
Step 6. A CommandResult from the command execution is returned to LogicManager
Given below is the sequence diagram of how the operation to find contact works:

AddContactCommand and AddContactParser should end
at the destroy marker (X) but due to a limitation of PlantUML, the lifeline reaches the end of diagram.
Given below is the sequence diagram showing the interaction between FindContactParser and FindContactCriteria:

Design consideration:
Aspect: Storing of predicates in FindContactCriteria
-
Alternative 1 (current choice): Store the predicates as a list of predicates
- Pros: Composing the predicates into a single predicate is easier as we can simply iterate through the list and compose all the predicates.
- Cons: Using a list means that the exact predicate objects in the list are not known. This can make testing and
debugging more complicated. Moreover, we need to enforce checks on the predicate ensure that
null objects, which can cause
NullPointerExceptionto be thrown, are not added.
-
Alternative 2: Store each predicate object as an individual field of
FindContactCriteria- Pros: Facilitates easier testing as we can accurately determine which predicate objects are present.
- Cons: It is tedious to compose the predicates into a single predicate as we have to check each individual field and determine if it is null of if the predicate exists.
Aspect: How to implement FindContactCommand
-
Alternative 1 : Implement separate find contact commands for each possible search parameter. In this case, to find contacts,
we can create a command to find contacts by name, and another to find by tags.
- Pros: Implementation of the commands would be more straightforward, as only one predicate has to be created for each
find contact command. The
FindContactCriteriaclass to store all the predicates would not be necessary in this case. - Cons: This can increase the number of different find contact commands which can cause confusion for users. Additionally, this can lead to repetitive code since the implementation of each find contact command would be similar.
- Pros: Implementation of the commands would be more straightforward, as only one predicate has to be created for each
find contact command. The
-
Alternative 2 (current choice): Implement a single
FindContactCommandwhich can search for contacts using all the possible search parameters. All the predicates needed to test for matching contacts would be encapsulated inFindContactCriteria- Pros: Reduces the need for multiple find contact commands with similar implementations. Users can make more refined and accurate searches by combining multiple search parameters.
- Cons: Increases the complexity of implementing
FindContactParserwhich has to validate and parse multiple search parameters provided.
Sort Contacts Feature
The sort contact feature allows the user to sort the contacts based on name lexicographically from the lowest to the highest value.
In addition this feature also supports the operation of reversing the list. The order will be the opposite of the order given above.
This feature is facilitated by the following classes:
-
SortContactParser:- It implements
SortContactParser#parse()to parse and validate the user input - It creates comparator objects using the command arguments and reversing it if necessary
- It implements
-
SortContactCommand:- It implements
SortContactCommand#execute()to sort theContactListinModel - It sorts the
ContactListby invokingModel#updateSortedContactList()
- It implements
-
ContactComparatorByName:- It implements
Comparator#compare()to compare 2 contacts based on their name
- It implements
Given below is an example usage scenario and how the mechanism for sorting contacts behaves at each step:
Step 1. LogicManager receives the user input sortcontact from Ui
Step 2. LogicManager calls ContactListParser#parseCommand() to create a FindContactParser
Step 3. Then, ContactListParser will call the SortContactParser#parse() method to parse the command arguments
Step 4. This creates the ContactComparatorByName based on the command arguments (if it’s reversed or not)
Step 4. Finally, a SortContactCommand is created and SortContactCommand#execute() will be invoked by LogicManager
Step 5. The Model#updateSortedContactList() operation exposed in the Model interface is invoked to update the displayed todo list
by updating the Model#sortedContactList with the new comparator.
Step 6. A CommandResult from the command execution is returned to LogicManager
In addition, if the user wants to reverse order, the ContactComparatorByName will be updated in the SortContactParser#parse()
using the built-in java method Comparator#reversed().
TodoList feature
Brief Overview
We design the TodoList to help the user manage their tasks. It is designed specifically to track the things that the user needs to accomplish. The tracking is quite detailed but still prioritizes user’s freedom and flexibility in managing their task.
TodoList stores all of the user’s tasks in a list that can be seen under Tasks tab in the GUI. Each entry in the list shows the details of a task and some GUI enhancements are also added. Furthermore, TodoList shows some statistics about the user’s tasks to give the user a general overview of how they are doing.
Implementation
The TodoList feature has two main component :
- Containee component (Task-related classes)
-
Task- container class to store information about a task -
TaskName- wrapper class to store the name of a task -
Date- wrapper class to store the date/deadline of a task -
Priority- enum class to represent priority of a task -
Status- enum class to represent the progress status of a task -
LocalDate- built-in class to represent the date creation of the task -
Container component (List-like classes)
-
UniqueTodoList- container class for storing tasks -
TodoList- wrapper class for UniqueTodoList -
ReadOnlyTodoList- interface for displaying the list on the GUI
-
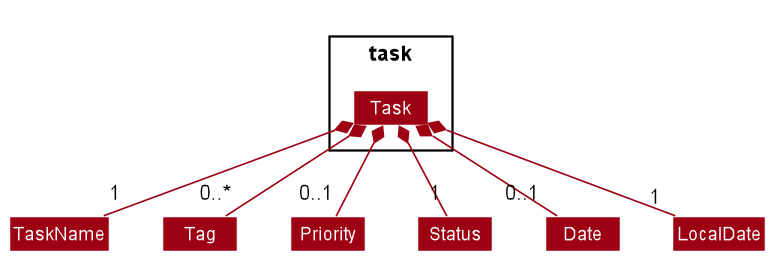
Containee Component
The Task mainly functions as a class to store all the information related to a task which are name, tag, priority,
date, status, and the date created. In particular, this class does not have subclasses.
These fields are optional in the Task class:
-
Tag- represented as empty by an emptyHashSet -
Priority- represented as empty bynull -
Date- represented as empty bynull
The Task class supports the following operations :
- Setters for all the field
- The setter supports immutability for better testing.
- Getters for all the field
- Getter returns an
Optionalobject.
- Getter returns an
-
Task#isSameTask()- checks if two tasks are the same i.e. have the same name (weaker than Task#equals() which requires all the fields to be the same) -
Task#hasSameTag()- checks if the task has the specified tag -
Task#hasSamePriority()- checks if the task has the specified priority -
Task#hasSameDate()- checks if the task has the specified date - The methods that are not mentioned here are used specifically for the GUI.
Container Component
The TodoList class is facilitated by UniqueTodoList. The UniqueTodoList is stored internally inside the TodoList class which act like a wrapper class.
The TodoList class supports the following operations :
-
TodoList#resetData()- replaces all data in TodoList with new data. -
TodoList#hasTask()- checks if the specified task exist in the list. -
TodoList#addTask()- adds a task to the list. -
TodoList#setTask()- replaces a task with the specified task. -
TodoList#removeTask()- removes the specified task from the list.
The operations above are exposed in the Model interface as :
Model#hasTask()Model#addTask()Model#setTask()Model#deleteTask()
TodoList implements ReadOnlyTodoList which require the following operation :
-
ReadOnlyTodoList#getTodoList()- returns an ObservableList with type Task that is immutable, and we cannot modify the elements.
Design Consideration
Aspect: Task type
-
Alternative 1 (current):
Use one concrete class i.e. Task without inheritance involved. The type of the task is represented by the Tag field instead.Pros :
- Easier to implement
- Types are not pre-defined i.e. can simply add a different tag to represent different type of task
Cons :
- All type of task have the same pre-defined field
-
Alternative 2 :
Use one abstract class i.e. Task with inheritance. Each subclasses represent a type of a Task.Pros :
- Difference between type are clear and standardized
- Can be considered more OOP
Cons :
- Types must be pre-defined i.e. cannot add new type of classes without adding codes
Alternative 1 is chosen since we prioritize user freedom to create custom type for the task.
Aspect: Optional fields in Task
-
Alternative 1 (current):
All fields does not need to be compulsory. In other word, the field can be null or empty.Pros :
- Add more flexibility to the user since the nature of specified task might not have some of the required fields.
Cons :
- Harder to implement i.e. need to check if the field is present or not everytime it is used.
- More prone to
NullPointerException
-
Alternative 2:
All fields should be compulsory. In other word, the field cannot be null or empty.Pros :
- Easier to implement
- Avoid getting a
NullPointerExceptionin runtime.
Cons :
- User needs to input all field when creating a task, which might not be convenient.
Alternative 1 is chosen since we prioritize flexibility in inputting details of a task.
Implemented Commands
In general, the commands for TodoList have similar implementation with ModuleTracker.
It extends from an abstract class Command and implements the method execute() to support
polymorphism when executing all the commands.
The details of each command will be explained in the respective sections of each command.
Below are the list of the all the implemented commands for TodoList:
-
AddTaskCommand- add a task to the list -
DeleteTaskCommand- delete a task from the list -
EditTaskCommand- edit a task in the list -
SortTaskCommand- sort the list based on criteria -
FindTaskCommand- find tasks based on keywords -
CompleteTaskCommand- label a task as completed -
ResetTaskCommand- reset task label to not completed -
ClearTaskCommand- clear the list
Add Task Feature
The add task feature is the most fundamental feature in the TodoList as it allows the user to add a task to the list. The implementation is similar compared to the other big feature. In addition, this feature does not allow the user to add duplicate task where 2 tasks are considered to be duplicates (or the same) if they have the exact same name (case-insensitive).
This feature creates and adds a new Task into the TodoList if the task does not already exist.
This feature is facilitated by the following classes:
-
AddTaskParser:- It implements
AddTaskParser#parse()to parse and validate the user arguments to create a newTask.
- It implements
-
AddTaskCommand:- It implements
AddTaskCommand#execute()which executes the addition of the newTaskintoModel.
- It implements
Given below is an example usage scenario and how the mechanism for adding task behaves at each step:
Step 1. LogicManager receives the user input addtask n/Finish Lab Report t/LAB t/CS2100 from Ui
Step 2. LogicManager calls TodoListParser#parseCommand() to create an AddTaskParser
Step 3. Additionally, TodoListParser will call the AddTaskParser#parse() method to parse the command arguments
Step 4. This creates an AddTaskCommand and AddTaskCommand#execute() will be invoked by LogicManager to execute the command to add the Task
Step 5. The Model#addTask() operation exposed in the Model interface is invoked to add the new Task
Step 6. A CommandResult from the command execution is returned to LogicManager
Given below is the sequence diagram of how the operation to add a Task works:
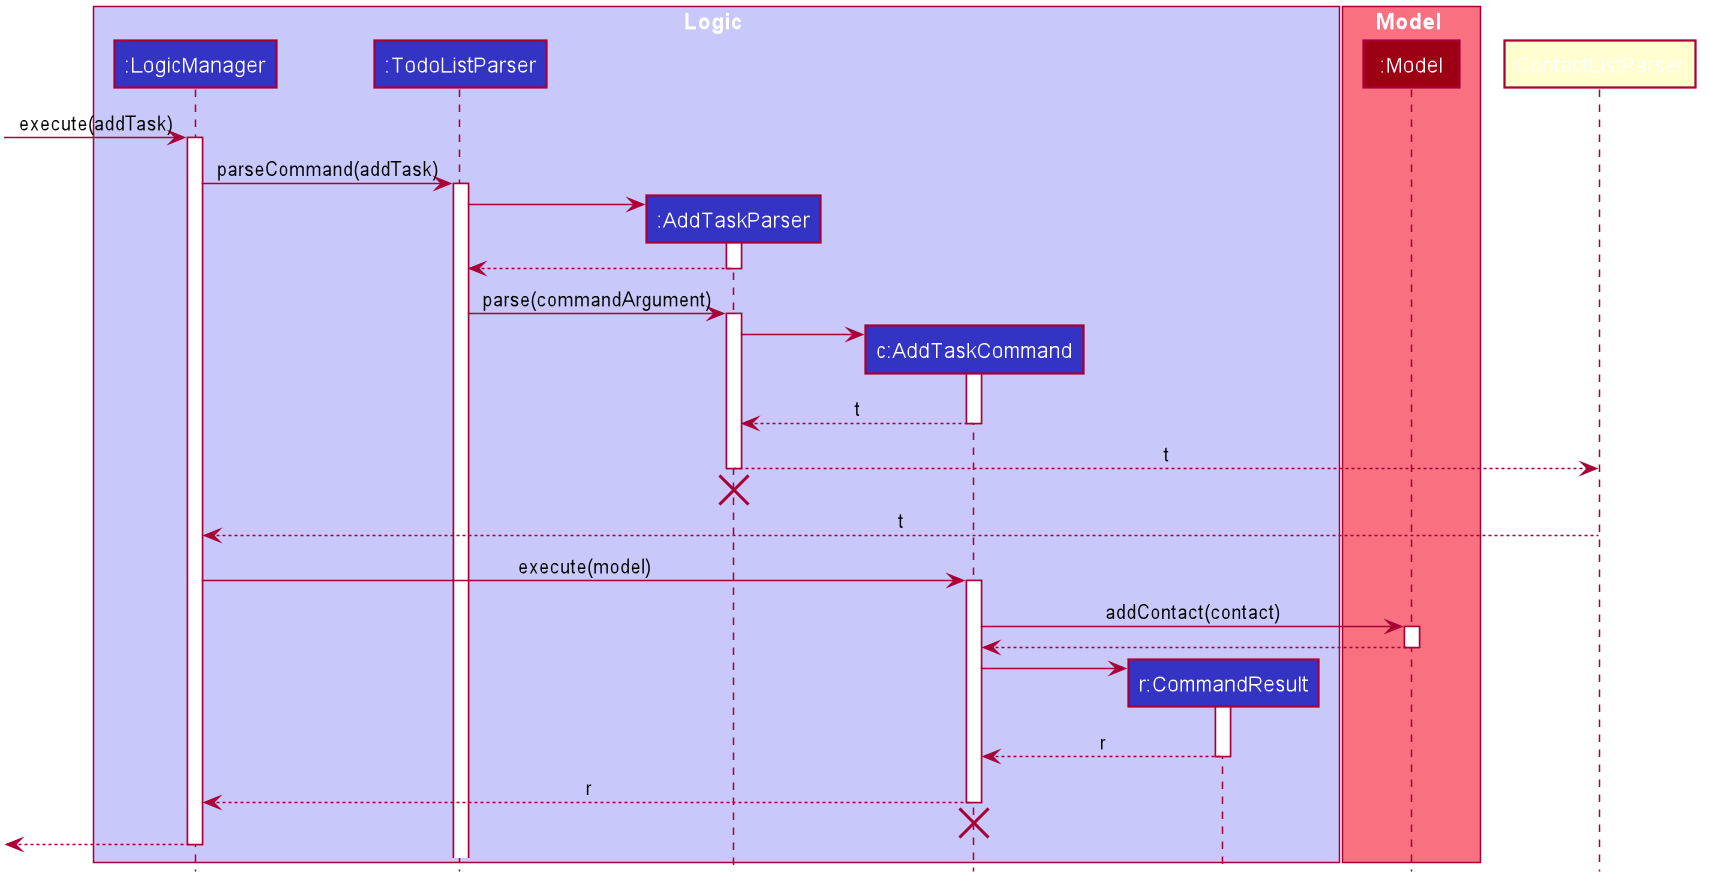 Figure Sequence diagram for the execution of
 AddTaskCommand
AddTaskCommand and AddTaskParser should end
at the destroy marker (X) but due to a limitation of PlantUML, the lifeline reaches the end of diagram.
Delete Task Feature
The delete task feature is a counterpart feature from the previous add task feature. This feature allows the user to delete a task based on the index of the task from the currently displayed list.
This feature deletes an existing task using the index of the Task on the displayed TaskList.
This feature is facilitated by the following classes:
-
DeleteTaskParser:- It implements
DeleteTaskParser#parse()to parse and validate theTaskindex
- It implements
-
DeleteTaskCommand:- It implements
DeleteTaskCommand#execute()to delete theTaskfromModel
- It implements
After the user input has been parsed by DeleteTaskParser, LogicManager will execute the delete operation by invoking
DeleteTaskCommand#execute(). The DeleteTaskCommand#execute() will get the target Task from the model.
Then delete the target Task by invoking the Model#deleteTask() method exposed in the Model interface.
The sequence diagram for this feature should be similar with figure
Edit Task Feature
The edit task feature is one of the feature that prioritizes user convenience. With this feature user does not have to delete a task and re-add the task when they mistakenly input the details of a task. Furthermore, the edit task feature also supports the operation to delete a detail from a task.
The edit task feature edits an existing Task in the TodoList using Task details provided by the user.
This feature is facilitated by the following classes:
-
EditTaskParser:- It implements
EditTaskParser#parse()to parse and validate the providedTaskdetails andTaskindex
- It implements
-
EditTaskDescriptor:- It stores the
Taskdetails which will be used to edit the targetTask
- It stores the
-
EditTaskCommand:- It implements
EditTaskCommand#execute()to edit the task inModel
- It implements
Given below is an example usage scenario and how the mechanism for editing a Task behaves at each step:
Step 1. LogicManager receives the user input edittask 1 n/Submit essay d/2020-10-10 t/ES2660 from Ui
Step 2. LogicManager calls TodoListParser#parseCommand() to create an EditTaskParser
Step 3. Additionally, TodoListParser will call the EditTaskParser#parse() method to parse the command arguments
Step 4. This creates an EditTaskCommand and EditTaskCommand#execute() will be invoked by LogicManager to edit the target Task
Step 5. The Model#setTask() operation exposed in the Model interface is invoked to replace the target Task with the edited Task
Step 6. A CommandResult from the command execution is returned to LogicManager
Given below is the sequence diagram of how the operation to edit a Task works:
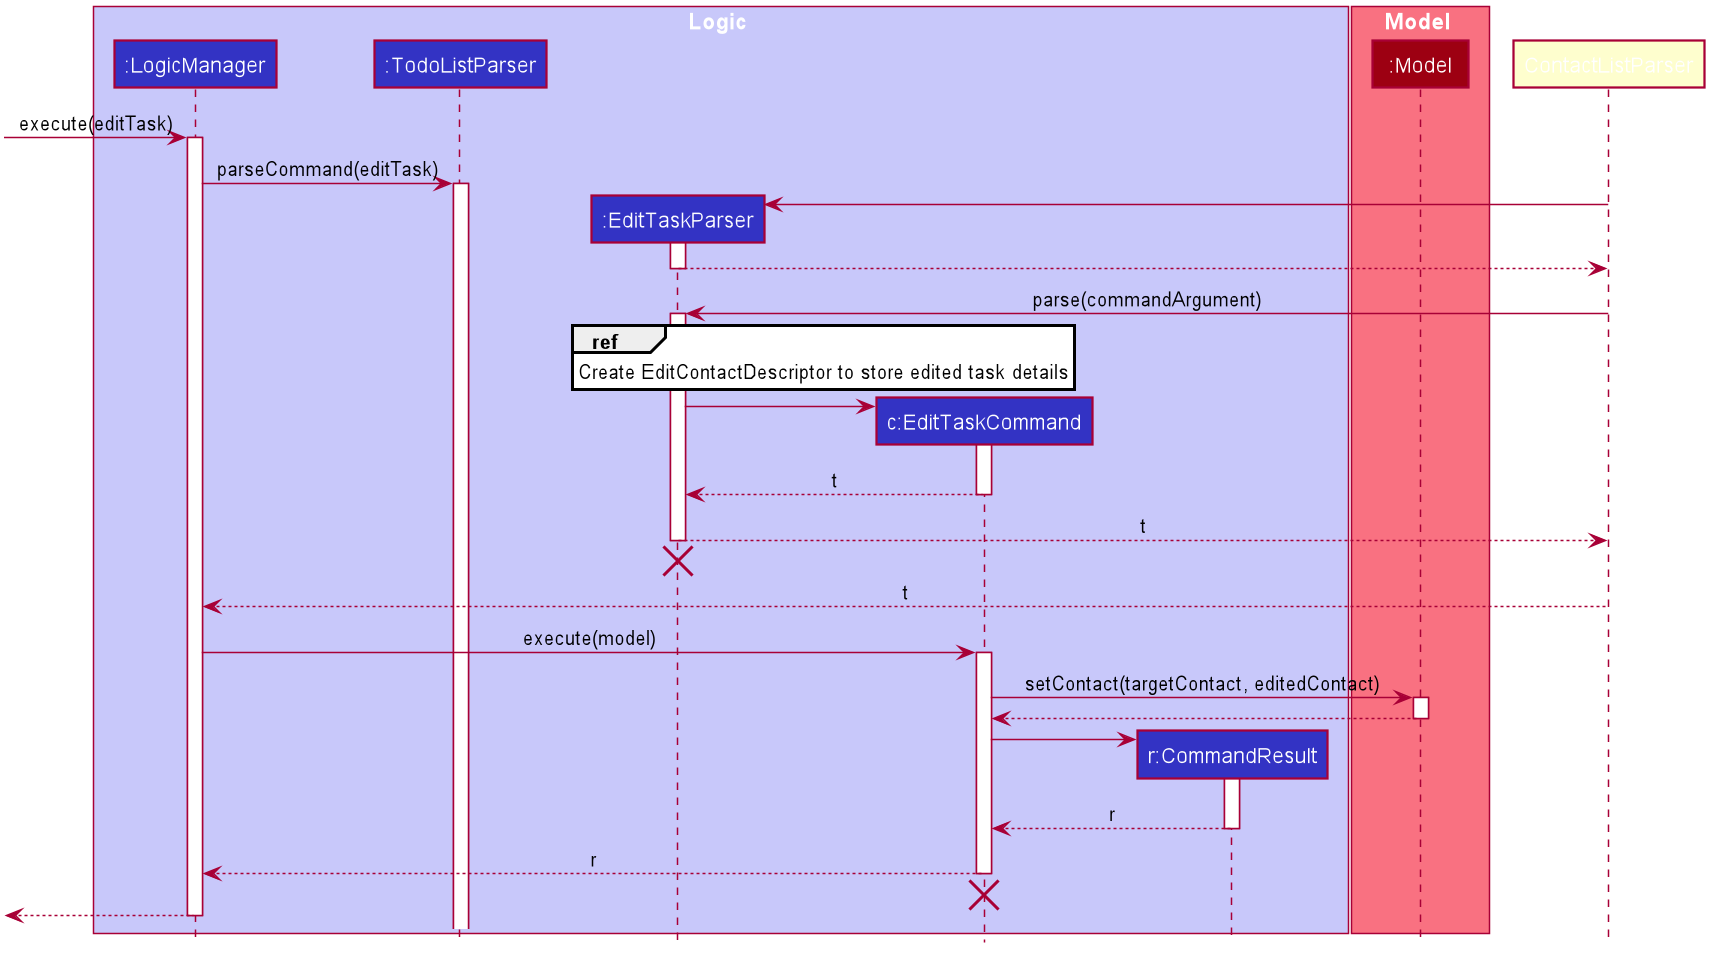
In addition, as mentioned previously the edit task feature support the operation to delete a detail from the task. The steps are given below:
Step 1. EditTaskParser#parse() will check if a given prefix has an empty description.
Step 2. If the given prefix has an empty description, EditTaskParser#parse() will set a boolean inside the editTaskDescriptor to true for that particular prefix.
Step 3. Then EditTaskCommand#execute() will edit the detail of a task based on the boolean inside the editTaskDescriptor.
Step 4. If the boolean is true for a specific prefix, the detail of the task represented by the prefix will be deleted from the task, otherwise the task is edited normally.
Step 5. The following steps should continue from step 5 from above sequence.
Given below is the activity diagram of how the above steps work:
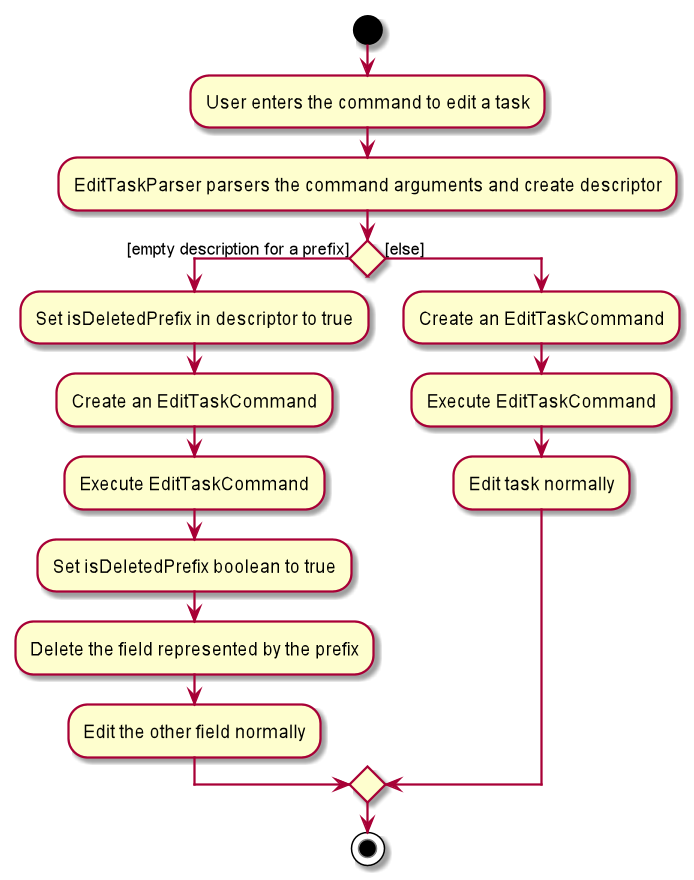
Design Consideration
Aspect: Descriptor for Both Deleting and Editing a Field
-
Alternative 1 (current):
Add a boolean variable inside the descriptor to indicate if a detail should be deleted or leaves as it is.Pros :
- Easier to implement i.e only need to add a boolean variable and some setter and getter method.
- The boolean can be used to facilitate the guard clause when editing a task.
Cons :
- Descriptor has more than 1 responsible because it does not just edit but also need to consider deleteing a field.
-
Alternative 2 :
Use a list to tell theEditTaskCommandwhich field to delete.Pros :
- More intuitive since we just simply add the prefix representing the details that we want to delete.
Cons :
- Will be harder to implement :
- Need to pass more parameters to
EditTaskCommand. - Might not be consistent to pass prefixes to
EditTaskCommand.
- Need to pass more parameters to
- Might take more memory space.
- Might take more time to execute since we need to check if each prefix exists in the list.
Alternative 1 is chosen since it cause minor changes to the overall code, however we might try to implement alternative 2 in the future.
Sort Tasks Feature
The sort task feature is one of the vital features in TodoList because it allows the user to effectively and efficiently manage their tasks. This is the case because in general people will execute tasks in an order. This feature lets the user know which task is the most important, the closest to deadline, and also by name.
This feature can sort the list based on these criteria:
-
Name- sorts the list lexicographically with case ignored, from the lowest to the highest based on the task’ name -
Priority- sorts the list from the highest priority to the lowest priority based on the task’ priority -
Date. - sorts the list from the closest date to the latest date based on the task’s deadline
In addition this feature also supports the operation of reversing the list. The order will be the opposite of the order given above.
This feature is facilitated by the following classes:
-
SortTaskParser:- It implements
SortTaskParser#parse()to parse and validate the user input - It creates comparator objects using the command arguments and reversing it if necessary
- It implements
-
SortTaskCommand:- It implements
SortTaskCommand#execute()to sort theTodoListinModel - It sorts the
TodoListby invokingModel#updateSortedTodoList()
- It implements
-
TaskComparatorByName:- It implements
Comparator#compare()to compare 2 tasks based on their name - It uses the
TaskNameComparatorclass
- It implements
-
TaskComparatorByPriority:- It implements
Comparator#compare()to compare 2 tasks based on their priority
- It implements
-
TaskComparatorByDate:- It implements
Comparator#compare()to compare 2 tasks based on their date - It uses the
DateComparatorclass
- It implements
In addition the classes below are uses by the comparator classes mentioned above:
-
TaskNameComparator:- It implements
Comparator#compare()for comparing 2TaskNameobjects
- It implements
-
DateComparator:- It implements
Comparator#comapre()for comparingDateobjects
- It implements
Given below is the class diagram describing the comparators:
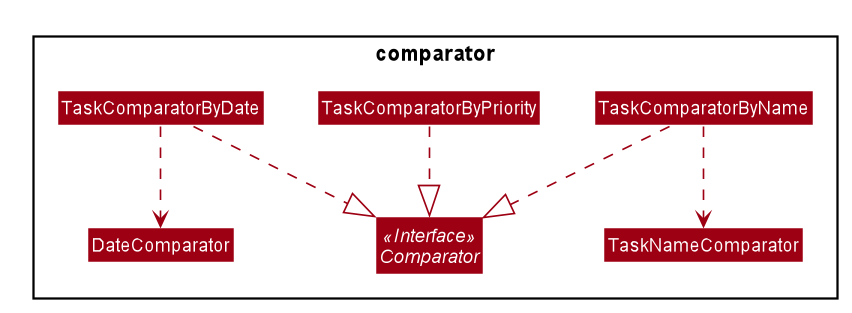
Given below is an example usage scenario and how the mechanism for sorting tasks behaves at each step:
Step 1. LogicManager receives the user input sorttask priority from Ui
Step 2. LogicManager calls TodoListParser#parseCommand() to create a FindTaskParser
Step 3. Then, TodoListParser will call the SortTaskParser#parse() method to parse the command arguments
Step 4. This creates the correct Comparator<Task> based on the command arguments
Step 4. Finally, a SortTaskCommand is created and SortTaskCommand#execute() will be invoked by LogicManager
Step 5. The Model#updateSortedTodoList() operation exposed in the Model interface is invoked to update the displayed todo list
by updating the Model#sortedTodoList with the new comparator.
Step 6. A CommandResult from the command execution is returned to LogicManager
 )
)
In addition, if the user wants to reverse order, the Comparator<Task> will be updated in the SortTaskParser#parse()
using the built-in java method Comparator#reversed().
Sort and Filter Implementation
This feature which require the list to be sorted can work together with he find task feature. This is because the
Model.sortedTodoList is wrapped inside the Model.filteredTodoList. When the Model#updateSortedList() is
invoked, the Model.filteredTodoList will also be updated. Furthermore, the list in the GUI will also be updated.
Combining sorting and filtering can be very powerful, especially when it comes to managing tasks.
Find Task Feature
The find task feature is crucial as it enables users to retrieve tasks efficiently rather than having to scan through their entire todo list to find the desired task. This can also contribute to a better management of user tasks which is important since Cap 5 Buddy is an application to track module related details and information. To ensure that searching for tasks is refined and accurate, this feature enables users to search using multiple parameters.
The search parameters that can be used to find tasks include: Name, Date, Tag, Priority and Status. If multiple search
parameters are provided by users, only tasks that fulfil all the search criteria will be returned.
This feature is facilitated by the following classes:
-
FindTaskParser:- It implements
FindTaskParser#parse()to parse and validate the user input - It creates predicate objects using the command arguments and adds them to the list of predicates in
FindTaskCriteria - It implements
FindTaskParser#isAtLeastOnePrefixPresent()to validate that at least one search parameter was provided by the user
- It implements
-
FindTaskCriteria:- It encapsulates all the predicates which will be used to test for matching tasks
- It implements the following operations:
-
FindTaskCriteria#addPredicate()to add a new predicate into the list of predicates to test for matching tasks -
FindTaskCriteria#getFindTaskPredicate()to compose all the predicates into a single predicate
-
- Predicate objects that can be stored in
FindTaskCriteria:-
TaskNameContainsKeywordsPredicate:- Tests if the name of a given task matches at least one of the name keywords provided (case-insensitive)
-
TaskContainsTagsPredicate:- Tests if a given task contains at least one of the search tags provided (case-insensitive)
-
TaskMatchesDatePredicate:- Tests if the date of a given task matches the search date exactly.
-
TaskMatchesPriorityPredicate:- Tests if the priority of a given task matches the search priority exactly (case-insensitive)
-
TaskMatchesStatusPredicate:- Tests if the status of a given task matches the search status exactly (case-insensitive)
-
Given below is the class diagram describing the FindTaskCriteria class:
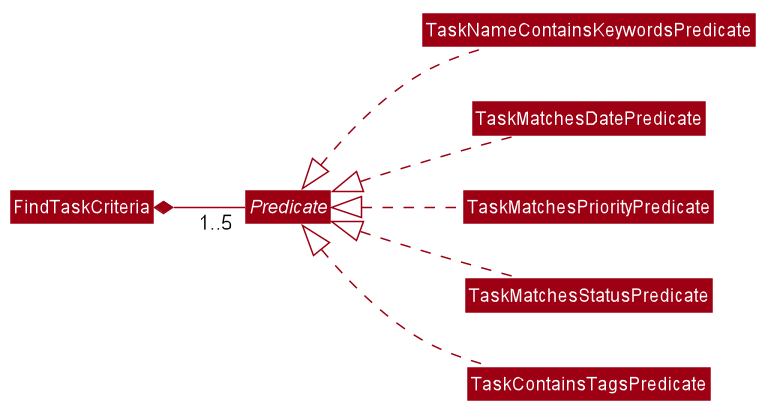
-
FindTaskCommand:- It implements
FindTaskCommand#execute()to find all matching tasks by updating the filtered todo list inModelusing the predicate fromFindTaskCriteria
- It implements
Given below is an example usage scenario and how the mechanism for finding tasks behaves at each step:
Step 1. LogicManager receives the user input findtask n/lab d/2020-01-01 from Ui
Step 2. LogicManager calls TodoListParser#parseCommand() to create a FindTaskParser
Step 3. Additionally, TodoListParser will call the FindTaskParser#parse() method to parse the command arguments
Step 4. This creates a FindTaskCriteria that encapsulates the created Predicate objects to test for matching tasks
Step 4. Additionally, a FindTaskCommand is created and FindTaskCommand#execute() will be invoked by LogicManager to find matching tasks
Step 5. The Model#updateFilteredTodoList() operation exposed in the Model interface is invoked to update the displayed todo list
using the predicate from FindTaskCriteria
Step 6. A CommandResult from the command execution is returned to LogicManager
The following activity diagram summarizes what happens when a user executes FindTaskCommand
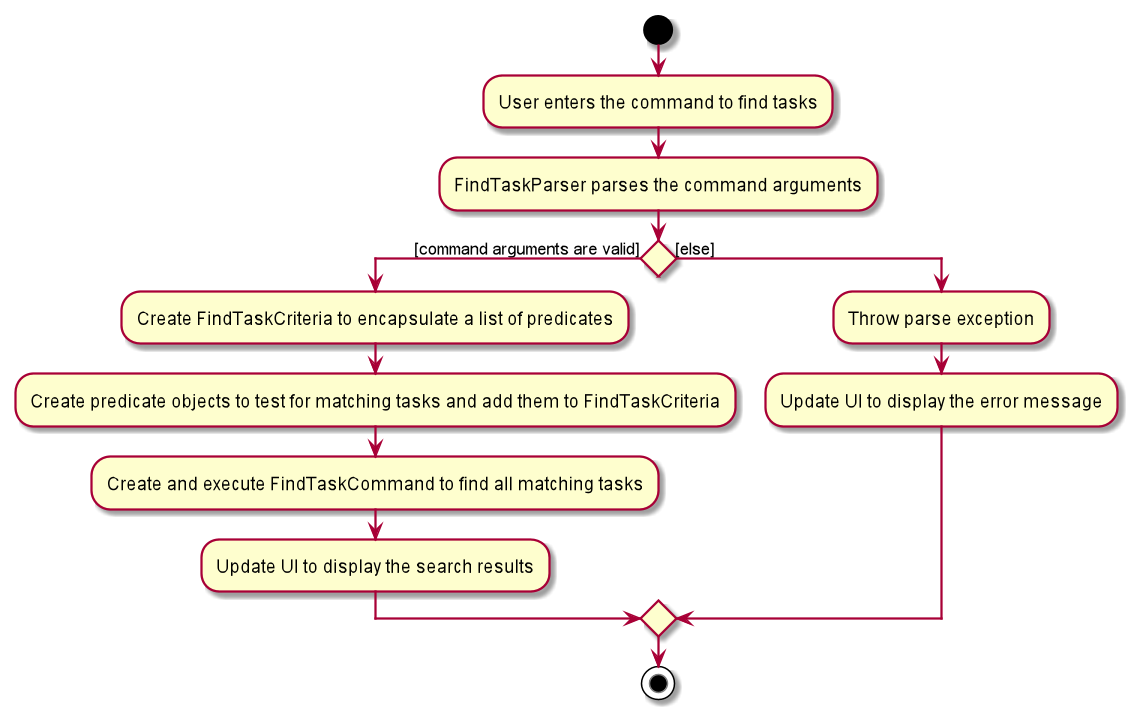
Design consideration:
Aspect: How to handle instances when the user does not provide any search parameter
-
Alternative 1 : Allow users to provide 0 search parameters, in which case the find task command does not perform any operation.
- Pros: Implementation of the command is simpler and straightforward as we do not need to check if at least one search parameter was provided.
- Cons: The command does not perform any meaningful operation.
-
Alternative 2 (current choice): Handle instances when no search parameter was provided using exceptions and inform users that at least one parameter is required.
- Pros: Ensures that users are aware of all the constraints related to the command.
- Cons: The implementation of the command is more complex since exception handling is required and we need to check if at least one search parameter was provided.
Alternative 2 was chosen as it conformed with the standard practice of handling errors using exception. Moreover, it removes any room for ambiguity by ensuring all constraints related to the command are made known to the users.
Complete Task Feature
The complete task feature allows the user to label a task as completed when they have accomplished it. The entry of the task in the GUI will show the green label COMPLETED when the task is done, or red label NOT COMPLETED if otherwise.
This feature is facilitated by the following classes:
-
Status:-
Enumto store the status of the task - It stores 2 values i.e.
COMPLETEDandNOT_COMPLETED
-
-
CompleteTaskCommand:- It implements
CompleteTaskCommand#execute()to mark aTaskasCOMPLETED
- It implements
Given below is an example usage scenario and how the mechanism for editing a Task behaves at each step:
Step 1. LogicManager receives the user input completetask 1 from Ui
Step 2. LogicManager calls TodoListParser#parseCommand() to create an CompleteTaskParser
Step 3. Additionally, TodoListParser will call the CompleteTaskParser#parse() method to parse the command arguments
Step 4. This creates an CompleteTaskCommand and CompleteTaskCommand#execute() will be invoked by LogicManager to set the task status as COMPLETED
Step 5. The Model#setTask() operation exposed in the Model interface is invoked to replace the target Task with the same Task but the status is set to COMPLETED
Step 6. A CommandResult from the command execution is returned to LogicManager
The sequence diagram for this feature should be similar with figure
Reset Task Feature
The reset task feature does the opposite of what the complete task feature does. It labels the task as NOT COMPLETED
instead. This feature is added to avoid the need to use the edit task to edit the status.
This feature is facilitated by the following classes:
-
Status:-
Enumto store the status of the task - It stores 2 values i.e.
COMPLETEDandNOT_COMPLETED
-
-
ResetTaskCommand:- It implements
ResetTaskCommand#execute()to mark aTaskasNOT COMPLETED
- It implements
Given below is an example usage scenario and how the mechanism for editing a Task behaves at each step:
Step 1. LogicManager receives the user input completetask 1 from Ui
Step 2. LogicManager calls TodoListParser#parseCommand() to create an ResetTaskParser
Step 3. Additionally, TodoListParser will call the ResetTaskParser#parse() method to parse the command arguments
Step 4. This creates an ResetTaskCommand and ResetTaskCommand#execute() will be invoked by LogicManager to set the task status as COMPLETED
Step 5. The Model#setTask() operation exposed in the Model interface is invoked to replace the target Task with the same Task but the status is set to COMPLETED
Step 6. A CommandResult from the command execution is returned to LogicManager
The sequence diagram for this feature should be similar with figure
Clear Tasks Feature
The clear tasks feature just simply clear the whole existing TodoList. This command can be undone by the undo command.
Given below is an example usage scenario and how the mechanism for celaring the tasks behaves at each step:
Step 1. LogicManager receives the user input cleartask
Step 2. LogicManager calls TodoListParser#parseCommand() to create a ClearTaskCommand
Step 3. This creates an ClearTaskCommand and ClearTaskCommand#execute() will be invoked by LogicManager to empty the list
Step 4. A CommandResult from the command execution is returned to LogicManager
The sequence diagram for this feature should be similar with figure
Take note that there is no additional parser created for the clear tasks feature i.e. ClearTaskParser is not created.
In this case, The parsing will be handled by the TodoListParser#singleWordCommandsChecker() instead. This method also
checks if the user included anything after the command word and throws the ParseException.
Event list management feature
Add Event Feature
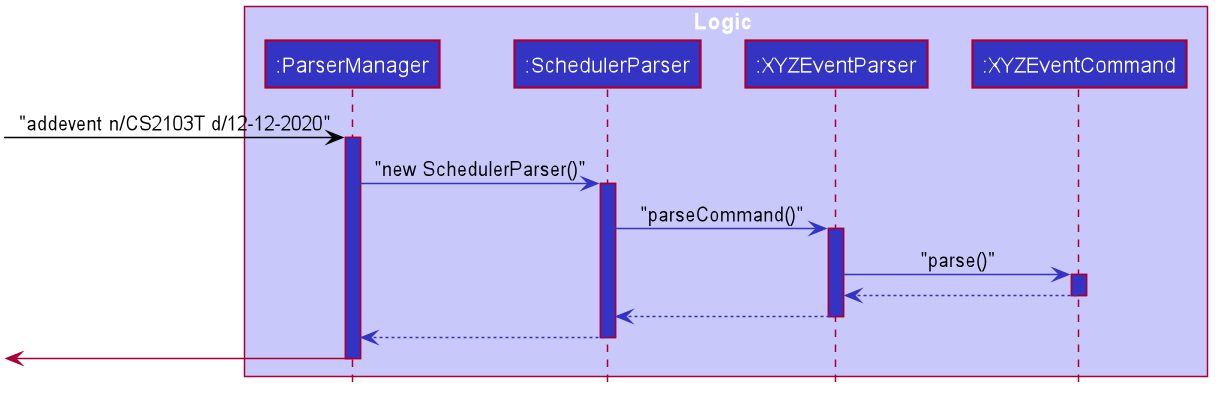
Implementation
The way this feature is currently implemented is similar to that of AB3. In the Logic component, we are using a specialised parser called
SchedulerParser that is currently set to handle all event related commands called by the user. This parser will activate the _AddEventParser_
that works similarly to AB3, returning the AddEventCommand that is executed in the LogicManager. Similar to AB3 and Module Tracker, the addevent
command will create the event based on the given user input and add that to the EventList to be stored.
This command is being facilitated by two supporting classes, EventName and EventTime. EventName is a logic container that contains the name of the
event to be created, and EventTime is the logic container for holding the date and time set by the user, as a LocalDateTime object. These two
classes are used in the creation of an Event, as the Event Object will take in a EventName and EventTime.
This is how Add Event works:
Step 1. LogicManager takes the user input from the UiManager and checks the command word to decide which parser to pass onto.
Step 2. ParserManager then selects SchedulerParser based on the command word.
Step 3. SchedulerParser takes the user input and separate the command word from the arguments.
Step 4. Based on the command word, the switch case selects the AddEventParser and passes the arguments into the parser.
Step 5. AddEventParser then uses the ArgumentTokenizer to break down the arguments by the Prefixes and returns them in a ArgumentMultiMap.
Step 6. Information under the name, date and tag prefixes are pulled out and checked for any invalid and null values,
if any are present, an ParseException is thrown.
Step 7. Once all the relevant information is parsed, the respective supporting objects are created such as EventName, EventTime and Tag.
Step 8. The supporting objects are used to create the new Event that passes to the AddEventCommand constructor.
Step 9. LogicManager receives the newly created AddEventCommand and executes it.
Step 10. The execute method of AddEventCommand takes in the current model and adds the Event to the eventlist of the model.
Delete Event Feature
Implementation
The implementation is similar to that of AB3 and of Add Event as mentioned previously. The main difference is the arguments that delete event takes in. Delete event will take in just one parameter, which is the index of the event based on the eventlist shown in the GUI.
This is how Delete Event works:
Step 1. LogicManager takes the user input from the UiManager and checks the command word to decide which parser to pass onto.
Step 2. ParserManager then selects SchedulerParser based on the command word.
Step 3. SchedulerParser takes the user input and separate the command word from the arguments.
Step 4. Based on the command word, the switch case selects the DeleteEventParser and passes the arguments into the parser.
Step 5. DeleteEventParser then uses the ArgumentTokenizer to break down the arguments by the Prefixes and returns them in a ArgumentMultiMap.
Step 6. The value of the index is pulled out and checked for any invalid (non-positive integers) and null values,
if any are present, an ParseException is thrown.
Step 7. The value parsed is used to create an Index that represents the value.
Step 8. The Index passes to the DeleteEventCommand constructor.
Step 9. LogicManager receives the newly created DeleteEventCommand and executes it.
Step 10. The execute method of DeleteEventCommand takes in the current model and removes the Event from the eventlist of the model.
Edit Event Feature
Implementation
Just like in AB3, this feature is supported by a static inner class EditEventDescriptor which serves as a logic container to
hold all the information fields that needs to be changed in the target event.
EditEventDescriptor is used to inform the later command of what needs to be changed and what will remain tha same. It is designed
using Optional where if the user did not input a new value for a parameter, then it will be an empty optinal object. Later on
in the execution of the command, when the value in the descriptor is empty, then it will take the original value in the target event.
The EditEventCommand also has a method called createEditedEvent which will help to make the newly update Event. It takes in the target
event object and the descriptor that holds the changes to be made. How this works is that it will check for each field in event, if there exist
a new value for that field. If there is, then the new field will be used to create the Event. For instance, if there is a new name for the event,
then a new EventName will be created based on the new name and the new Event will be created with thi new EventName.
This is how Edit Event works:
Step 1. LogicManager takes the user input from the UiManager and checks the command word to decide which parser to pass onto.
Step 2. ParserManager then selects SchedulerParser based on the command word.
Step 3. SchedulerParser takes the user input and separate the command word from the arguments.
Step 4. Based on the command word, the switch case selects the EditEventParser and passes the arguments into the parser.
Step 5. EditEventParser then uses the ArgumentTokenizer to break down the arguments by the Prefixes and returns them in a ArgumentMultiMap.
Step 6. The values under the preamble, name, date and tag prefixes are extracted out and checked for any invalid (non-positive integers) and null values,
if any are present, an ParseException is thrown.
Step 7. The values parsed are used to create the supporting classes, Index, EventName, EventTime and Tag.
Step 8. These supporting classes will be passed into the descriptor object using the respective set methods.
Step 9. The descriptor and index passes along to the EditEventCommand constructor.
Step 10. LogicManager receives the newly created EditEventCommand and executes it.
Step 11. The execute method of EditEventCommand takes in the current model and calls the createEditedEvent methods as mentioned above, and
replaces the target event with the new Event that is created.
Find Event Feature
Implementation
Same as the previously mentioned features, the Find Event feature is similar as well. The key difference is that all of the parameters are optional but at least one must be present. The Find Event feature will search through the EventList and return a new filtered list that contains all the events that matches the given keywords.
This feature is supported by four classes:
-
FindEventCriterais used as a logic container to hold all the predicates that are going to be entered into the find command. -
EventNameContainsKeyWordsPredicateis used to create the predicate that returns true for all events that contains any of the keywords in theirEventNamefield. -
EventContainsDatePredicateis used to create the predicate that returns true for all events that have the exact same date and time as entered by the user. -
EventContainsTagPredicateis used to create the predicate that returns true for all events that have the sameTagunder them.
This is how Find Event works:
Step 1. Similar to the other features mentioned previously.
Step 2. Similar to the other features mentioned previously.
Step 3. Similar to the other features mentioned previously.
Step 4. Similar to the other features mentioned previously.
Step 5. Similar to the other features mentioned previously.
Step 6. The values parsed by the ArgumentTokenizer are extracted out and used to create the supporting classes, EventNameContainsKeyWordsPredicate,
EventNameContainsKeyWordsPredicate, EventContainsDatePredicate and EventContainsTagPredicate.
Step 7. FindEventCriteria is created and all the predicates will be added to it using the add method.
Step 8. The FindEventCriteria is then passed to the FindEventCommand constructor.
Step 9. The LogicManager receives the FindEventCommand and executes it.
Step 10. The execute method of FindEventCommand will pass all the predicates to the filtered list.
Step 11. The filtered list will take in the predicates and filters out the events that passes the predicates and update the
FilteredList<Event>, which will be displayed in the GUI.
Calendar GUI Feature
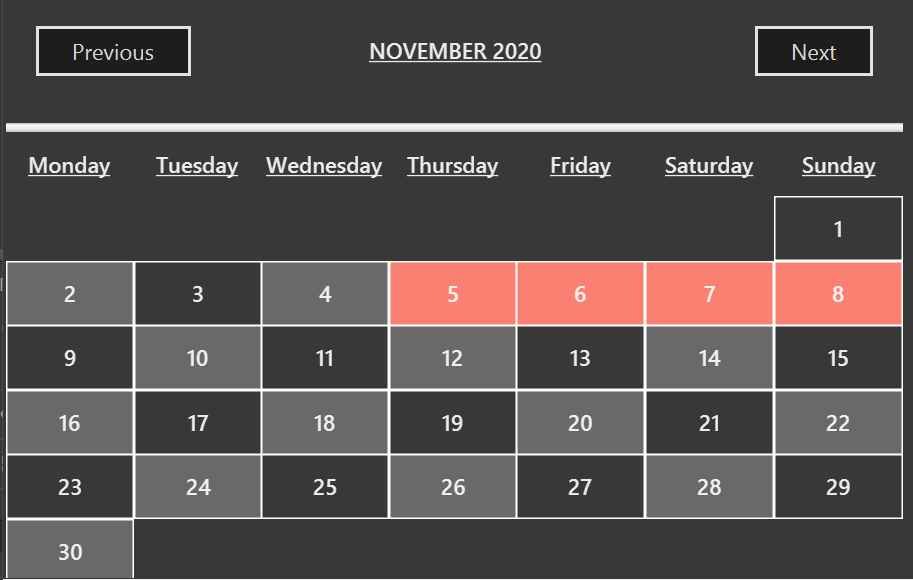
Implementation
The Calendar is added to help reflect the Eventlist in the model. It generates an accurate monthly Calendar based on the current date
and time of the user. This Calendar feature has 2 main parts, the FXML design and the GUI-component class, Calendar.
The design of the Calender mainly consists of 2 Gridpanes, one for the header and the other is used to form the days in each month. The header Gridpane is a 1 x 1 grid, that contains a Label for the month and year, and two buttons for the users to cycle between the months in the Calender. The second Gridpane is a 7 x 7 grid. The first row is reserved for headers for the different days of the week, while the rest are used for filling up the days based on the month and year.
The logic of the Calender is located in the Calendar under the Ui component. It contains methods to load the month based on the date of the header, a method to scan
through the eventlist in model to identify the days of the events in the eventlist, and the methods for the buttons to switch between the next month and previous month.
The constructor of the Calendar takes in the ReadOnlyEventList from model, so that it can check for the dates that need to be marked out. The constructor also
loads in the values for headerMonth, headerYear and now. The headerMonth and headerYear is used to track which month and year to display in the Calendar, while the now tracks the
current month and year to start the Calendar in each time it loads up.
Each time the user presses any of the two buttons, depending on which, the method for handling the buttons will either add or minus a month from the headerMonth. This updates the
Calendar on which month to display. Also, the method will check if the current is either the start or end on the year, so that it knows when to change the values of the year.
Next, the method that loads the Calendar will pull the values of headerMonth and headerYear. It will check if the month is Feburary, and if so, it will check if the
year is a leap year. Then, it will return the appropriate number of days for the headerMonth. Then, it checks what is the day of the week that the first day of
this month is on, then it starts to fill up the grid starting from the first day of the week. A VBox is created for each grid cell, and a Label is created and added
to that VBox with the correct value of the dates. If there is an event that falls on the date, it the colour of the VBox will be set to a different color
to indicate an existing event.
##General Features
Undo/redo feature
Implementation
The undo/redo mechanism is facilitated by the respective versioned lists of each list type. For example
VersionedModuleList for a ModuleList type. We will use VersionedModuleList to demonstrate the implementation of undo/redo mechanism. It extends ModuleList with an undo/redo history, stored internally as an moduleListStateList and currentStatePointer. Additionally, it implements the following operations:
-
VersionedModuleList#commit()— Saves the currentModuleListstate in its history. -
VersionedModuleList#undo()— Restores the previousModuleListstate from its history. -
VersionedModuleList#redo()— Restores a previously undoneModuleListstate from its history.
These operations are exposed in the Model interface as Model#commitModuleList(), Model#undoModuleList() and Model#ModuleList() respectively.
Given below is an example usage scenario and how the undo/redo mechanism behaves at each step.
Step 1. The user launches the application for the first time. The VersionedModuleList will be initialized with the initial ModuleList state, and the currentStatePointer pointing to that single ModuleList state.
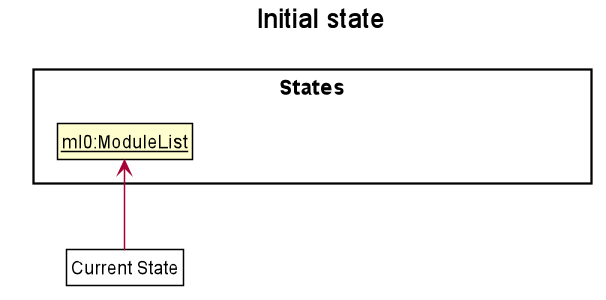
Step 2. The user executes deletemodule 5 command to delete the 5th module in the ModuleList. The deletemodule command calls Model#commitModuleList(), causing the modified state of the ModuleList after the deletemodule 5 command executes to be saved in the moduleListStateList, and the currentStatePointer is shifted to the newly inserted ModuleList state.
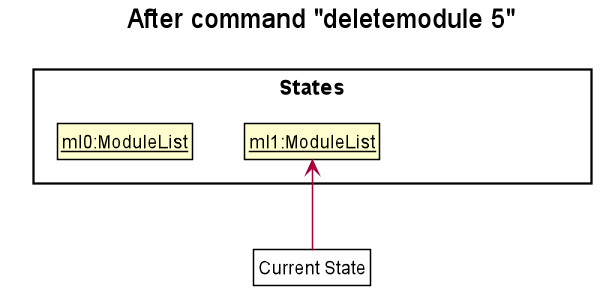
Step 3. The user executes addmodule n/CS2103T to add a new module. The addmodule command also calls Model#commitModuleList(), causing another modified ModuleList state to be saved into the moduleListStateList.
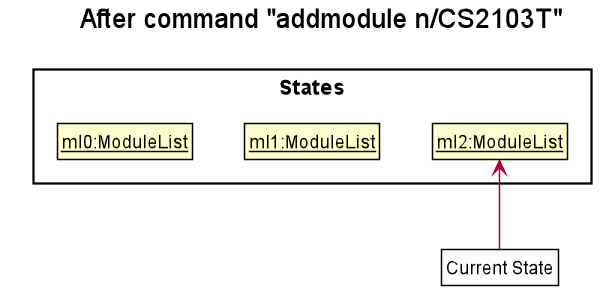
Model#commitModuleList(), so the ModuleList state will not be saved into the moduleListStateList.
Step 4. The user now decides that adding the module was a mistake, and decides to undo that action by executing the undo command. The undo command will call Model#undoModuleList(), which will shift the currentStatePointer once to the left, pointing it to the previous ModuleList state, and restores the ModuleList to that state.
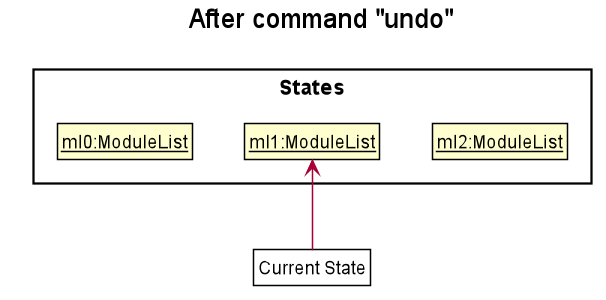
currentStatePointer is at index 0, pointing to the initial ModuleList state, then there are no previous ModuleList states to restore. The undo command uses isIndexZero() to check if this is the case. If so, it will return an error to the user rather
than attempting to perform the undo.
The following sequence diagram shows how the undo operation works:
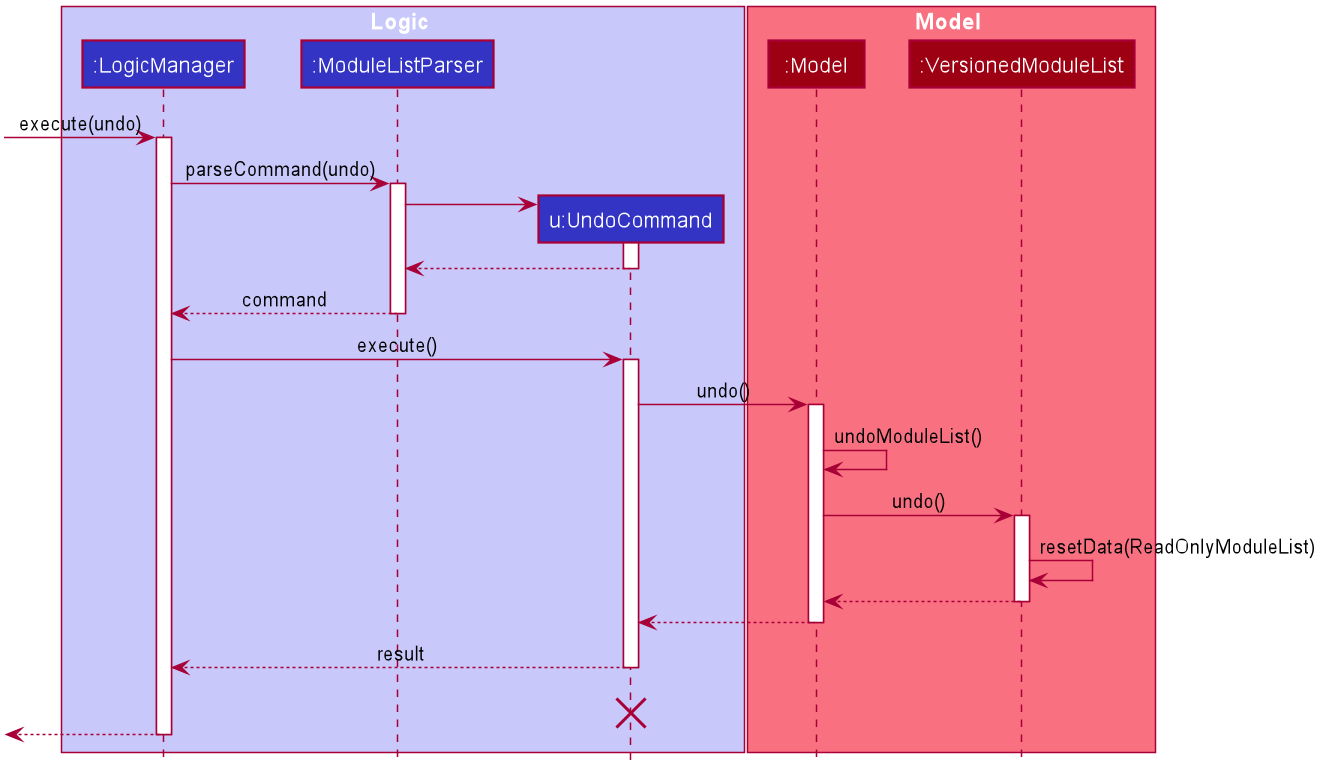
UndoCommand should end at the destroy marker (X) but due to a limitation of PlantUML, the lifeline reaches the end of diagram.
The redo command does the opposite — it calls Model#redoModuleList(), which shifts the currentStatePointer once to the right, pointing to the previously committed state, and restores the ModuleList to that state.
currentStatePointer is at index moduleListStateList.size() - 1, pointing to the latest ModuleList state, then there are no undone ModuleList states to restore. The redo command uses Model#canRedoAddressBook() to check if this is the case. If so, it will return an error to the user rather than attempting to perform the redo.
Step 5. The user then decides to execute the command list. Commands that do not modify ModuleList, such as list, will usually not call Model#commitModuleList(), Model#undoModuleList() or Model#redoModuleList(). Thus, the ModuleListStateList remains unchanged.

Step 6. The user executes clearmodule, which calls Model#commitModuleList(). Since the currentStatePointer is not pointing at the end of the moduleListStateList, all ModuleList states after the currentStatePointer will be purged. Reason: It no longer makes sense to redo the addmodule n/CS2103 command. This is the behavior that most modern desktop applications follow.

The following activity diagram summarizes what happens when a user executes a new command:
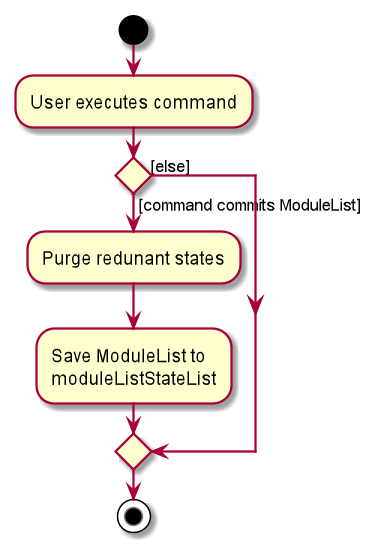
Design consideration:
Aspect: How undo & redo executes
-
Alternative 1 (current choice): Saves the entire
moduleList.- Pros: Easy to implement.
- Cons: May have performance issues in terms of memory usage.
-
Alternative 2: Individual command knows how to undo/redo by
itself.
- Pros: Will use less memory (e.g. for
deletemodule, just save the module being deleted). -
Cons: We must ensure that the implementation of each individual command is correct.
- Pros: Will use less memory (e.g. for
Documentation, logging, testing, configuration, dev-ops
Appendix: Requirements
Product scope
Target user profile:
- has a need to manage a number of classes
- prefer desktop apps over other types
- can type fast
- prefers typing to mouse interactions
- is reasonably comfortable using CLI apps
Value proposition:
- Users can keep track of all module details efficiently.
- Centralize key module details.
- Keep track of study progress effectively.
- Everything can be done in a single app.
User stories
Priorities: High (must have) - * * *, Medium (nice to have) - * *, Low (unlikely to have) - *
| Priority | As a … | I want to … | So that I can… |
|---|---|---|---|
| module list | |||
* * * |
new user | see usage instructions | refer to instructions when I forget how to use the App |
* * * |
user | add a new module | keep track of the module information easily |
* * * |
user | delete a module | remove modules that are completed |
* * |
user | find a module by name | locate details of a module without having to go through the entire list |
* * * |
user with many online zoom lessons | add a zoom link to a module | keep track and retrieve it easily |
* * |
user | edit the zoom link of a module | update the zoom link whenever it changes |
* * |
user | delete the zoom link of a module | prevent the accumulation of unused zoom links |
* * |
user | calculate my CAP details | plan my academic progress for the future |
* * |
user | archive a modules | hide less relevant modules that might still be useful for future purposes |
* * |
user | add graded assignments | add the information of the assignments that contributed to my grade |
* * * |
user | add module contacts | keep track of all contact details for future reference |
* * * |
user | delete a contact | prevent unnecessary contacts from accumulating |
* * * |
user | edit a contact | update contact details whenever they are changed |
* * * |
user | find a contact by keyword | retrieve the necessary contact easily without having to look through all my contacts |
* * |
user | edit my graded assignments | update the information of the assignments I have completed |
* * |
user | delete graded assignments | remove the assignments that are do not contribute to my grade anymore |
* |
user | add an overall grade to a module | change my grade without adding assignments to control it |
* |
user who is overloading | sort modules by name | locate a module easily |
* * * |
user | add a task | keep track of the tasks that I must complete |
* * * |
user | delete a task | remove a task that has been done |
* * * |
user | edit a task | make necessary changes to a task |
* * |
user | label a task as completed | |
* * |
user | find a task | retrieve a task easily without looking at the entire list |
* * |
user | sort tasks based on criteria | easily manage the tasks by order |
* * |
user | filter tasks based on criteria | easily manage the tasks by group |
* |
user | reset the status of a task | change a task from labeled as completed to not completed |
* |
user | archive a task | hide irrelevant tasks that might still be useful for future purposes |
* |
user | quickly add a module tagged as completed | input data to calculate CAP details quickly |
{More to be added}
Use cases
(For all use cases below, the System is the CAP5BUDDY and the Actor is the user, unless specified otherwise)
Module list use cases
Use case: UC01 - View a module
MSS
- User requests to view the list of modules.
- CAP5BUDDY displays all the modules in a list.
- User requests to view the information of a specific module from the list.
- CAP5BUDDY displays all information related to the specified module.
Extensions
-
2a. The list is empty.
Use case ends here.
-
3a. The given index is invalid or null.
- 3a1. CAP5BUDDY displays an error message.
Use case resumes at step 2.
Use case: UC02 - Archive a module
MSS
- User requests to show all the un-archived modules (UC06).
- User wants to archive a specific module from the list.
- CAP5BUDDY archives the module.
Extensions
-
1a. The list is empty.
Use case ends here.
-
2a. The given index is invalid or does not exist.
-
2a1. CAP5BUDDY displays an error message.
Use case resumes at step 2.
-
Use case: UC03 - Un-archive a module
MSS
- User requests to show all the archived modules (UC07).
- User wants to un-archive a specific module from the list.
- CAP5BUDDY un-archives the module.
Extensions
-
1a. The list is empty.
Use case ends here.
-
2a. The given index is invalid or does not exist.
-
2a1. CAP5BUDDY displays an error message.
Use case resumes at step 2.
-
Use case: UC04 - Calculate CAP
MSS
- User requests to calculate CAP
- CAP5BUDDY calculates and displays CAP to user.
Use case ends.
Extensions
-
2a. There are no modules tagged as completed.
-
2a1. CAP5BUDDY displays an error message.
-
2a2. User enters required data.
Steps 2a1-2a2 are repeated until the data requirements are fulfilled.
Use case resumes at step 2. -
Use case: UC05 - Calculate target CAP details
MSS
- User requests to calculate target CAP details
- CAP5BUDDY calculates and displays target CAP details to user.
Use case ends.
Extensions
-
2a. There are no modules marked as completed.
-
2a1. CAP5BUDDY displays an error message.
-
2a2. User enters required data.
Steps 2a1-2a2 are repeated until the data requirements are fulfilled.
Use case resumes at step 2. -
-
2b. User inputs invalid target cap value.
-
2b1. CAP5BUDDY displays an error message.
-
3b2. User enters valid input.
Steps 2a1-2a2 are repeated until the data requirements are fulfilled.
Use case resumes at step 2. -
-
2c. Target cap is unachievable.
-
2c1. CAP5BUDDY displays an error message.
-
4c2. User enters valid input.
Steps 3a1-3a2 are repeated until the data requirements are fulfilled.
Use case resumes at step 2. -
Use case: UC06 - View un-archived module list
MSS
- User requests to view the list of un-archived modules.
- CAP5BUDDY displays all the un-archived modules.
Use case ends.
Use case: UC07 - View archived module list
MSS
- User requests to view the list of un-archived modules.
- CAP5BUDDY displays all the un-archived modules.
Use case ends.
Use case: UC08 - Add zoom link to module
MSS
- User requests to add a new zoom link to a specific module in the module list.
- User provides the module index, zoom link and module lesson name.
- CAP5BUDDY creates and zoom link and adds it into the specified module.
- CAP5BUDDY indicates that the zoom link has been successfully added and displays the newly created zoom link.
Use case ends.
Extensions
-
2a. CAP5BUDDY detects that the module index is invalid.
- 2a1. CAP5BUDDY displays an error message and informs the user of the invalid module index.
Use case ends.
-
2b. CAP5BUDDY detects that the provided zoom link details are invalid.
- 2b1. CAP5BUDDY displays an error message and informs the user of the invalid zoom link.
Use case ends.
-
2c. CAP5BUDDY detects that the provided zoom link already exists in the module.
- 2c1. CAP5BUDDY displays an error message and informs the user that a duplicate zoom link exists.
Use case ends.
Use case: UC09 - Delete zoom link from module
MSS
- User requests to delete a zoom link from a specific module.
- User provides the module index and module lesson which the target zoom link belongs to.
- CAP5BUDDY deletes the zoom link from the module.
- CAP5BUDDY indicates that the zoom has been successfully deleted.
Use case ends.
Extensions
-
2a. CAP5BUDDY detects that the module index is invalid.
-
2a1. CAP5BUDDY displays an error message and informs the user of the invalid module index.
Use case ends.
-
-
2b. CAP5BUDDY detects that the module lesson is invalid.
-
2b1. CAP5BUDDY displays an error message and informs the user of the invalid module lesson.
Use case ends.
-
Contact list use cases
Use case: UC01 - Add contact to contact list
MSS
- User requests to add a new contact to the contact list.
- User provides the name and email of the contact, and optionally a telegram field and/or tags.
- CAP5BUDDY creates the new contact and adds it into the contact list
- CAP5BUDDY indicates that the contact has been successfully added and displays the newly created contact.
Use case ends.
Extensions:
-
2a. CAP5BUDDY detects that the contact details provided are invalid.
-
2a1. CAP5BUDDY displays an error message and informs the user of the contact detail constraints.
Use case ends.
-
-
3a. CAP5BUDDY detects that a duplicate contact exists in the contact list.
- 3a1. CAP5BUDDY displays an error message and informs the user that the contact could not be added as a duplciate contact exists.
Use case ends.
Use Case: UC02 - Delete contact from contact list
MSS
- User requests to delete a contact from the contact list.
- User provides the index of the contact in the displayed contact list to be deleted.
- CAP5BUDDY deletes the contact from the contact list.
- CAP5BUDDY indicates that the contact was successfully deleted and displays the details of the deleted contact.
Use case ends.
Extensions:
-
2a. CAP5BUDDY detects that the contact index provided is invalid.
-
2a1. CAP5BUDDY displays an error message and informs the user that the index provided is invalid.
Use case ends.
-
Use Case: UC03 - Edit contact in contact list
MSS
- User requests to edit a contact in the contact list.
- User provides the index of the target contact and the edited contact details.
- CAP5BUDDY edits the target contact with the provided contact details.
- CAP5BUDDY indicates that the contact was edited successfully and displays the details of the edited contact.
Use case ends.
Extensions
-
2a. CAP5BUDDY detects that the contact index provided is invalid.
-
2a1. CAP5BUDDY displays an error message and informs the user that the index provided is invalid.
Use case ends.
-
-
2b. CAP5BUDDY detects that the contact details provided are invalid.
-
2b1. * 2a1. CAP5BUDDY displays an error message and informs the use of the invalud command arguments.
Use case ends.
-
Use Case: UC04 - Find contacts
MSS
- User requests to find contacts in the contact list.
- User provides the search keywords and parameter.
- CAP5BUDDY finds all the contacts that match the search parameters provided.
- CAP5BUDDY displays all the contacts.
Extensions
-
2a. CAP5BUDDY detects that no search keywords or parameters were provided.
-
2a1. CAP5BUDDY displays an error message and informs the user that at least one search parameter must be provided.
Use case ends.
-
Todo List Use Cases
Use case: UC - Add a task to todo list Actor: user MSS:
- User wants to add a task to the todo list.
- User enters the command to add a task.
- CAP 5 Buddy saves the given task in the todo list.
Use case ends.
Extensions
-
2a. Format for information about the task is invalid.
- 2a1. CAP 5 Buddy displays an error message and ask the user to use the correct format.
- 2a2. User enters the information with the correct format.
Use case resumes at step 3.
-
2b. User enters the wrong information.
- 2b2. User edits the task.
Use case ends.
-
2c. User enters an already existing task.
- 2b1. CAP 5 Buddy displays an error message about duplicate tasks.
Use case resumes at step 1.
Use case: UC - Delete a task in the todo list Actor: user MSS
- User wants to delete a task in the todo list.
- User enters the command to delete a task.
- CAP 5 Buddy deletes the task from the todo list.
Use case ends.
Extensions
-
2a. User accidentally delete the wrong task.
- 2a1. User enters the undo command.
Use case resumes at step 1.
Use case: UC - Edit a task in the todo list Actor: user MSS
- User wants to edit a task in the todo list.
- User enters the command to edit a task.
- CAP 5 Buddy edits the specified task.
Use case ends.
Extensions
-
2a. User accidentally edits the wrong task.
- 2a1. User enters the undo command.
Use case resumes at step 1.
Use case: UC - Sort task in the todo list Actor: user MSS
- User wants to sort the tasks in the todo list.
- User enters the command to sort the todo list based on a criterion.
- CAP 5 Buddy displays the sorted tasks based on the chosen criterion.
Use case ends.
Extensions
-
2a. User input the wrong criterion.
- 2a1. User reset the order using the list command.
- 2a2. User re-enter the command with the correct criterion.
Use case resumes at step 3.
Use case: Find a task in the todo list Actor: user MSS
- User wants to find a task in the todo list.
- User enters the command to find a task based on keywords.
- CAP5 Buddy displays all task based on the user input from step 2.
Use case ends.
Extensions
-
2a. User input is invalid.
- 2a1. CAP 5 Buddy displays an error message and tells the user the correct format.
- 2a2. User enters the keywords with the correct format.
Use case resumes at step 3
-
2b. User input the wrong keywords.
- 2b1. User shows all the tasks using the list command.
- 2b2. User re-enter the command with the correct keywords.
Use case resumes at step 3.
Use case: UC - Label a task in the todo list as completed Actor: user MSS
- User wants label a task as “completed”.
- User enters the command to complete a task.
- CAP 5 Buddy labels the specified task as “completed”.
Use case ends.
Extensions
-
2a. User accidentally labels the wrong task.
- 2a1. User enters the undo or reset task command.
Use case resumes at step 1.
Use case: UC - Reset task label in the todo list to “not completed” Actor: user MSS
- User wants reset a task to “not completed”.
- User enters the command to reset a task.
- CAP 5 Buddy labels the specified task as “not completed”.
Use case ends.
Extensions
-
2a. User accidentally labels the wrong task.
- 2a1. User enters the undo or complete task command.
Use case resumes at step 1.
Use case: UC - List all tasks in the list Actor: user Precondition: User just entered a sort task or find task command” MSS
- User wants see all the tasks in the list with the default ordering.
- User enters the command to list all tasks.
- CAP 5 Buddy displays all the tasks with the default ordering.
Use case ends.
Use case: UC - Clear all tasks in the list Actor: user MSS
- User wants to remove all tasks from the list.
- User enters the command to clear the list.
- CAP 5 Buddy removes all the tasks from the list.
Use case ends.
Extensions
-
2a. User changes mind and wants the list back.
- 2a1. The user enter the undo command.
Use case ends.
Use case: Archive a task in the todo list (Proposed) Actor: user MSS
- User wants to archive a task in the todo list.
- User input the command to archive a task.
- CAP5 Buddy archives the task.
Use case ends.
Extensions
-
2a. User accidentally archive the wrong task.
- 2a1. The user enter the undo or unarchive command.
Use case resumes at step 1.
General feature use cases
Use case: Undo previous command
MSS
- User requests to undo previous command.
- CAP5BUDDY undoes the previous command.
Use case ends.
Extensions
-
2a. There are no commands to undo.
-
CAP5BUDDY shows an error message.
Use case resumes at step 1.
-
Use case: Redo undone command
MSS
- User requests to redo most recent undone command.
- CAP5BUDDY redoes the undone command.
Use case ends.
Extensions
-
2a. There are no commands to redo.
-
CAP5BUDDY shows an error message.
Use case resumes at step 1.
-
Use case: UC01 Add a new Module
MSS
- User wants to add a new module to track.
- User enters the command for adding a module:
add [module name/code] - CAP5BUDDY adds the module into storage and display the success message.
{More to be added}
Use case: UC02 - Delete a module
MSS
- User requests to show all the existing modules.
- CAP5BUDDY displays a list of the modules.
- User wants to delete a specific module from the list.
- User enters the command for module deletion:
delete [module name/code] - CAP5BUDDY deletes that module from the list.
Extensions
-
2a. The list is empty.
Use case ends here.
-
3a. The given index is invalid or does not exist.
-
3a1. CAP5BUDDY displays an error message.
Use case resumes at step 2.
-
{More to be added}
Use case: UC03 - Edit a module
MSS
- User requests to show all the existing modules.
- CAP5BUDDY displays all the modules in a list.
- User wants to edit a specific module from the list.
- User enters the new information for that module.
- CAP5BUDDY overwrites the existing information of that module.
Extensions
-
2a. The list is empty.
Use case ends here.
-
3a. The given index is invalid or does not exist.
-
3a1. CAP5BUDDY displays an error message.
Use case resumes at step 2.
-
-
4a. The new information is empty
- 4a1. CAP5BUDDY display an error message.
Use case resumes at step 2.
{More to be added}
Use case: Add a task to todo list
MSS
- User wants to add a task to the todo list.
- User chooses the type of task to be added.
- User enters the information regarding the task.
- CAP5BUDDY saves the given task in the todo list.
Use case ends.
Extensions
-
3a. Format for information about the task is invalid.
- 3a1. CAP5BUDDY displays an error message and ask the user to use the correct format.
- 3a2. User enters the information with the correct format.
Use case resumes at step 4
{More to be added}
Use case: Delete a task in the todo list
MSS
- User wants to delete a task in the todo list.
- User chooses the task to be deleted.
- CAP5BUDDY shows a prompt message asking if the user really wants to delete the task.
- User clicks the “YES” button.
- CAP5BUDDY deletes the task from the todo list.
Use case ends.
Extensions
-
4a. User accidentally clicked the “NO” button.
- 4a1. The prompt message disappears and CAP5BUDDY does not delete the task.
Use case ends.
{More to be added}
Use case: Sort task in the todo list
MSS
- User wants to sort the tasks in the todo list.
- User chooses the basis for sorting the tasks.
- CAP5BUDDY displays the sorted tasks based on the chosen basis.
Use case ends.
{More to be added}
Use case: Find a task in the todo list
MSS
- User wants to find a task in the todo list.
- User chooses whether to find task based on date or keyword.
- User enters the date or keyword.
- CAP5BUDDY displays all task based on the user input from step 3.
Use case ends.
Extensions
-
3a. User inputs the date with an incorrect format.
- 3a1. CAP5BUDDY displays an error message and ask the user to use the correct format.
- 3a2. User enters the date with the correct format.
Use case resumes at step 4
{More to be added}
Use case: Archive a task in the todo list
MSS
- User wants to archive a task in the todo list.
- CAP5BUDDY shows a prompt message asking if the user is sure to archive the task.
- User clicks the “YES” button.
- CAP5BUDDY archives the task.
Use case ends.
Extensions
-
3a. User accidentally clicked the “NO” button.
- 3a1. The prompt message disappears and CAP5BUDDY does not archive the task.
Use case ends.
{More to be added}
Use Case: Add assignment to CAP5BUDDY
MSS
- User requests to add an assignment to a module in CAP5BUDDY.
- CAP5BUDDY retrieves module from module list.
- CAP5BUDDY creates and adds assignment to the gradetracker in the module retrieved.
- CAP5BUDDY updates module in module list.
- CAP5BUDDY displays success message.
Extensions
-
2a. The module to add to is invalid.
-
CAP5BUDDY displays an error message.
Use case ends.
-
-
3a. One or more of the assignment details are invalid.
-
CAP5BUDDY displays an error message.
Use case ends.
-
Use Case: Add grade to a module
MSS
- User requests to add a grade to a module.
- CAP5BUDDY retrieves the module from the module list.
- CAP5BUDDY creates a new grade to replace the current one in the module.
- CAP5BUDDY updates module in module list.
- CAP5BUDDY displays success message
Extensions
-
3a. The current list of grades is empty.
-
CAP5BUDDY displays an error message.
Use case ends.
-
Use Case: Edit assignment in CAP5BUDDY
MSS
- User requests to edit an assignment in a module in CAP5BUDDY.
- CAP5BUDDY retrieves the module from the module list.
- CAP5BUDDY retrieves the assignment requested from the grade tracker in the module.
- CAP5BUDDY creates a new assignment to replace the assignment retrieved.
- CAP5BUDDY updates the grade tracker in the module.
- CAP5BUDDY updates the module in the module list.
- CAP5BUDDY displays success message.
Extensions
-
2a. The given module is invalid.
-
CAP5BUDDY displays an error message.
Use case ends.
-
-
3a. The assignment to retrieve is invalid.
-
CAP5BUDDY displays an error message.
Use case ends.
-
-
4a. The information to create a new assignment is invalid.
-
CAP5BUDDY displays an error message.
Use case ends.
-
{More to be added}
Use case: Delete an assignment
MSS
- User requests to delete an assignment in a module in CAP5BUDDY.
- CAP5BUDDY retrieves the module.
- CAP5BUDDY retrieves the assignment requested from the grade tracker in the module.
- CAP5BUDDY deletes the assignment.
- CAP5BUDDY updates the grade tracker in the module.
- CAP5BUDDY updates the module list with the module.
- CAP5BUDDY displays success message.
Extensions
-
2a. The provided module is invalid.
- CAP5BUDDY displays an error message.
-
3a. The provided assignment is invalid.
-
CAP5BUDDY displays an error message.
Use case ends.
-
{More to be added}
Use case: Add an event
MSS
- User request to create and add a new event into the tracker.
- CAP5BUDDY creates and add the event into the list.
Extensions
-
1a. The provide event information is invalid, missing date and time.
-
CAP5BUDDY displays an error message.
Use case resumes at step 1.
-
Use case: Edit an event
MSS
- User requests to view all existing events.
- CAP5BUDDY displays the list of all events.
- User requests to modify an existing event.
- CAP5BUDDY displays the newly modified event.
Extensions
-
3a. The newly inputted information is invalid format or empty.
-
CAP5BUDDY displays an error message.
Use case resumes at step 2.
-
-
3b. The requested event does not exist.
-
CAP5BUDDY displays an error message.
Use case resumes at step 2.
-
Use case: Delete an event
MSS
- User requests to view all existing events in the list.
- CAP5BUDDY displays all the events.
- User requests to remove a specific event from the list.
- CAP5BUDDY shows a success message and shows the new list.
Extensions
-
3a. The event to be removed does not exist.
-
CAP5BUDDY displays an error message.
Use case resumes at step 2.
-
Use case: Mark an event as completed
MSS
- User requests to show all events.
- CAP5BUDDY displays all tracked events.
- User requests to mark a specific event as completed.
- CAP5BUDDY shows the event as completed.
Extensions
-
3a. The event requested does not exist.
-
CAP5BUDDY shows an error message.
Use case resumes at step 2.
-
-
3b. The event requested is already marked as completed/
-
CAP5BUDDY does nothing.
Use case resumes at step 2.
-
Use case: Push the event back
MSS
- User requests to show all events.
- CAP5BUDDY displays all currently tracked events.
- User requests to push the event back.
- CAP5BUDDY shows the new date and time of the event.
Extensions
-
3a. The requested event does not exist.
-
CAP5BUDDY shows an error message.
Use case resumes at step 2.
-
-
3b. The new date and time is invalid.
-
CAP5BUDDY shows an error message.
Use case resumes at step 2.
-
Non-Functional Requirements
- Should work on any mainstream OS as long as it has Java
11or above installed. - A user with above average typing speed for regular English text (i.e. not code, not system admin commands) should be able to accomplish most of the tasks faster using commands than using the mouse.
- A user with not be able to access and modify other users’ data files.
- Should be usable by any novice that has never used this program before.
- The name of the modules should not exceed 40 characters.
- Should not contain more than 100 modules at 1 time.
{More to be added}
Glossary
- Mainstream OS: Windows, Linux, Unix, OS-X
- Module List: A list of all modules currently being tracked and stored in the CAP5BUDDY.
- CAP: Calculate Cumulative Average Point, a grading number that rates academic level in NUS.
Appendix: Instructions for manual testing
Given below are instructions to test the app manually.
Launch and shutdown
-
Initial launch
-
Download the jar file and copy into an empty folder
-
Double-click the jar file Expected: Shows the GUI with a set of sample contacts. The window size may not be optimum.
-
-
Saving window preferences
-
Resize the window to an optimum size. Move the window to a different location. Close the window.
-
Re-launch the app by double-clicking the jar file.
Expected: The most recent window size and location is retained.
-
-
{ more test cases … }
Module List
Deleting a module
-
Deleting a module while all modules are being shown
-
Prerequisites: List all un-archived modules using the
listmodulecommand. Multiple modules in the list. -
Test case:
deletemodule 1
Expected: First module is deleted from the list. Details of the deleted module shown in the status message. -
Test case:
deletemodule 0
Expected: No module is deleted. Error details shown in the status message. -
Other incorrect delete module commands to try:
deletemodule,deletemodule x,...(where x is larger than the module list size)
Expected: Similar to previous.
-
Archiving a module
-
Archiving a module while all modules are being shown
-
Prerequisites: List all modules using the
listmodulecommand. Multiple modules in the list. -
Test case:
archivemodule 1
Expected: First module is archived. Details of the deleted module shown in the status message. -
Test case:
archivemodule 0
Expected: No module is archived. Error details shown in the status message. -
Other incorrect archive module commands to try:
archivemodule,archivemodule x,...(where x is larger than the module list size)
Expected: Similar to previous.
-
-
Similar test procedures can be used to test the un-archive module feature. This can be done by using the keyword
unarchivemoduleinstead ofarchivemodule.- Prerequisites : List all archived modules using the
viewarchivecommand. Multiple modules in the list.
- Prerequisites : List all archived modules using the
Finding a module
-
Finding a module while all modules are being shown.
-
Prerequisites: List out all modules using the
listmodulecommand. Multiple modules in the list. -
Test case:
findmodule CS2030
Expected: Any module with their name containing the wordCS2030will be displayed in the contact list panel. -
Test case:
findmodule CS2030 CS2040
Expected: Any module with their name containing the wordCS2030orCS2040will be displayed in the contact list panel. -
Test case:
findmodule
Expected: No module is found.
-
Clearing modules
-
Clearing module list while all modules are being shown.
-
Prerequisites: List out all modules using the
listmodulecommand. Multiple modules in the list. -
Test case:
clearmodule
Expected: All modules cleared, module list should be empty.
-
-
Clearing module list while some modules are being shown.
-
Prerequisites: List out some modules using the
findmodulecommand. A few modules in the list. -
Test case:
clearmodule
Expected: All modules cleared, module list should be empty.
-
Calculate CAP
-
Calculate CAP
-
Prerequisites: There must be at least one module tagged as completed and containing grade point information.
-
Test case:
calculatecap
Expected: CAP is calculated. Details of the calculated CAP shown in the status message.
-
Calculate target CAP details
-
Target Cap
-
Prerequisites: There must be at least one module tagged as completed and containing grade point information.
-
Test case:
targetcap 5
Expected: Target CAP details are calculated. Target CAP details shown in the status message.
-
Adding a zoom link
-
Prerequisites: List out all modules using the
listmodulecommand. Multiple modules in the list.-
Test case:
addzoom 1 n/lecture z/https://nus-sg.zoom.us/zoomlink
Expected: A zoom linkhttps://nus-sg.zoom.us/zoomlinkfor the module lessonlectureis added to the first module in the displayed module list. Details of the newly created zoom link are shown in the status message. -
Test case:
addzoom 0 n/lecture z/https://nus-sg.zoom.us/zoomlink
Expected: No zoom link is added. Error message for invalid command format is shown in the status message. -
Test case:
addzoom x n/lecture z/https://nus-sg.zoom.us/zoomlinkwherexis larger than the module list size
Expected: No zoom link is added. Error message for invalid module index is shown in the status message. -
Test case:
addzoom
Expected: No zoom link is added. Error message for invalid command format is shown in the status message. -
Test case:
addzoom 1 n/*** z/https://nus-sg.zoom.us/zoomlink
Expected: No zoom link is added. Error message for invalid module lesson is shown in the status message. -
Test case:
addzoom 1 n/lecture z/https://invalidzoomlink
Expected: No zoom link is added. Error message for invalid zoom link is shown in the status message. -
Test case:
addzoom 1 n/lecture
Expected: No zoom link is added. Error message for invalid command format is shown in the status message. -
Test case:
addzoom 1 z/https://nus-sg.zoom.us/zoomlink
Expected: No zoom link is added. Error message for invalid command format is shown in the status message.
-
Deleting a zoom link
-
Prerequisites: List out all modules using the
listmodulecommand. Multiple modules in the list.-
Test case:
deletezoom 1 n/lecture
Expected: Deletes the zoom link from the first module in the displayed module list for the module lessonlecture. Details of the module lesson and module which the zoom link was deleted from are shown in the status message. -
Test case:
deletezoom 0 n/lecture
Expected: No zoom link is deleted. Error message for invalid command format is shown in the status message. -
Test case:
deletezoom x n/lecturewherexis larger than the module list size
Expected: No zoom link is deleted. Error message for invalid module index is shown in the status message. -
Test case:
deletezoom
Expected: No zoom link is deleted. Error message for invalid command format is shown in the status message. -
Test case:
deletezoom 1 n/***
Expected: No zoom link is delete. Error message for invalid module lesson is shown in the status message.
-
Editing a zoom link
-
Prerequisites: List out all modules using the
listmodulecommand. Multiple modules in the list.-
Test case:
editzoom 1 n/lecture z/https://nus-sg.zoom.us/newZoomLink
Expected: The zoom link for the module lessonlecturein the first module in the displayed module list is edited tohttps://nus-sg.zoom.us/newZoomLink. Details of the newly created zoom link are shown in the status message. -
Test case:
editzoom 0 n/lecture z/https://nus-sg.zoom.us/newZoomLink
Expected: No zoom link is edited. Error message for invalid command format is shown in the status message. -
Test case:
editzoom x n/lecture z/https://nus-sg.zoom.us/newZoomLinkwherexis larger than the module list size
Expected: No zoom link is edited. Error message for invalid module index is shown in the status message. -
Test case:
editzoom
Expected: No zoom link is edited. Error message for invalid command format is shown in the status message. -
Test case:
editzoom 1 n/*** z/https://nus-sg.zoom.us/newZoomLink
Expected: No zoom link is edited. Error message for invalid module lesson is shown in the status message. -
Test case:
editzoom 1 n/lecture z/https://invalidzoomlink
Expected: No zoom link is edited. Error message for invalid zoom link is shown in the status message. -
Test case:
editzoom 1 n/lecture
Expected: No zoom link is edited. Error message for invalid command format is shown in the status message. -
Test case:
editzoom 1 z/https://nus-sg.zoom.us/newZoomLink
Expected: No zoom link is added. Error message for invalid command format is shown in the status message.
-
Contact List
Adding a contact
-
Adding a contact while all contacts are being shown.
-
Prerequisites: List out all contacts using the
listcontactcommand. Multiple contacts in the list. -
Test case:
addcontact n/john e/john@gmail.com
Expected: A contact with the namejohnand emailjohn@gmail.comwill be created. Details of the newly created contact are shown in the status message. -
Test case:
addcontact n/john e/john@gmail.com te/@johndoe
Expected: A contact with the namejohn, emailjohn@gmail.comand telegram@johndoewill be created. Details of the newly created contact are shown in the status message. -
Test case:
addcontact n/john e/john@gmail.com t/tag1 t/tag2
Expected: A contact with the namejohn, emailjohn@gmail.comand tagstag1andtag2will be created. Details of the newly created contact are shown in the status message. -
Test case:
addcontact n/*** e/john@gmail.com
Expected: The contact will not be created. Error message for invalid contact name is shown in the status message. -
Test case:
addcontact n/john e/incorrectemail.com
Expected: The contact will not be created. Error message for invalid contact email is shown in the status message. -
Test case:
addcontact n/john e/john@gmail.com te/john
Expected: The contact will not be created. Error message for invalid contact telegram is shown in the status message. -
Test case:
addcontact n/john e/john@gmail.com t/&^*
Expected: The contact will not be created. Error message for invalid contact tag is shown in the status message. -
Test case:
addcontact
Expected: No contact will be created. Error message for invalid command format is shown in the status message. -
Test case:
addcontact n/john
Expected: No contact will be created. Error message for invalid command format is shown in the status message. -
Test case:
addcontact e/john@gmail.com
Expected: No contact will be created. Error message for invalid command format is shown in the status message.
-
Deleting a contact
-
Deleting a contact while all contacts are being shown.
-
Prerequisites: List out all contacts using the
listcontactcommand. Multiple contacts in the list. -
Test case:
deletecontact 1
Expected: The first contact is deleted from the list. Details of the deleted contact shown in the status message. -
Test case:
deletecontact 0
Expected: No contact is deleted. Error message for invalid contact index shown in the status message. The contact list remains unchanged. -
Test case:
deletecontact xwhere x is larger that the displayed contact list size
Expected: No contact is deleted. Error message for invalid contact index shown in the status message. The contact list remains unchanged. -
Test case:
deletecontact
Expected: No contact is deleted. Error message for invalid contact index shown in the status message. The contact list remains unchanged.
-
-
Deleting a contact while some contacts are being shown
-
Prerequisites: List out some contacts using the
findcontactcommand. A few contacts in the list. -
Test case:
deletecontact 1(assuming there is at least one contact in the displayed contact list)
Expected: The first contact is deleted from the filtered contact list. Details of the deleted contact shown in the status message. -
Test case:
deletecontact 0
Expected: No contact is deleted. Error message for invalid command format shown in the status message. The contact list remains unchanged. -
Test case:
deletecontact xwherexis larger that the displayed contact list size
Expected: No contact is deleted. Error message for invalid contact index shown in the status message. The contact list remains unchanged.
-
Editing a contact
-
Editing a contact while all contacts are being shown.
-
Prerequisites: List out all contacts using the
listcontactcommand. Multiple contacts in the list. -
Test case:
editcontact 1 n/john e/john@gmail.com
Expected: The first contact in the displayed contact list will be edited with the namejohnand emailjohn@gmail.com. Details of the newly edited contact are shown in the status message. -
Test case:
editcontact 1 te/@johndoe
Expected: The first contact in the displayed contact list will be edited with the telegram@johndoe. Details of the newly edited contact are shown in the status message. -
Test case:
editcontact 1 te/tag1
Expected: The first contact in the displayed contact list will be edited with the tagtag1. Details of the newly edited contact are shown in the status message. -
Test case:
editcontact 1 t/
Expected: The first contact in the displayed contact list will be edited with all tags removed. Details of the newly edited contact are shown in the status message. -
Test case:
editcontact 1 n/***
Expected: The first contact will not be edited. Error message for invalid contact name is shown in the status message. -
Test case:
editcontact e/incorrectemail.com
Expected: The first contact will not be edited. Error message for invalid contact email is shown in the status message. -
Test case:
editcontact 1 te/john
Expected: The first contact will not be edited. Error message for invalid contact telegram is shown in the status message.
-
-
Test case:
editcontact 1 t/&^*
Expected: The first contact will not be edited. Error message for invalid contact tag is shown in the status message. -
Test case:
editcontact 0 n/john
Expected: No contact is edited. Error message for invalid command format shown in the status message. The contact list remains unchanged. -
Test case:
editcontact x n/johnwherexis larger that the displayed contact list size
Expected: No contact is edited. Error message for invalid contact index shown in the status message. The contact list remains unchanged. -
Test case:
editcontact
Expected: No contact is edited. Error message for invalid command format shown in the status message. The contact list remains unchanged.
Finding a contact
-
Finding a contact while all contacts are being shown.
-
Prerequisites: List out all contacts using the
listcontactcommand. Multiple contacts in the list. -
Test case:
findcontact n/john
Expected: All contacts with their name containing the wordjohnwill be displayed in the contact list panel. -
Test case:
findcontact t/friend
Expected: All contacts containing the tagfriendwill be displayed in the contact list panel.
-
-
Test case:
findcontact n/john t/friend
Expected: All contacts which fulfil all the following criteria will be displayed in the contact list panel.-
Contact name contains the word
john -
Contains the tag
friend
-
-
Test case:
findcontact 1 t/john
Expected: No contact will be found. Error message for invalid command format shown in the status message. The displayed contact list remains unchanged. -
Test case:
findcontact n/***
Expected: No contact will be found. Error message for invalid contact name shown in the status message. The displayed contact list remains unchanged. -
Test case:
findcontact t/$$
Expected: No contact will be found. Error message for invalid contact tag shown in the status message. The displayed contact list remains unchanged. -
Test case:
findcontact
Expected: No contact will be found. Error message for invalid command format shown in the status message. The displayed contact list remains unchanged.
Clearing all contacts
-
Clearing contact list while all contacts are being shown.
-
Prerequisites: List out all contacts using the
listcontactcommand. Multiple contacts in the list. -
Test case:
clearcontact
Expected: All contacts cleared, displayed contact list should be empty.
-
-
Clearing contact list while some contacts are being shown.
-
Prerequisites: List out some contacts using the
findcontactcommand. A few contacts in the list. -
Test case:
clearcontact
Expected: All contacts cleared, displayed contact list should be empty.
-
Listing all contact
-
Listing all contacts while all contacts are being shown.
-
Prerequisites: List out all contacts using the
listcontactcommand. Multiple contacts in the list. -
Test case:
listcontact
Expected: Displayed contact list remains unchanged.
-
-
Listing all contacts while some contacts are being shown.
-
Prerequisites: List out some contacts using the
findcontactcommand. A few contacts in the list. -
Test case:
listcontact
Expected: All contacts in the contact list are displayed.
-
Todo List
-
Labeling task as completed while all tasks are being shown
-
Test case:
completetask 1
Expected: First task is labelled as completed. Details of the completed module will be shown. -
Test case:
completetask 0
Expected: No task is labelled as completed. Error details will be shown. -
Other incorrect
completetaskcommand to try:completetask,completetask y,...(where xy is larger than the todo list size)
Expected: Similar to previous.
-
Scheduler
Add Event
-
Adding an Event while all Events are shown.
- Test case:
addevent n/CS2100 Test d/2-1-2020 1200
Expected: Event added into the list. Added Event can be found at the bottom of the list.
- Test case:
-
Adding an Event that is already present.
- Test case:
addevent n/CS2100 Test d/2-1-2020 1200
Expected: Duplicate Event Error message thrown, the Event will not be added to the list.
- Test case:
Delete Event
-
Deleting an Event from the list shown in the GUI.
- Test case:
deleteevent 1
Expected: Event of index 1 will be deleted and removed from the list of Events.
- Test case:
-
Deleting an Event with an invalid index
- Test case:
deleteevent -1
Expected: Invalid event index Error message thrown, no Events will be deleted.
- Test case:
Edit Event
-
Editing an Event name
- Test case:
editevent 1 n/Testing fileExpected: The Event in index 1 will have its name changed toTesting file.
- Test case:
-
Editing an Event name using invalid event index
- Test case:
editevent -1 n/TestingExpected: Invalid event index Error message thrown, no Events will be edited.
- Test case:
Finding a task
-
Prerequisites: List out all tasks using the
listtaskcommand. Multiple tasks in the list.-
Test case:
findtask n/lab
Expected: All tasks with their name containing the wordlabwill be displayed in the todolist panel. -
Test case:
findtask t/easy
Expected: All tasks containing the tageasywill be displayed in the todolist panel. -
Test case:
findtask d/2020-01-01
Expected: All tasks with the date2020-01-01will be displayed in the todolist panel. -
Test case:
findtask p/high
Expected: All tasks with the priorityhighwill be displayed in the todolist panel. -
Test case:
findtask s/completed
Expected: All tasks with the statuscompletedwill be displayed in the todolist panel. -
Test case:
findtask n/lab d/2020-01-01 p/high
Expected: All tasks which fulfil all the following criteria will be displayed in the todolist panel.-
Task name contains the word
lab -
Has the date
2020-01-01 -
Has the priority
high
-
-
Test case:
findtask 1 t/easy
Expected: No task will be found. Error message for invalid command format shown in the status message. The displayed todolist remains unchanged. -
Test case:
findtask n/***
Expected: No task will be found. Error message for invalid task name shown in the status message. The displayed todolist remains unchanged. -
Test case:
findtask t/$$
Expected: No task will be found. Error message for invalid task tag shown in the status message. The displayed todolist remains unchanged. -
Test case:
findtask p/invalidPriority
Expected: No task will be found. Error message for invalid task priority shown in the status message. The displayed todolist remains unchanged. -
Test case:
findtask d/invalidDate
Expected: No task will be found. Error message for invalid task date shown in the status message. The displayed todolist remains unchanged. -
Test case:
findtask s/invalidStatus
Expected: No task will be found. Error message for invalid task status shown in the status message. The displayed todolist remains unchanged. -
Test case:
findtask
Expected: No task will be found. Error message for invalid command format shown in the status message. The displayed todolist remains unchanged.
-
Common Features
Undo a command
-
There is an undoable command
-
Prerequisites: A command that modifies the storage has been entered is since the application started.
-
Test case:
undo
Expected: Most recent undoable command is undone. Undo command success message shown in the status message.
-
-
There is no undoable command
-
Prerequisites: The application is freshly started with no commands entered yet.
-
Test case:
undo
Expected: No command is undone. Error details shown in the status message.
-
Redo a command
-
There is a redoable command
-
Prerequisites: A command has been redone. Commands that modify the storage have not been entered since. (e.g deletemodule)
-
Test case:
redo
Expected: Most recent undoable command is undone. Redo command success message shown in the status message.
-
-
There is no redoable command
-
Prerequisites: The application is freshly started with no commands entered yet.
-
Test case:
redo
Expected: No command is redone. Error details shown in the status message.
-
Saving data
-
Dealing with missing/corrupted data files
- {explain how to simulate a missing/corrupted file, and the expected behavior}
-
{ more test cases … }