User Guide
Introduction
Do you even find yourself struggling to manage all the different kinds of module information that you have to track? Are there too many modules, contacts, tasks and events to remember? Well, do not worry, CAP5Buddy is here to help.
CAP5Buddy is a desktop application that helps NUS SoC students to keep track of their module details efficiently. It helps you to centralize key module details, contacts and information while following your study progress. It is optimized for use via a Command Line Interface (CLI), while still having the benefits of a Graphical User Interface (GUI). If you can type fast, CAP5Buddy can help you manage your module details and information more efficiently than traditional GUI apps.
- Introduction
- Quick start
- Navigating the GUI
-
Features
- Module Tracker Features
-
Zoom link management feature
- Zoom link command parameters
- Adding a zoom link for a specific lesson to a module:
addzoom - Editing a zoom link of a specific lesson in a module:
editzoom - Deleting a zoom link for a specific lesson from a module:
deletezoom - Deleting a module:
deletemodule - Editing a module :
editmodule - Clearing the module list:
clearmodule - What is an Assignment ? :
Assignment - Adding assignment to a module:
addassignment - Editing an assignment in a module:
editassignment - Deleting an assignment in a module:
deleteassignment - Adding a grade to a module:
addgrade - Calculating Cumulative Average Point(CAP):
calculatecap - Calculating target CAP details:
targetcap
- Todo List Features
-
Contact List Features
- Contact command parameters
- Adding a contact:
addcontact - Locating contacts:
findcontact - Listing all contacts:
listcontact - Editing a contact:
editcontact - Deleting a contact:
deletecontact - Sorting contacts:
sortcontact - Marking contacts as important:
importantcontact - Resetting contacts:
resetcontact - Clearing the contact list:
clearcontact
- Scheduler Features
- General Features
- FAQ
- Command Summary for Module Tracker
- Command Summary for Contact List
- Command summary for Todo List
- Command summary for Scheduler
- Command summary for general features
Quick start
-
Ensure you have Java
11or above installed in your Computer. -
Download the latest
CAP5Buddy.jarfrom here. -
Copy the file to the folder you want to use as the home folder for the CAP5Buddy application.
-
Double-click the file to start the app. The GUI similar to the one below should appear in a few seconds.

Navigating the GUI
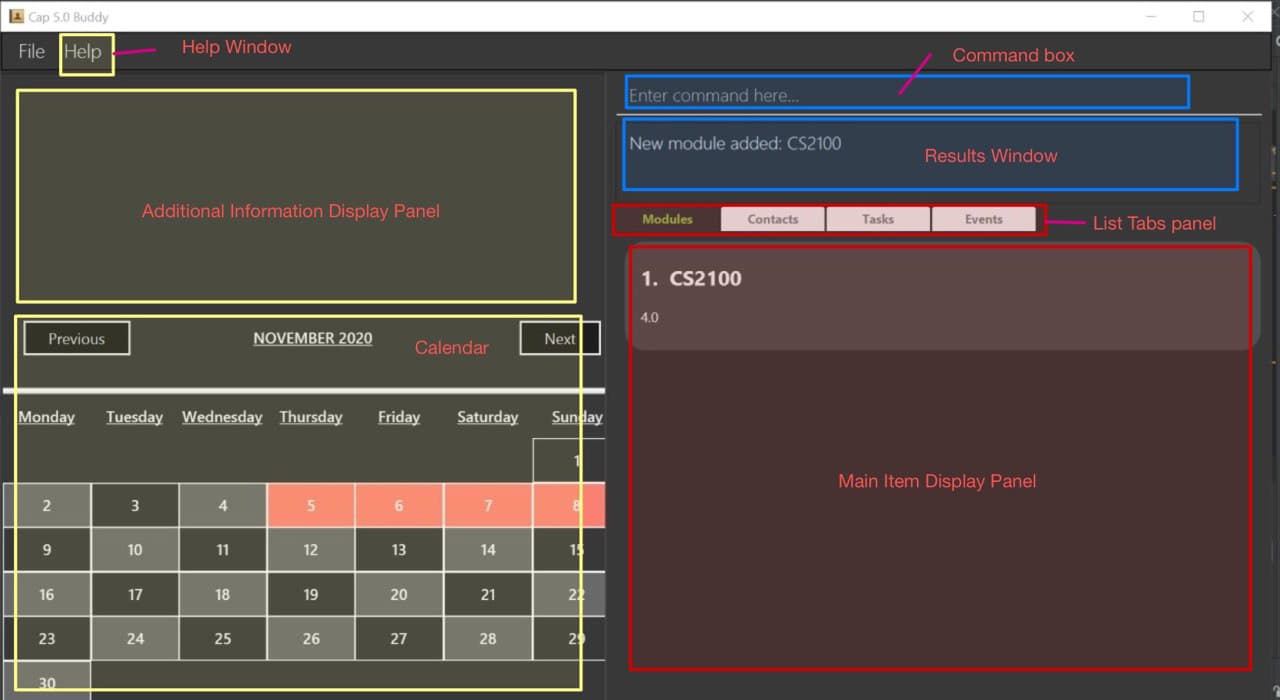
Key Components
Help Window
You can click this button to open up the User Guide help window.
Additional information Display Panel
This panel displays all the additional information of each item when a view Command is called.
Calendar
This is where you can view your calendar, it is as accurate as a built-in calendar and it also displays those days that have an existing event with a color coded box.
Command Box
Here is where you enter your command input to be executed by the application.
Results Display Panel
This panel will display the status of the command, whether it passes or fails, and displays some basic information or error message.
Main Item Display Panel
Here is where all of the items that are added into the application can be found. It shows all the items as individual cell boxes.
List Tabs Panel
From here, you can choose between the different windows to view.
Features
Some common symbols that can be found in the user guide and their meanings:
-
 Represents useful information that should be noted.
 -
 Represents a useful tip.
 -
 Represents a warning that users should be aware of.
![]() Notes about the command format:
Notes about the command format:
-
Words in
UPPER_CASEare the parameters to be supplied by you.
e.g. inaddtask n/NAME,NAMEis a parameter which can be used asaddtask n/Week 11 quiz. -
Items in square brackets are optional. Items without square brackets are compulsory fields.
e.g.addtask n/NAME [p/PRIORITY]can be used asaddtask n/Week 11 quiz p/highestor asaddtask n/Week 11 quiz -
Items with
...after them can be used multiple times, including zero times.
e.g.[t/TAG]...can be used as ` ` (i.e. 0 times),t/easy,t/friend t/importantetc. -
Argument parameters can be provided in any order, unless one of the parameter is
INDEX, in which caseINDEXhas to be the first parameter. e.g. if the command specifiesedittask INDEX [n/NAME] [p/PRIORITY], thenedittask INDEX [p/PRIORITY] [n/NAME]is also acceptable, butedittask [n/NAME] INDEX [p/PRIORITY]is not allowed. -
If you enter duplicate parameters when the command format does not expect multiple occurrence of the same parameter, i.e. parameters without
...at the back in the command format (e.g. n/NAME), the application will only consider the argument of the last occurring duplicate parameter. e.g. inaddtask n/Week 11 quiz n/Lab assignment,n/Week 11 quizwill be ignored and a task with the nameLab assignmentwill be added.
Module Tracker Features
Adding a new module: addmodule
Creates and add a new module to be stored in the system.
Format: addmodule n/MODULE_NAME [t/TAG]...
-
You can only key in the module code for the
MODULE_NAME. Invalid module codes, such asCS2103TTwill not be accepted. -
The module code you input must be capitalised, eg.
cs2103twill be rejected whileCS2103Tis correct.
Example :
-
addmodule n/CS2103Tcreates and adds the module CS2103T.
Expected Outcome:

Other helpful example(s):
-
addmodule n/CS2103T t/Coremodulecreates and adds the module CS2103T with the tag CoreModule.
Adding a new completed module: addcmodule
Creates and add a new completed module to be stored in the system.
Format: addcmodule n/NAME mc/MODULAR_CREDITS gp/GRADE_POINT [t/TAG]...
- Using this command to add a completed module will automatically tag the module as completed.
- Completed modules can be modified using
editmodule. Do note that editing tags will reset all existing tags, therefore in order to keep the completed tag after editing, you must specify the completed tag parameter in theeditmodulecommand by addingt/completedto your command line exactly. - Completed modules added this way will be used for CAP calculation purposes.
Examples:
-
addcmodule n/CS2103T mc/4.0 gp/5.0creates and adds the module named CS2103T with 4 modular credits and 5 grade points with acompletedtag. -
addcmodule n/CS2101 mc/2.0 gp/4.5 t/year1creates and adds the module named CS2101 with 2 modular credits and 4.5 grade points with the tagscompletedandyear1.
Viewing a module: viewmodule
Displays a snapshot of a module stored in the system.
Format: viewmodule INDEX
-
The module viewed will be at the
INDEXposition of the current displayed list. -
The index refers to the index number of the module shown on the displayed module list.
-
The index must be a positive integer 1, 2, 3…
-
Clicking on the
ZoomLinkdisplayed(if any) will copy theZoomLinkinto your clipboard. -
Note that the displayed snapshot is not updated when the module being displayed is changed.
Example:
-
viewmodule 1views the first module in the displayed list.
Expected Outcome:

Archiving a module: archivemodule
Archives a module in the module list and moves it into archived storage.
Format: archivemodule INDEX
-
The module archived will be at the
INDEXposition of the currently displayed un-archived list. -
The index refers to the index number of the module shown on the displayed un-archived module list.
-
You can only call this command when viewing the un-archived module list.
-
The index must be a positive integer 1, 2, 3…
Example:
-
archivemodule 1Archives the first module in the displayed list.
Expected Outcome:

Other helpful example(s):
* `archivemodule 2` Archives the second module in the displayed list.
Un-archiving a module: unarchivemodule
Un-Archives a module in the module list and moves it back into current module list storage.
Format: unarchivemodule INDEX
-
The module un-archived will be at the
INDEXposition of the currently displayed archived list. -
The index refers to the index number of the module shown on the displayed archived module list.
-
You can only call this command when viewing the archived module list.
-
The index must be a positive integer 1, 2, 3…
Examples:
-
unarchivemodule 1Un-Archives the first module in the displayed archived module list. -
unarchivemodule 2Un-Archives the second module in the displayed archived module list.
View-archived modules: viewarchive
Allows you to view the archived module list on the display.
Format: viewarchive
- Executing this command will remove the current un-archived module list from display if you are currently viewing it. You can use the
listcommand to display the un-archived module list(See next section).
Examples:
-
viewarchiveViews the archived module list on the display.
View un-archived modules: listmodule
Allows you to view the un-archived module list on the display.
Format: listmodule
- Executing this command will remove the current archived module list from display if you are currently viewing it. You can use the
viewarchivecommand to display the archived module list(See previous section).
Examples:
-
listmoduleViews the un-archived module list on the display.
Locating modules: findmodule
Finds all modules that fulfil the provided module name search criteria.
Format: findmodule [MODULE_NAME_KEYWORDS...]
-
The search is case-insensitive, e.g.
cs2030will matchCS2030. -
You are allowed to provide multiple search keywords for the module name parameter.
-
When you are providing module name keywords, separate distinct keywords with a whitespace, e.g.
findmodule CS2030 CS2100will search for contacts using the 2 distinct keywordsCS2030andCS2100. -
The order of the search keywords does not matter, e.g.
CS2030 CS2100will matchCS2100 CS2030. -
You should ensure that keywords are not be blank and at least one search parameter should be provided.
-
Search Parameters:
-
Name
-
Module with a name matching at least one of the name keywords provided will be considered to have fulfilled the module name search criteria.
-
Module name must match your search criteria exactly for module to be displayed, e.g.
cs2030will matchCS2030but notCS20301.
-
-
Example:
-
findmodule cs2030returns the module(if any) with the module nameCS2030.
Expected Outcome:

Other helpful example(s):
-
findmodule cs2030 cs2100returns the modules(if any) with the module namesCS2030orCS2100.
Zoom link management feature
The following features allow you to manage the zoom links for your respective modules and perform various zoom link related functions.
The section below provides some useful details about the zoom list management features.
![]() Note:
Note:
As zoom links are only displayed on the additional information display panel, and not the main item display panel,
to view all your zoom links, you can use the viewmodule INDEX command, where INDEX refers to the index of the module with the zoom links.
![]() Note:
Note:
To view changes or updates made to zoom links, you should use the command viewmodule INDEX, where INDEX refers to
the index of the module with the zoom links, after executing the zoom link command.
e.g. addzoom 1 n/lecture z/https://nus-sg.zoom.us/j/huf7r3 followed by viewmodule 1
![]() Note:
Note:
Each lesson in a module will only be allowed to have one zoom link,
i.e. you will not be allowed to add multiple zoom links to the same lesson.
Zoom link command parameters
-
ZOOM_LINK:-
Represents the zoom link of a module
-
All zoom links should adhere to the following constraints:
-
Belong to the NUS domain and have the following format:
https://nus-sg.zoom.us/[path] -
The zoom link path should only contain alphanumeric characters and these special characters:
?=/, and should not be blank -
Example:
https://nus-sg.zoom.us/j/babcyg?pwd=
-
-
-
LESSON_NAME:-
Represents the name of a module lesson which contains the zoom link
-
Lesson name should only contain alphanumeric characters, spaces and the hyphen character, and it should not be blank.
-
Example:
Lecture-weds
-
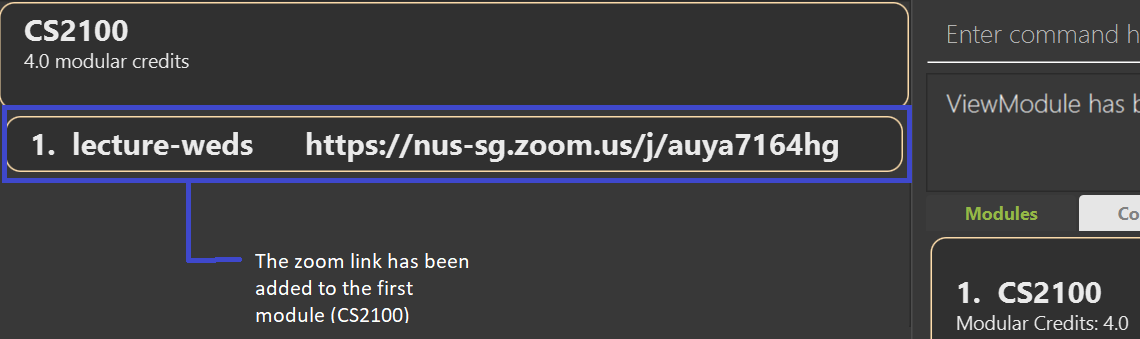
Adding a zoom link for a specific lesson to a module: addzoom
Adds a zoom link for a specific lesson to an existing module.
![]() If you have 2 or more types of lectures in the same module, e.g. lecture on Monday and
Wednesday, and they have different zoom links, you can add 2 zoom links with different lesson names
e.g.
If you have 2 or more types of lectures in the same module, e.g. lecture on Monday and
Wednesday, and they have different zoom links, you can add 2 zoom links with different lesson names
e.g. Mon-Lecture and Wed-Lecture.
Format: addzoom INDEX n/LESSON_NAME z/ZOOM_LINK
-
Adds a zoom link to the module at the specified
INDEX. -
The index refers to the index number of the module shown on the displayed module list.
-
The index must be a positive integer 1, 2, 3…
-
LESSON_NAMErefers to the name of the module lesson which the added zoom link belongs to.
Example:
addzoom 1 n/lecture-weds z/https://nus-sg.zoom.us/j/auya7164hg adds a zoom link https://nus-sg.zoom.us/j/auya7164hg to the first module
in the displayed module list for the lesson lecture-weds.
![]() Note:
Note:
To view the newly added zoom link, you have to use the viewmodule INDEX command after the addzoom command, where INDEX refers to the index of the module which contains the added zoom link
Expected Outcome:
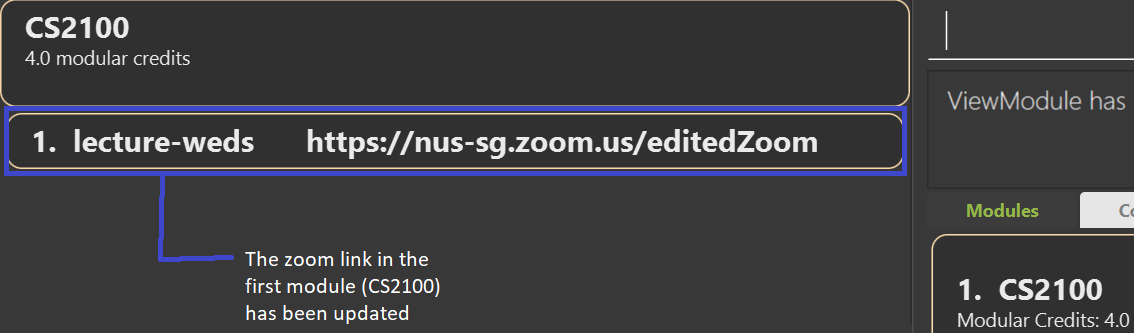
Editing a zoom link of a specific lesson in a module: editzoom
Edits a zoom link of a specific lesson in a module.
Format: editzoom INDEX n/LESSON_NAME z/EDITED_ZOOM_LINK
-
Edits the zoom link of the module at the specified
INDEX. -
The index refers to the index number of the module shown on the displayed module list.
-
The index must be a positive integer 1, 2, 3…
-
LESSON_NAMErefers to the name of the lesson which the target zoom link to be edited belongs to. -
LESSON_NAMErefers to the name of the module lesson which contains the zoom link to be edited.
![]() This command only allows you to edit the zoom link of an existing lesson in a module, i.e.
it does not allow you to edit the name of that lesson.
This command only allows you to edit the zoom link of an existing lesson in a module, i.e.
it does not allow you to edit the name of that lesson.
If you wish you to edit the lesson name while keeping the same zoom link, you can try the following:
1. Delete the zoom link that belongs to the lesson which you wish to edit.
2. Add the same zoom link with the edited lesson name.
Example:
editzoom 1 n/lecture-weds z/https://nus-sg.zoom.us/editedZoom edits the zoom link of the lesson lecture-weds
in the first module to be https://nus-sg.zoom.us/editedZoom
![]() Note:
Note:
To view the newly edited zoom link, you have to use the viewmodule INDEX command after the editzoom command, where INDEX refers to the index of the module which contains the edited zoom link
Expected Outcome:
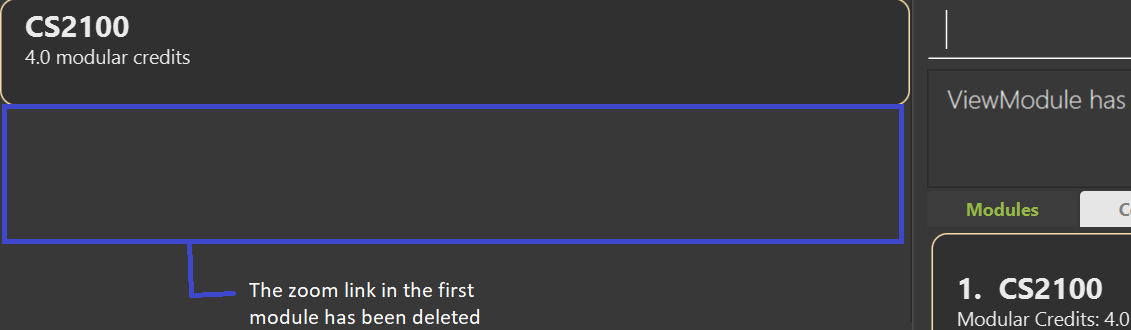
Deleting a zoom link for a specific lesson from a module: deletezoom
Deletes a zoom link for a specific lesson from an existing module.
Format: deletezoom INDEX n/LESSON_NAME
-
Deletes a zoom link from the module at the specified
INDEX. -
The index refers to the index number of the module shown on the displayed module list.
-
The index must be a positive integer 1, 2, 3…
-
LESSON_NAMErefers to the name of the module lesson which contains the zoom link to be deleted.
Example
deletezoom 1 n/lecture-weds deletes the zoom link of the lesson lecture-weds from the 1st module in the displayed module list.
![]() Note:
Note:
To view the changes made, you have to use the viewmodule INDEX command after the deletezoom command, where INDEX refers to the index of the module which the zoom link was deleted from.
Expected Outcome:
Deleting a module: deletemodule
Deletes a module in the displayed module list.
Format: deletemodule INDEX
-
The index must be a positive integer 1, 2, 3…
-
The index refers to the index number of the module shown on the displayed module list.
Examples:
-
deletemodule 1deletes the module at position1
Editing a module : editmodule
Edits an existing module in the displayed module list with new details.
Format: editmodule INDEX [n/MODULE_NAME] [mc/MODULAR_CREDITS] [gp/GRADE_POINT] [t/TAG]...
-
Edits the details of the module at position
INDEXwith the optional fields listed. -
The index must be a positive integer 1, 2, 3…
-
At least one of the optional fields
[MODULE_NAME],[MODULAR_CREDITS]or[GRADE_POINT]must be present. -
You can add
[TAG]s to a module through this command,eg.Tutorial. -
You can remove all the contact’s tags by typing
t/without specifying any tags after it.
Examples:
-
editmodule 1 n/CS2030edits theMODULE_NAMEfor a module at index1toCS2030. -
editmodule 3 mc/8 gp/4.5edits theMODULAR_CREDITSandGRADE_POINTfor the module at index3to8.0modular credits and the grade points to4.5.
To be implemented:
- We are working on adding the functionality to edit the zoom links for the module for each lesson.
Clearing the module list: clearmodule
Clears all un-archived modules.
Format: clearmodule
-
Tips : If you accidentally cleared the whole module list, you can always use the
undocommand to restore the module list.
What is an Assignment ? : Assignment
Each assignment is stored under a module and represents the cumulative results achieved for that module. Your assignments will contain the following fields:
-
ASSIGNMENT_NAME- Represents the name of the assignment you are providing, eg.
Quiz 1orOral Presentation 2.
- Represents the name of the assignment you are providing, eg.
-
ASSIGNMENT_PERCENTAGE-
Represents the percentage the assignment carries for the final grade, eg. if
Quiz 1is worth15% of the final grade, theASSIGNMENT_PERCENTAGEshould be15.0%. -
Can only be a value from
0.00 - 1.00
-
-
ASSIGNMENT_RESULT- Represents your results attained for the assignment, eg. if a score of
75/100is achieved forOral Presentation 2, anASSIGNMENT_RESULTof0.75should be input.
- Represents your results attained for the assignment, eg. if a score of
Adding assignment to a module: addassignment
Adds an assignment to an existing module.
Format: addassignment n/MODULE_NAME a/ASSIGNMENT_NAME %/ASSIGNMENT_PERCENTAGE r/ASSIGNMENT_RESULT
-
Adds an assignment
ASSIGNMENT_NAMEto a moduleMODULE_NAME -
The assignment takes up a percentage of the final grade,
ASSIGNMENT_PERCENTAGE. -
Your
ASSIGNMENT_RESULTcan only range from0.00 - 100 -
The changes for your assignment would only be seen through using the
viewmodulecommand.
Example:
-
addassignment n/CS2100 a/Quiz 1 %/5 r/80adds an assignment calledQuiz 1to the moduleCS2100.Quiz 1carries5% of the final grade and the result for this assignment is80.
Expected Outcome:

Editing an assignment in a module: editassignment
Edits an assignment at the specified position in the specified module.
Format: editassignment INDEX n/MODULE_NAME [a/ASSIGNMENT_NAME] [%/ASSIGNMENT_PERCENTAGE]
[r/ASSIGNMENT_RESULT]
-
The fields that can be edited are the
ASSIGNMENT_NAME,ASSIGNMENT_PERCENTAGEof the final grade andASSIGNMENT_RESULT. -
At least one of the optional fields must be present.
-
The index must be a positive integer 1, 2, 3…
-
Your new
ASSIGNMENT_RESULTcan only range from0.00 - 100 -
The
viewmodulecommand needs to be called again to update the assignment visually.
Examples of usage:
-
editassignment 1 n/CS2100 a/Quiz 1edits the assignment at position1of the moduleCS2100with a new assignment name,Quiz 1. -
editassignment 1 n/CS2100 %/20 r/80edits the assignment at position1of the moduleCS2100with a new assignment percentage,20% of the final grade, and a new assignment result,80.
To be implemented:
- We are working on showing the assignment changes without the need to call
viewmoduleagain as we see the possible hassle involved.
Deleting an assignment in a module: deleteassignment
Deletes an assignment at the specified position in the specified module.
Format: deleteassignment INDEX n/MODULE_NAME
-
You can retrieve the index of the assignment list by using the
viewmodulecommand to list out the details of the module. -
The index must be a positive integer 1, 2, 3…
-
The changes for your assignment would only be seen through using the
viewmodulecommand.
Example of usage:
-
deleteassignment 1 n/CS2100deletes the assignment at position1of the moduleCS2100.
Adding a grade to a module: addgrade
Adds a grade to the specified module.
Format: addgrade n/MODULE_NAME g/GRADE
-
The
MODULE_NAMEmust match exactly with an existing module in the module list. -
The
GRADEcan only range from 0 - 100. -
The existing
GRADEwill be overwritten by the newGRADEbeing added. -
The changes for your assignment would only be seen through using the
viewmodulecommand.
Example of usage:
-
addgrade n/CS2100 g/85adds a grade of85to the moduleCS2100.
Expected Outcome:

Calculating Cumulative Average Point(CAP): calculatecap
Calculates your CAP based on completed modules
Format: calculatecap
Examples:
-
calculatecapcalculate the user’s cap
Calculating target CAP details: targetcap
Calculates helpful CAP details based on the target CAP you input
Format: targetcap [tc/TARGET_CAP]
- The target cap refers to the desired CAP input by you
Example:
-
targetcap tc/4.5Calculates CAP achievement required for planned modules in order to achieve target CAP
Todo List Features
The GUI for TodoList is shown below

Todo List can store all of your tasks that you need to complete. Before you start learning how to use the commands for Todo List, you should first understand the details of a task.
What is a Task ? : Task
A task contains 5 type of information that can be useful when you are tying to track all the things that you need to do. Below are the explanations for each information that you can add to a task.
-
TASK_NAME-
Represents the name of the task which can be a short description.
-
Can only consist of 30 characters.
-
Tips : You can set the
TASK_NAMEto be short and clear, for instance, you can name the task as “Finish Lab09”. this way, you can read through the list much faster.
-
-
TAG- Represents a single-word (tag) that can help describe the type of the task.
-
PRIORITY-
Represents how important the task is.
-
You can choose 4 pre-defined priority level, which are,
HIGHESTHIGHNORMALLOW
-
-
DATE- You can use
DATEbased on your need, for instance, you can set the `DATE as the deadline of a task or a target deadline that is earlier than the real deadline. It’s all up to you.
- You can use
-
STATUS-
Represents the progress status of a task.
-
Only have two value which are
CompletedorNote Completed. -
When you create a new task, it will have a status of
Not Completedby default.
-
Adding a task: addtask
Adds a task to the list.
Format: addtask n/TASK_NAME [t/TAG]... [p/PRIORITY] [d/DATE]
-
All fields except
TASK_NAMEare optional. -
The order of the input does not matter.
-
TASK_NAMEshould not be longer than 30 characters. -
You can provide more than one
TAGe.g.t/LAB t/DAILY. -
You can choose 3 level of
PRIORITYi.e.HIGH,NORMAL,LOW. -
Input for
PRIORITYis not case-sensitive e.g.highest,Highestwork fine. -
Datemust be in the form ofYYYY-MM-DDe.g.2020-12-20.
Examples:
-
addtask n/read book t/DAILY t/HOBBY p/low d/2020-10-10adds a task with the given input. -
addtask n/finish assignemnt t/SCHOOL d/2020-12-10adds a task with the given input.
Expected output:

Deleting a task: deletetask
Deletes a task from the list.
Format: deletetask INDEX
-
You can get the
INDEXfrom the current displayed list under theTaskstab. -
Index must be a positive integer.
Examples:
-
deletetask 1deletes the first task in the list. -
deletetask 2deletes the second task in the list.
Editing a task: edittask
Edits a task in the list.
Format: edittask INDEX [n/TASK_NAME] [t/TAG]... [p/PRIORITY] [d/DATE]
-
You can get the
INDEXfrom the current displayed list under theTaskstab. -
INDEXmust be a positive integer. -
The order of the input does not matter.
-
At least one field must not be empty.
-
TASK_NAMEshould not be longer than 30 characters. -
Editing the
TAGwill overwrite all the currentTAGs.
Examples:
-
edittask 1 n/read chapter 5 p/HIGHedits the first task name toread chapter 5and and the priority toHIGH. -
edittask 2 n/read tutorial d/2020-11-04edits the second task name toread tutorialand and theDATEto2020-11-04.
Locating tasks: findtask
Finds all tasks that fulfil all the provided search criteria.
Format: findtask [n/NAME_KEYWORDS] [d/DATE] [p/PRIORITY] [s/STATUS] [t/TAG_KEYWORDS]
-
The search is case-insensitive, e.g.
labwill matchLab. -
When you are providing name or tag keywords, separate distinct keywords with a whitespace, e.g.
findtask n/lab quizwill search for tasks using the 2 distinct keywordslabandquiz. -
You should ensure that search arguments are not blank and at least one search parameter should be provided.
-
Search Parameters:
-
Name-
You are allowed to provide multiple name keywords.
-
Tasks with their name matching at least one of the name keywords provided will be considered to have fulfilled the task name search criteria.
-
The order of the search keywords does not matter, e.g.
Lab Quizwill matchQuiz Lab. -
Only full words will be matched, e.g.
labwill matchlab assignmentbut notlabs.
-
-
Date-
Your search date should be of the format:
YYYY-MM-DD. -
You should only provide one search date, i.e.
d/2020-01-01 2020-02-02would not be accepted. -
Tasks with their date matching the search date exactly are considered to have fulfilled the task date search criteria.
-
-
Priority-
Your search priority should be one of the following:
highest,high,normal,low(case-insensitive). No other search priority will be allowed. -
You should only provide one search priority, i.e.
p/highest lowis not allowed. -
Tasks with their priority matching the search priority exactly are considered to have fulfilled the task priority search criteria.
-
-
Status-
Your search status should be one of the following:
completed,incomplete(case-insensitive). -
You should only provide one search status, i.e.
s/completed incompleteis not allowed. -
Tasks with their status matching the search status exactly are considered to have fulfilled the task status search criteria.
-
-
Tag-
You are allowed to provide multiple tag keywords.
-
The tag keyword provided should conform to the tag constraint, i.e. should be alphanumeric and should not be blank or contain whitespaces.
-
Task tags will be considered a match only if the tag words are an exact match (case-insensitive), e.g. a tag with the word
hardwill match a tag with the wordHARD, but will not match a tag with the wordharder. -
Tasks containing tags which match at least one of the tag keywords provided will be considered to have fulfilled the task tag search criteria.
-
-
-
Only tasks matching all search criteria provided will be returned.
Example:
findtask
Expected Outcome:
Other helpful examples:
-
findtask d/2020-10-10 p/highreturns all tasks with the date2020-10-10andhighpriority -
findtask t/difficult onlinereturns all tasks that have thedifficultoronlinetag -
findtask n/lab quiz t/difficultreturns all tasks with their name containing either the wordlaborquizand hasdifficultas one of its tags
Marking a task as completed: completetask
Labels a task as Completed.
Format: completetask INDEX
-
You can get the
INDEXfrom the current displayed list under theTaskstab. -
INDEXmust be a positive integer. -
Tips : You can change back the status to
Not Completedby using either theundoorresettaskcommand.
Examples:
-
completetask 1labels the first task in the list asCompleted. -
completetask 2labels the second task in the list asCompleted.
Resetting a task: resettask
Reset the status of a task back to Not Completed.
Format: resettask INDEX
-
You can get the
INDEXfrom the current displayed list under theTaskstab. -
INDEXmust be a positive integer.
Examples:
-
resettask 1reset the first task in the list. -
resettask 2reset the second task in the list.
Sorting tasks: sorttask
Sorts the list based on a criterion.
Format: sorttask [r] CRITERION
-
rindicates if the sorted list should have reversed order, for example, ifsorttask prioritysorts the list from the highest priority to the lowest priority thensorttask r prioritywill sort the list from the lowest to the highest priority instead. -
ris optional. -
CRITERIONis pre-defined, you can chooseNAME,PRIORITY, orDATE. -
CRITERIONis not case-sensitive e.gpriority, PRIORITYwork fine.
Examples:
-
sorttask datesorts the task from the task with the closest date to the current date to. -
sorttask r datesorts the task from the task with the farthest date from the current date.
Listing all tasks: listtask
List all the tasks on the list and resets ordering.
Format: listtask
-
Tips : You can use
listtaskto go back to the original list after performing afindtaskorsorttaskcommand.
Clearing the list: cleartask
Clears all tasks in the list.
Format: cleartask
-
Tips : If you accidentally cleared the whole list, you can always use the
undocommand to restore the list.
Contact List Features
The following features allow you to manage a list of contacts and perform various contact related functions.
The section below provides some useful details about the contact list features.
Contact command parameters
A contact list feature can use one or more of the following parameters:
-
NAME:-
Represents the name of a contact
-
Can only contain alphanumeric characters and spaces, and should not be blank.
-
Examples:
John,Amy -
All contacts must have a name
-
-
EMAIL:-
Represents the email address of a contact
-
Emailshould be of the formatlocal-part@domainand adhere to the following constraints:-
The local-part should only contain alphanumeric characters and these special characters:
!#$%&'*+/=?{|}~^.- -
This is followed by a
@and then a domain name. -
The domain name must:
- Be at least 2 characters long
- Start and end with alphanumeric characters
- Consist of alphanumeric characters, a period or a hyphen for the characters in between, if any.
-
-
Example:
johndoe@gmail.com -
All contacts must have an email address
-
-
Telegram:-
Represents the telegram username of a contact
-
The
TELEGRAMfield provided must be a valid telegram username that follows the following constraints:- Must start with the
@symbol - At least 5 characters long, not including the
@symbol - Contains only alphanumeric characters or underscore
- Must start with the
-
Examples:
@john_doe,@johndoe -
Telegram is a not a compulsory field of a contact
-
-
Tag:-
Represents a tag that can be used to describe a contact
-
Tags names should be alphanumeric and should not be blank or contain whitespaces.
-
Examples:
friend,TA -
Tag is not a compulsory field of a contact
-
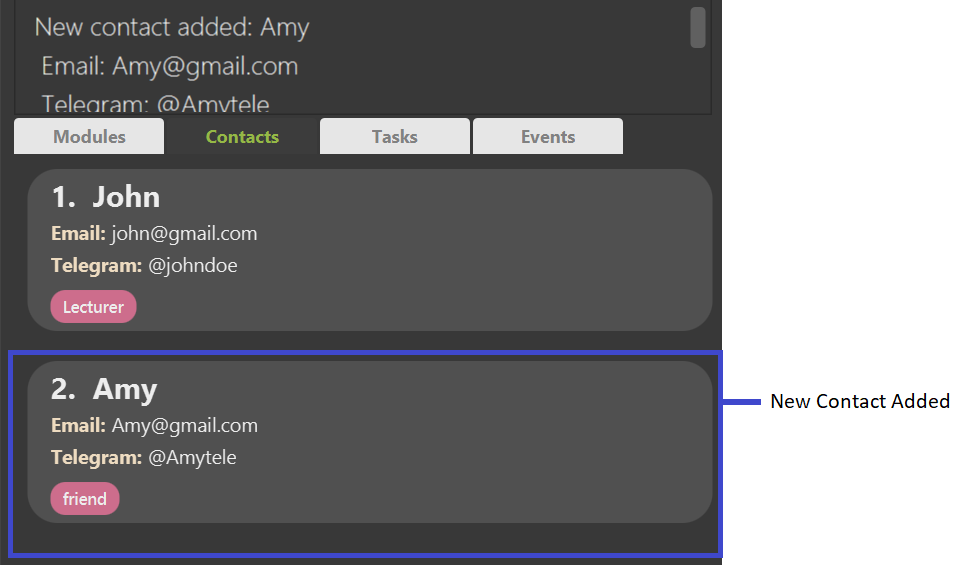
Adding a contact: addcontact
Adds a new contact into the contact list if it does not already exist.
Format: addcontact n/NAME e/EMAIL [te/TELEGRAM] [t/TAG]...
- A contact can have any number of tags (including 0)
Example:
addcontact n/Amy e/Amy@gmail.com te/@Amytele t/friend adds a new contact with the name Amy, email Amy@gmail.com, telegram @Amytele and a tag friend
Expected Outcome:
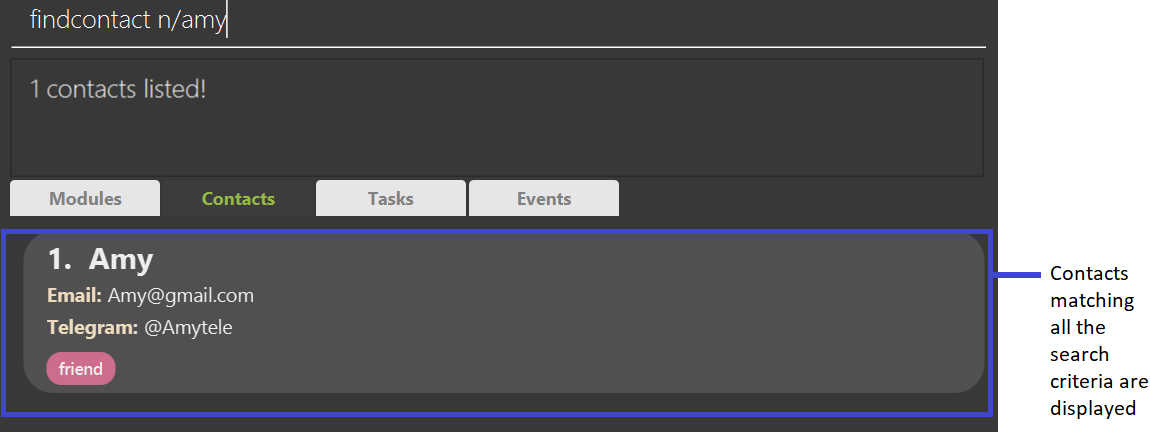
Locating contacts: findcontact
Finds all contacts that fulfil all the provided search criteria.
Format: findcontact [n/NAME_KEYWORDS] [t/TAG_KEYWORDS]
-
The search is case-insensitive, e.g.
bobwill matchBob. -
You are allowed to provide multiple search keywords for both the name and tag parameter.
-
The order of the search keywords does not matter, e.g.
Bob Abramhamwill matchAbraham Bob. -
When you are providing name or tag keywords, separate distinct keywords with a whitespace, e.g.
findcontact n/bob abrahamwill search for contacts using the 2 distinct keywordsbobandabraham. -
You should ensure that keywords are not be blank and at least one search parameter should be provided.
-
Search Parameters:
-
Name
-
Contacts with their name matching at least one of the name keywords provided will be considered to have fulfilled the contact name search criteria.
-
Only full words will be matched, e.g.
Bobwill matchBob Abrahambut notBobs.
-
-
Tag
-
Contacts containing tags which match at least one of the tag keywords provided will be considered to have fulfilled the contact tag search criteria.
-
Contact tags will be considered a match only if the tag words are an exact match (case-insensitive), e.g. a tag with the word
friendwill match a tag with the wordFRIEND, but will not match a tag with the wordfriendly. -
The tag keyword provided should conform to the tag constraint, i.e. should be alphanumeric and should not be blank or contain whitespaces.
-
-
-
Only contacts matching all search criteria provided will be returned.
Example:
findcontact n/amy finds all contacts with the word amy in their name
Expected Outcome:
Other helpful examples:
-
findcontact n/Bob Abrahamreturns all contacts with the wordBoborAbrahamin their name, e.g.Bob Lim,Tommy Abraham -
findcontact t/friend coworkerreturns all contacts that have thefriendorcoworkertag -
findcontact n/john t/friendreturns all contacts with the wordjohnin its name and hasfriendas one of its tags
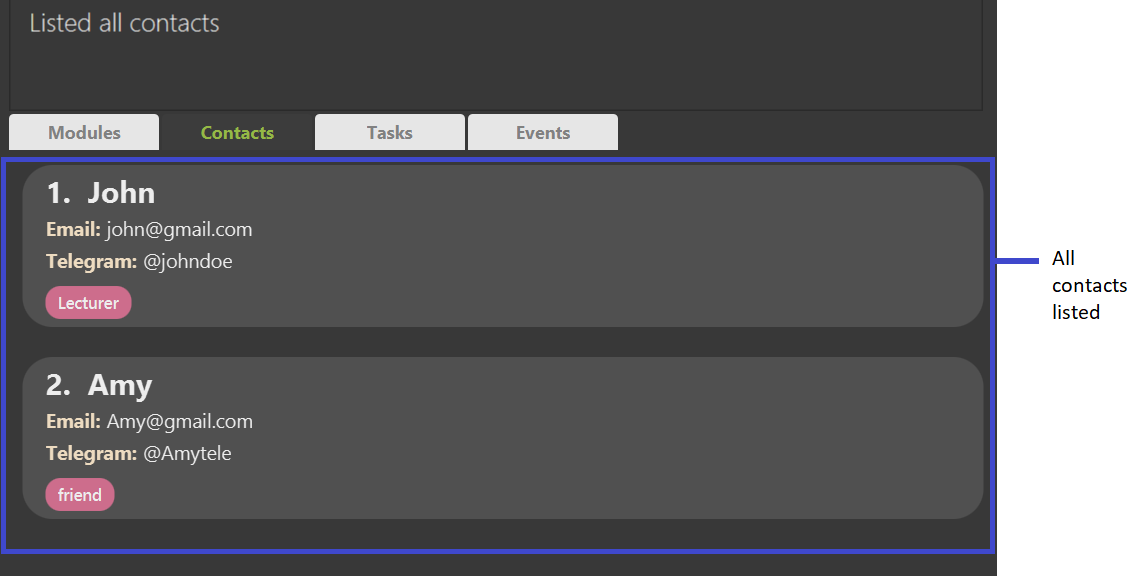
Listing all contacts: listcontact
Shows a list of all contacts in the contact list.
Format: listcontact
![]() Tip:
Tip:
listcontact is a useful command that you can use to display the original contact list.
e.g. after using the findcontact or sortcontact commands.
Example: listcontact
Expected Outcome:
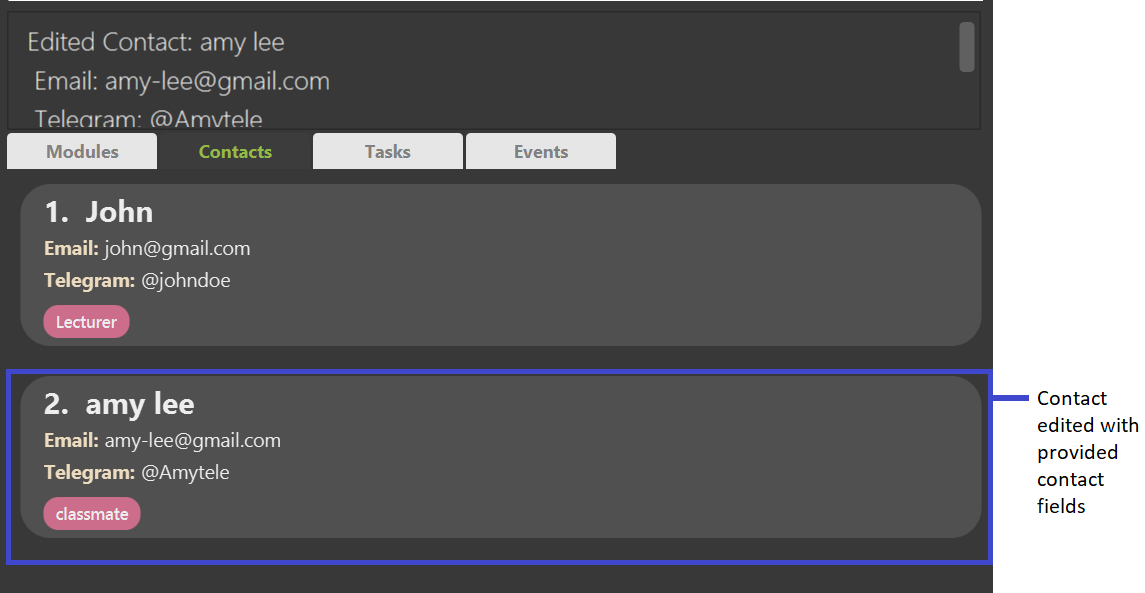
Editing a contact: editcontact
Edits an existing contact in the contact list.
Format: editcontact INDEX [n/NAME] [e/EMAIL] [te/TELEGRAM] [t/TAG]...
-
Edits the contact at the specified
INDEX. The index refers to the index number of the contact shown in the displayed contact list. The index must be a positive integer 1, 2, 3… -
At least one of the optional fields must be provided.
-
Existing values will be updated to the input values.
-
If the contact has an existing telegram field, you can remove it by typing
te/without specifying any telegram field after it, i.e.editcontact 1 te/ -
When editing tags, the existing tags of the contact will be removed i.e adding of tags is not cumulative.
-
You can remove all the contact’s tags by typing
t/without specifying any tags after it, i.e.editcontact 1 t/
Example:
editcontact 2 n/amy lee e/amy-lee@gmail.com t/classmate edits the second contact in the displayed contact list with the name amy lee, email amy-lee@gmail.com and tag classmate
Expected Outcome:
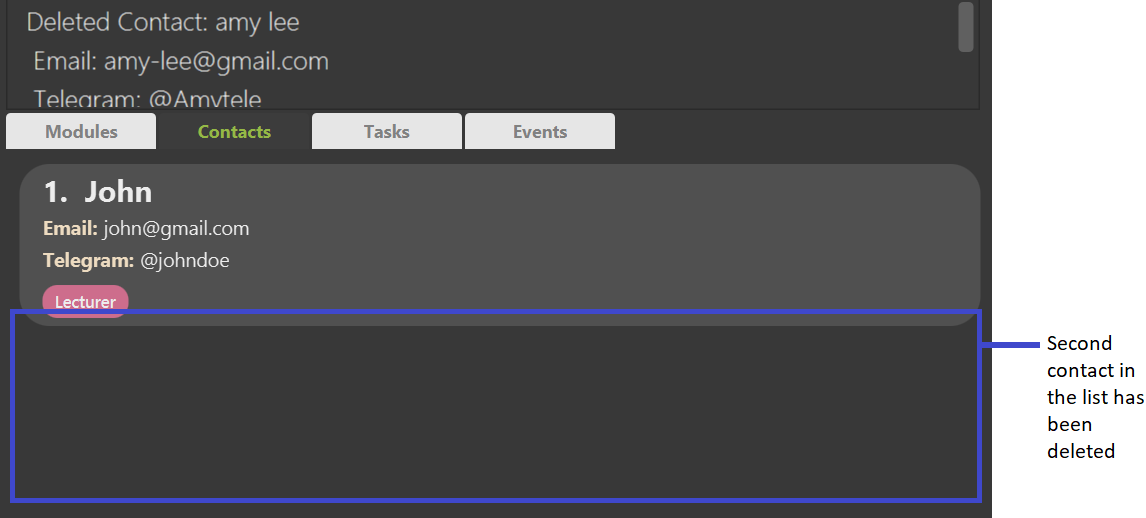
Deleting a contact: deletecontact
Deletes the specified contact from the contact list.
Format: deletecontact INDEX
-
Deletes the contact at the specified
INDEX. -
The index refers to the index number of the contact shown on the displayed contact list.
-
The index must be a positive integer 1, 2, 3…
Example:
deletecontact 2 deletes the second contact in the displayed contact list
Expected Outcome:
Sorting contacts: sortcontact
Sorts the list based on the name of the contact lexicographically.
Format: sortcontact [r]
-
rindicates if the sorted list should have reversed order. -
ris optional.
Examples:
-
sortcontactmight produce a list of{michael, sasha}. -
sortcontact rmight produce a list of{sasha, michael}.
Marking contacts as important: importantcontact
Marks a task as Important.
Format: importantcontact INDEX
-
You can get the
INDEXfrom the current displayed list under theContactstab. -
INDEXmust be a positive integer. -
Tips : You remove important mark from contact by using either the
undoorresetcontactcommand.
Examples:
-
importantcontact 1marks the first contact in the list asImportant. -
importantcontact 2mark the second contact in the list asImportant.
Resetting contacts: resetcontact
Removes a contact’s important mark and replaces it with Not Important (default).
Format: resetcontact INDEX
-
You can get the
INDEXfrom the current displayed list under theContactstab. -
INDEXmust be a positive integer.
Examples:
-
resetcontact 1marks the first contact in the list asNot Important. -
resetcontact 2mark the second contact in the list asNot Important.
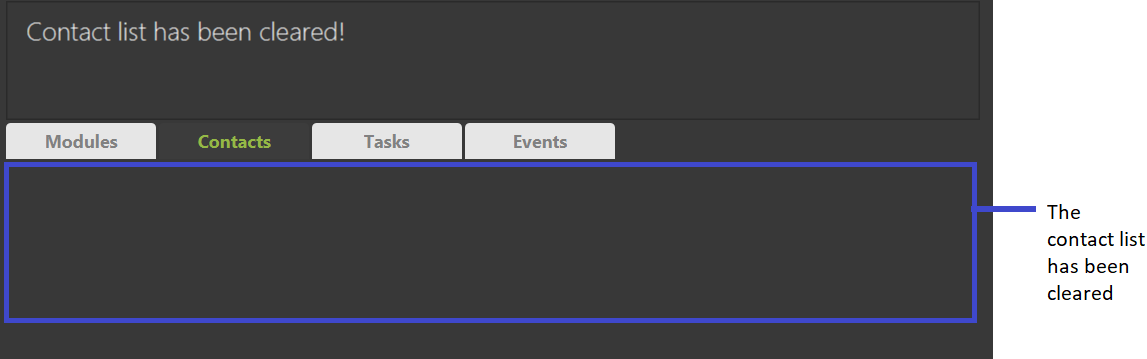
Clearing the contact list: clearcontact
Clears all contacts in the contact list.
Format: clearcontact
![]()
If you accidentally cleared the whole contact list, you can always use the undo command
to restore the list.
Example: clearcontact
Expected Outcome:
Scheduler Features
Adding an Event to the Scheduler: addevent
Creates and add a new Event with the specified information from the user input
Format: addevent n/EVENT_NAME d/DATE_TIME [t/TAG]

Examples:
* addevent n/CS2100 Assignment 1 d/10-9-2020 1200 t/Important adds an Event called C2100 Assignment 1 with the deadline of 10-9-2020 1200 and the tagging of Important.(Expected result shown in above image.)
* addevent n/CS2103T exams d/12-12-2020 1200 adds an Event called CS2103T into the Scheduler with the date 12-12-2020.
* addevent n/CS2103T exams d/12-12-2020 1200 t/Important adds an Event called CS2103T into the Scheduler with the date 12-12-2020 and the tag of Important.
* addevent n/CS2103T exams d/12-12-2020 1200 t/Important t/Urgent adds an Event called CS2103T into the Scheduler with the date 12-12-2020 and the tag of Important and Urgent.
Deleting an Event from the Scheduler: deleteevent
You can delete an existing event from the list by specifying the index.
Format: deleteevent index
Example:
* deleteevent 1 deletes the event of index 1 from the EventList.
Editing an Event from the Scheduler: editevent
You can select an existing event from the list and modify the information such as event name and the event date.
Format: editevent index [n/new name] [d/new date]
Note: All fields are optional but at least 1 of them must be present.

Examples:
* editevent 1 n/CS2103T assignment d/2-4-2020 1200 t/NotImportant edits the event of index 1 with the new name of CS2103T, new date and time of 2-4-2020 1200 and the new tag of NotImportant. (Expected result shown in above image.)
* editevent 1 n/CS2100 edits the event of index 1 with the new name of CS2103T.
* editevent 1 d/3-3-2020 1300 edits the event of index 1 with the new date time of 3-3-2020 1300.
* editevent 1 t/NotImportant edits the event of index 1 with the new tag of Not Important.
Finding an Event from the Scheduler: findevent
You can search for a particular event based on the name and date. This will return you a list of all events that have these keywords.
Format: findevent [n/EVENT_NAME] [d/DATE_TIME]
Note: All fields are optional but at least 1 of them must be present.
Examples:
* findevent n/CS2103T finds all events that have CS2103T in their event name.
* findevent d/1-1-2020 1200 finds all event that have the date and time of 1 Jan 2020 12:00.
List events: listevent
Allows you to view all events.
Format: listevent
Examples:
-
listeventViews the event list on the display.
General Features
Undo previous user command: undo
Undoes the previous user command
Format: undo
- The
undofeature currently has not been extended to Scheduler commands
Example:
undo
Redo previous user command: redo
Redoes the previously undone user command
Format: redo
- The
redofeature currently has not been extended to Scheduler commands
Example:
redo
Exiting the application: exit
Exits CAP5Buddy
Format: exit
Example:
exit
Getting help : help
Opens the help window
Format: help
Example:
-
help -
Tips : If you accidentally cleared the whole list, you can always use the
undocommand to restore the list.
FAQ
Q: How do you add a module into the program?
A: Run the program and wait for the terminal to start up. Next, type in : “addmodule n/CS2103T” to add a module called CS2103T.
Q: How do you view the zoom links of a particular module?
A: When the program has started running, enter the following in the terminal : “viewmodule 1” to view the zoom link for the first module in the displayed list.
Q: How do you edit a module’s information? A: When the program is running, you can enter the edit command and enter whichever field you want to modify but at least 1 field must be present.
Q: How do I save all the module related information I have entered? A: All information and details entered will be automatically stored and can be accessed the next time you start the application. ——————————————————————————————————————–
Command Summary for Module Tracker
| Action | Format, Examples |
|---|---|
| Add Module |
addmodule n/MODULE_NAMEe.g. addmodule n/CS2103T
|
| Add Completed Module |
addcmodule n/MODULE_NAME mc/MODULAR_CREDITS gp/GRADE_POINT [t/TAG]...e.g. addcmodule n/CS2101 mc/2.0 gp/4.5 t/year1
|
| View Module |
viewmodule INDEXe.g. viewmodule 2
|
| Delete Module |
deletemodule INDEXe.g. deletemodule 3
|
| Edit Module |
editmodule INDEX n/NEW_NAME [mc/MODULAR_CREDITS] [gp/GRADE_POINT] [t/TAG]...e.g. editmodule 2 n/CS2103T gp/4.5
|
| Clear Module List |
clearmodulee.g. clearmodule
|
| Add Zoom to module |
addzoom INDEX n/LESSON_NAME z/ZOOM_LINK e.g. addzoom 1 n/lecture z/https://nus-sg.zoom.us/j/uascya367yfy
|
| Add Assignment |
addassignment n/MODULE_NAME a/ASSIGNMENT_NAME %/ASSIGNMENT_PERCENTAGE r/ASSIGNMENT_RESULT e.g. addassignment n/CS2100 a/Quiz 1 %/5.0 r/80
|
| Edit Assignment |
editassignment INDEX n/MODULE_NAME [a/ASSIGNMENT_NAME] [%/ASSIGNMENT_PERCENTAGE] [r/ASSIGNMENT_RESULT] e.g. editassignment 1 n/CS2100 a/Quiz 3 %/20.0
|
| Delete Assignment |
deleteassignment INDEX n/MODULE_NAME e.g. deleteassignment 1 n/CS2100
|
| Add Grade |
addgrade n/MODULE_NAME g/GRADE e.g. addgrade n/CS2100 g/90
|
| Archive |
archivemodule INDEX e.g. archivemodule 3
|
| Un-archive |
unarchivemodule INDEX e.g. unarchivemodule 3
|
| Archive Module |
archivemodule INDEX e.g. archivemodule 3
|
| Un-archive Module |
unarchivemodule INDEX e.g. unarchivemodule 3
|
| View Archived Module List |
viewarchive e.g. viewarchive
|
| View Un-archived Module List |
listmodule e.g. list
|
| Calculate CAP |
calculatecap e.g. calculatecap
|
| Calculate Target CAP details |
targetcap tc/TARGET_CAP e.g. targetcap 4.5
|
Command Summary for Contact List
| Action | Format, Examples |
|---|---|
| Add Contact |
addcontact n/NAME e/EMAIL [te/TELEGRAM] [t/TAG]... e.g. addcontact n/john e/john@gmail.com te/@johndoe t/friend
|
| Edit Contact |
editcontact INDEX [n/NAME] [e/EMAIL] [te/TELEGRAM] [t/TAG]... e.g. editcontact 1 n/amy te/@amytele
|
| Find Contact |
findcontact [n/NAME_KEYWORDS] [t/TAG_KEYWORDS] e.g. findcontact n/john
|
| Delete Contact |
deletcontact INDEX e.g. deletecontact
|
| List Contacts | listcontact |
| Sort Contacts | sortcontact |
| Mark Contact as Important |
importantcontact INDEX e.g. importantcontact 1
|
| Mark Contact as unimportant |
resetcontact INDEX resetcontact 1
|
| Clear Contact | clearcontact |
Command summary for Todo List
| Action | Format, Examples |
|---|---|
| Add Task | addtask n/TASK_NAME [t/TAG]... [p/PRIORITY] [d/DATE] |
| Edit Task | edittask INDEX [n/TASK_NAME] [t/TAG]... [p/PRIORITY] [d/DATE] |
| Find Task | findtask [n/NAME_KEYWORDS] [d/DATE] [p/PRIORITY] [s/STATUS] [t/TAG_KEYWORDS] |
| Delete Task | deletetask INDEX |
| List Tasks | listtask |
| Sort Tasks | sorttask [r] CRITERION |
| Label Task as Completed | completetask INDEX |
| Label Task as Not Completed | resettask INDEX |
| Clear Tasks | cleartask |
Command summary for Scheduler
| Action | Format, Examples |
|---|---|
| Add Event |
addevent n/EVENT_NAME d/DATE_TIME [t/TAG] e.g. addevent n/CS2103T d/12-2-2020 t/Important
|
| Delete Event |
deleteevent index e.g. deleteevent 1
|
| Edit Event |
editevent index [n/EVENT_NAME] [d/DATE_TIME] [t/TAG] e.g. editevent 1 n/CS2100 d/2-1-2020 t/Done
|
| Find Event |
findevent [n/EVENT_NAME] [d/DATE_TIME] e.g. findevent n/CS2103T
|
| List Event |
listevet e.g. listevent
|
Command summary for general features
| Action | Format, Examples |
|---|---|
| Undo |
undo e.g. undo
|
| Redo |
redo e.g. redo
|
| Exit |
exit e.g. exit
|
| Help |
help e.g. help
|